

Disclaimer
The community here at 355nation.net urges you to please use caution and seek professional assistance when performing modifications to your vehicle. Before attempting any modification it is advised that you refer to your Colorado or Canyon service manual or contact a certified mechanic as not all GMT355 trucks are the same. The staff and the associated members are in no way responsible for any damages, injuries or other harm inflicted to your vehicle or yourself which may result in attempting these modifications. The posts and content presented on this site reflect in no way the views of 355nation.net or it’s ownership.
![Image]()
A 355nation (MTS) presented by
Supermodulation/Coyote/DBNissan/TJM276
Project Name
How T0: Aux Power RAP Control Mod
Project Description
This modification converts the right Aux Power Cigarette outlet from constant power to RAP or ignition-controlled on/off. Can also be used for your radio and amplifier remote power ignition ON/Off power source.
Skill Level
Easy
Project Vehicle
Make: GMC
Model: Canyon
Year: 2006
Engine: 3.5L
Power windows: Yes
Sun Roof: No
Tools Needed
Wire cutters
Solder iron
Heat shrink or electrical tape
Project Time
1 hour or less
Project Cost
Under $10.00
Theory of Operation:
Definition of "RAP" is Retained Accessory Power. It allows the radio, power windows and sunroof (if equipped), to operate for several minutes after turning the ignition switch to the OFF position.
Retained accessory power (RAP) is a power mode that permits the operation of some accessories for up to 10 minutes after the ignition switch is turned OFF. The RAP power mode is enabled by the body control module (BCM).
The BCM:
- Controls certain body functions.
- Sends out a class 2 message via the serial data link, which enables/disables other modules at the beginning/end of the RAP power mode.
Some BCM features, such as the interior courtesy lamps will function after the 10 minute RAP time limit has elapsed. This is normal, and does not mean the RAP power mode is malfunctioning. The BCM enables the following functions in the RAP Power Mode:
- The windshield wipers and washer through the RAP/adaptive cruise control (ACC) relay.
- The right and left power windows through the RAP/ACC relay.
- Any class 2 module that functions in RAP power mode and is not connected to the RAP/ACC relay, is controlled by the BCM via class 2 power mode messages. EXAMPLE: The radio works in RAP power mode because the BCM sends it a class 2 message telling it that the power mode is RAP.
RAP is disabled when:
- A door is opened.
- Low battery voltage is detected by the BCM.
- The ignition switch transitions from OFF to ON or ACC.
- 10 minutes have elapsed after the ignition was turned OFF.
The BCM monitors the ignition switch position, battery voltage and passenger compartment door status to determine whether RAP power mode should be enabled. If the ignition switch transitions from ON to OFF, the battery voltage is within the acceptable range, and the passenger compartment doors are closed, the BCM enables RAP power mode. After 10 minutes have elapsed, the BCM sends a class 2 message to the serial data network. This message commands the other modules that are power moded by the BCM to stop functioning.
RAP/ACC Relay
The BCM controls the RAP/ACC relay coil circuit using low side drive. The output of the relay is used to supply battery voltage to the windshield wipers and power windows. The RAP/ACC relay also provides voltage to the windshield wipers and power windows when the Accessory and Run power modes are selected.
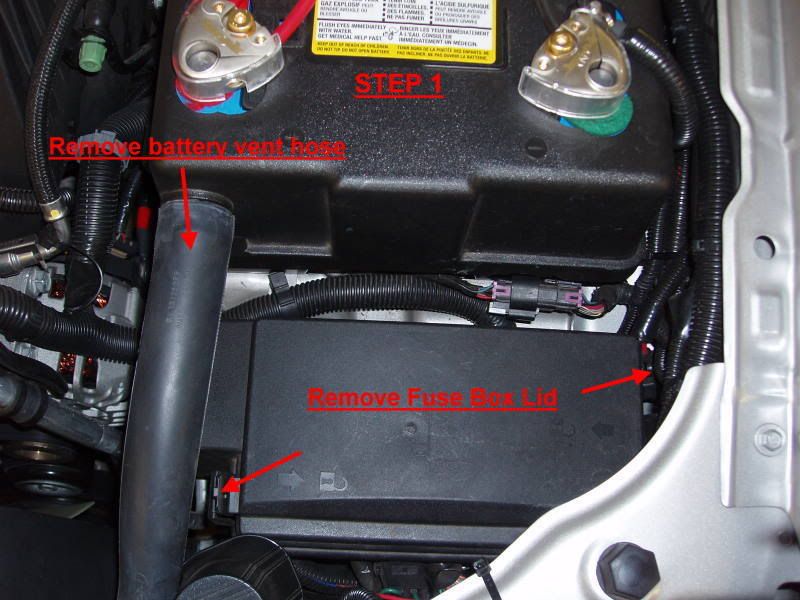
This is a relatively easy modification that can be accomplished with basic tools, and a little heat-shrink tubing! For easier access to the fuse box, gently pull the battery vent hose from the case. Then, pull out each tab on both sides of the fuse box, and lift the cover up and away.
![Image]()
Next, locate the Auxiliary Power 1 fuse, and remove the 20A fuse labeled RAP, along with the Aux 1 fuse.
![Image]()
The inside of your fuse box cover has a handy diagram you can use to identify all fuses and fuse receptacles!
![Image]()
The service manual shows the opposite configuration for my truck.
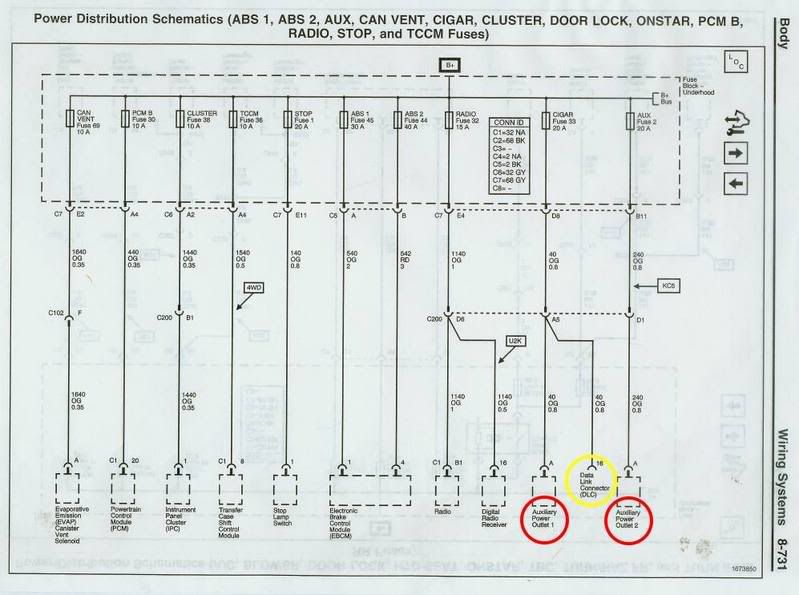
To confirm which AUX OUTLET has the DLC power for your truck.
A simple test to match the AUX OUTLET with the correct fuse.
a. Remove AUX 1 fuse
b. Confirm which outlet is not getting power.
Use a voltmeter, radar detector, GPS or equivalent.
![Image]()
![Image]()
Warning! One of the Aux Power circuits controls DLC (Data Link Connector) also known as the ODBII port,
located under the driver side dashboard. This is the power source for the external ODBII scanner.
![Image]()
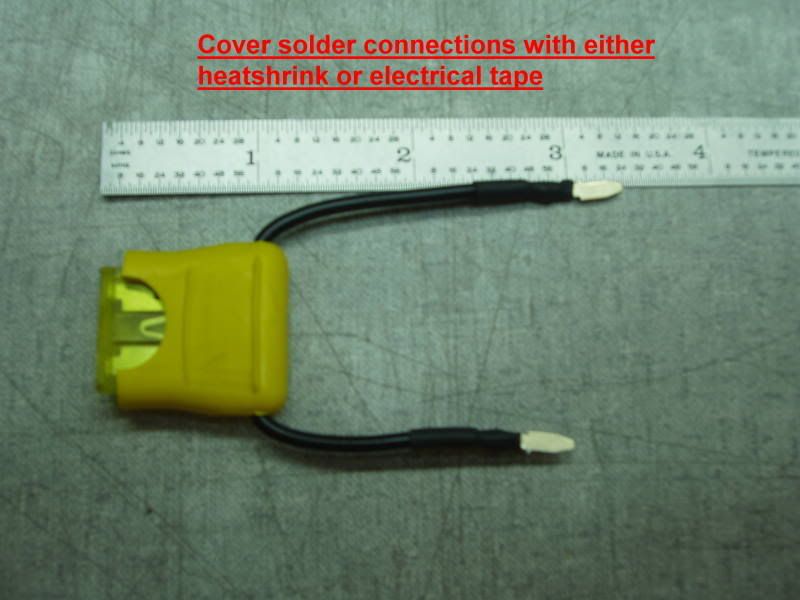
Next, with a good set of wirecutters, carefully split the RAP fuse into two separate pieces. Carefully remove the insulation from the metal tabs.
![Image]()
With your new fuse holder wiring carefully stripped of insulation, solder the fuse tabs to each end of the wire. You may want to slide the heat-shrink tubing up on the wires before soldering, and then slide the tube shrink back over the solder joint and apply some heat once the connection is made.
![Image]()
![Image]()
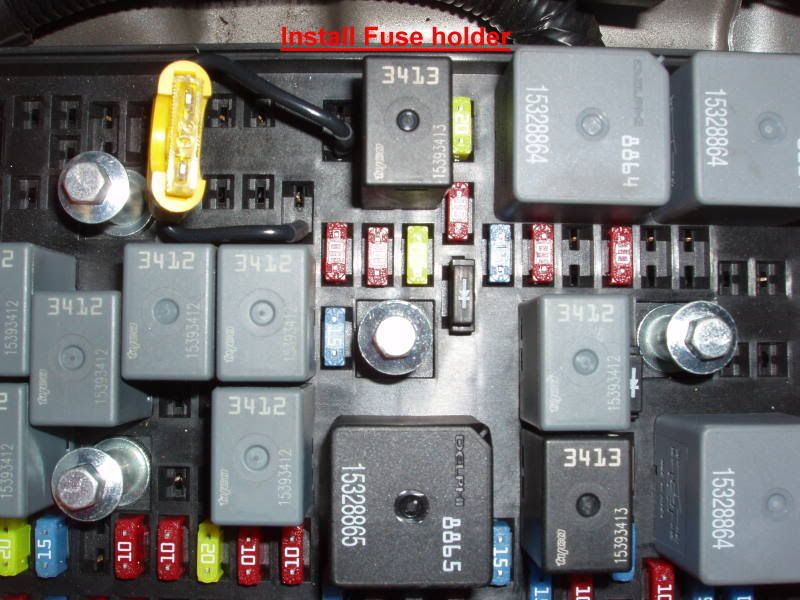
Install the new fuse holder/wiring as shown. Gently push the fuse and fuse holder down snugly into the fuse box.
![Image]()
![Image]()
===========================================================================================
2004 & 2005 Fuse Box with RAP tap.
![Image]()
===========================================================================================
Now that you've completed this mod, return the fuse box lid to it's proper location. Re-attach the battery vent hose to the battery case. Enjoy!
The community here at 355nation.net urges you to please use caution and seek professional assistance when performing modifications to your vehicle. Before attempting any modification it is advised that you refer to your Colorado or Canyon service manual or contact a certified mechanic as not all GMT355 trucks are the same. The staff and the associated members are in no way responsible for any damages, injuries or other harm inflicted to your vehicle or yourself which may result in attempting these modifications. The posts and content presented on this site reflect in no way the views of 355nation.net or it’s ownership.
A 355nation (MTS) presented by
Supermodulation/Coyote/DBNissan/TJM276
Project Name
How T0: Aux Power RAP Control Mod
Project Description
This modification converts the right Aux Power Cigarette outlet from constant power to RAP or ignition-controlled on/off. Can also be used for your radio and amplifier remote power ignition ON/Off power source.
Skill Level
Easy
Project Vehicle
Make: GMC
Model: Canyon
Year: 2006
Engine: 3.5L
Power windows: Yes
Sun Roof: No
Tools Needed
Wire cutters
Solder iron
Heat shrink or electrical tape
Project Time
1 hour or less
Project Cost
Under $10.00
Theory of Operation:
Definition of "RAP" is Retained Accessory Power. It allows the radio, power windows and sunroof (if equipped), to operate for several minutes after turning the ignition switch to the OFF position.
Retained accessory power (RAP) is a power mode that permits the operation of some accessories for up to 10 minutes after the ignition switch is turned OFF. The RAP power mode is enabled by the body control module (BCM).
The BCM:
- Controls certain body functions.
- Sends out a class 2 message via the serial data link, which enables/disables other modules at the beginning/end of the RAP power mode.
Some BCM features, such as the interior courtesy lamps will function after the 10 minute RAP time limit has elapsed. This is normal, and does not mean the RAP power mode is malfunctioning. The BCM enables the following functions in the RAP Power Mode:
- The windshield wipers and washer through the RAP/adaptive cruise control (ACC) relay.
- The right and left power windows through the RAP/ACC relay.
- Any class 2 module that functions in RAP power mode and is not connected to the RAP/ACC relay, is controlled by the BCM via class 2 power mode messages. EXAMPLE: The radio works in RAP power mode because the BCM sends it a class 2 message telling it that the power mode is RAP.
RAP is disabled when:
- A door is opened.
- Low battery voltage is detected by the BCM.
- The ignition switch transitions from OFF to ON or ACC.
- 10 minutes have elapsed after the ignition was turned OFF.
The BCM monitors the ignition switch position, battery voltage and passenger compartment door status to determine whether RAP power mode should be enabled. If the ignition switch transitions from ON to OFF, the battery voltage is within the acceptable range, and the passenger compartment doors are closed, the BCM enables RAP power mode. After 10 minutes have elapsed, the BCM sends a class 2 message to the serial data network. This message commands the other modules that are power moded by the BCM to stop functioning.
RAP/ACC Relay
The BCM controls the RAP/ACC relay coil circuit using low side drive. The output of the relay is used to supply battery voltage to the windshield wipers and power windows. The RAP/ACC relay also provides voltage to the windshield wipers and power windows when the Accessory and Run power modes are selected.
This is a relatively easy modification that can be accomplished with basic tools, and a little heat-shrink tubing! For easier access to the fuse box, gently pull the battery vent hose from the case. Then, pull out each tab on both sides of the fuse box, and lift the cover up and away.
Next, locate the Auxiliary Power 1 fuse, and remove the 20A fuse labeled RAP, along with the Aux 1 fuse.

The inside of your fuse box cover has a handy diagram you can use to identify all fuses and fuse receptacles!

The service manual shows the opposite configuration for my truck.
To confirm which AUX OUTLET has the DLC power for your truck.
A simple test to match the AUX OUTLET with the correct fuse.
a. Remove AUX 1 fuse
b. Confirm which outlet is not getting power.
Use a voltmeter, radar detector, GPS or equivalent.
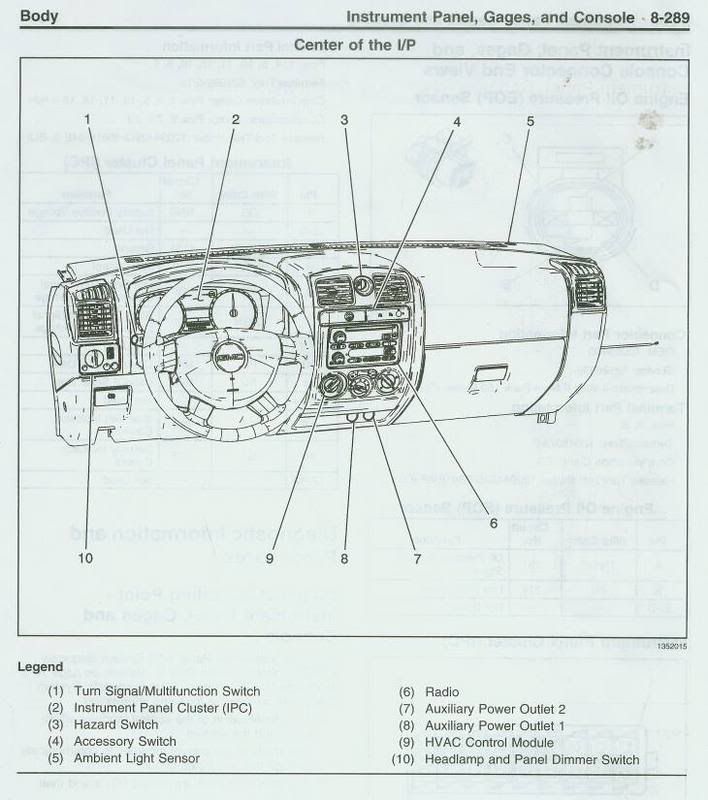

Warning! One of the Aux Power circuits controls DLC (Data Link Connector) also known as the ODBII port,
located under the driver side dashboard. This is the power source for the external ODBII scanner.
Next, with a good set of wirecutters, carefully split the RAP fuse into two separate pieces. Carefully remove the insulation from the metal tabs.

With your new fuse holder wiring carefully stripped of insulation, solder the fuse tabs to each end of the wire. You may want to slide the heat-shrink tubing up on the wires before soldering, and then slide the tube shrink back over the solder joint and apply some heat once the connection is made.

Install the new fuse holder/wiring as shown. Gently push the fuse and fuse holder down snugly into the fuse box.

===========================================================================================
2004 & 2005 Fuse Box with RAP tap.

===========================================================================================
Now that you've completed this mod, return the fuse box lid to it's proper location. Re-attach the battery vent hose to the battery case. Enjoy!


