

Disclaimer
The community here at 355nation.net urges you to please use caution and seek professional assistance when performing modifications to your vehicle. Before attempting any modification it is advised that you refer to your Colorado or Canyon service manual or contact a certified mechanic as not all GMT355 trucks are the same. The staff and the associated members are in no way responsible for any damages, injuries or other harm inflicted to your vehicle or yourself which may result in attempting these modifications. The posts and content presented on this site reflect in no way the views of 355nation.net or it’s ownership.
![Image]()
A 355nation How To presented by
LSUBOY
Project Name
How To Remove A Colorado/Canyon Alternator or Starter
Project Description
Step by step guide to replacing the alternator and/or starter on a non V8 Canyon or Colorado
Skill Level
Moderate but VERY VERY TIME CONSUMING
Project Vehicle
Make: Chevrolet
Model: Colorado
Year: 2004
Engine: 3.5L
Power windows: No
Sun Roof: No
Tools Needed
1/8 inch and 1/4 inch
Socket Wrench Socket wrench
Torque Wrench 15mm socket
Long/short 10mm socket 15mm ratchet type box wrench from Sears or Mac Tools
10mm box wrench Long/short extensions
short & long extensions Offset socket or offset adapter
Torque wrench
You can only use a ratchet box wrench with a small diameter like the Sears or Blackhawk by Mac Tools. Harbor Freight types are too large in diameter for said job.
All big bolts are 15mm and 37 ft. lbs.
All throttle body, intake manifold and thermostat bolts are 10mm and 89 inch pounds
Project Time
* 1-1/2 days for antifreeze, plugs, throttle body, thermostat, starter & alternator removal
* 3 to 4 hours for alternator because you don't have to remove the starter or manifold
* 5 hours to all day to replace the starter because you have to remove everything
Project Cost
$215.00 plus your labor for a QUALITY rebuild starter & alternator from a QUALITY shop in your town using high-end replace parts.........This is not the time for a cheap parts
$650.00 plus tax plus towing to the GM dealer if your starter fails and you are far away from home...Rebuilt starter also
GO TO THE 355 NATION HOW TO SECTION AND READ THE FOLLOWING HOW TO'S:
1. Antifreeze replacement
2. Spark plug replacement
3. Throttle body cleaning
N O W S T A R T H E R E:
SUPPORT DRIVERS SIDE OF TRUCK ON A STAND THEN DISCONNECT AND OR REMOVE
1. Throttle body from the intake manifold....89 inch lbs.
2. Top electrical harness plastic cap
![Image]()
3. Carefully pry up the top electrical wiring harness from the motor using a large screwdriver
![Image]()
4. (6) clips holding the top fan shroud then remove the top fan shroud
5. Serpentine belt
6. Battery and battery box
7. Electrical line to the alternator
8. Compressor hose from the engine hoist bracket
9. Drivers side tire....100 ft. lbs
10. Drivers side lower inside fender well housing
![Image]()
11. Reach inside the drivers side fender-well housing and disconnect the electrical line to
the compressor in (2 separate) places VERY VERY IMPORTANT!
12. Engine hoist bracket bracket but you can't get it off until you unbolt the alternator
ALTERNATOR REMOVAL:
1. Remove the 3 bolts to the alternator and rest it on top of the compressor hose...37 ft.lbs
2. Remove the engine hoist bracket....37 ft. lbs.
At this point the alternator will not come out of the truck until you remove/reposition the air compressor
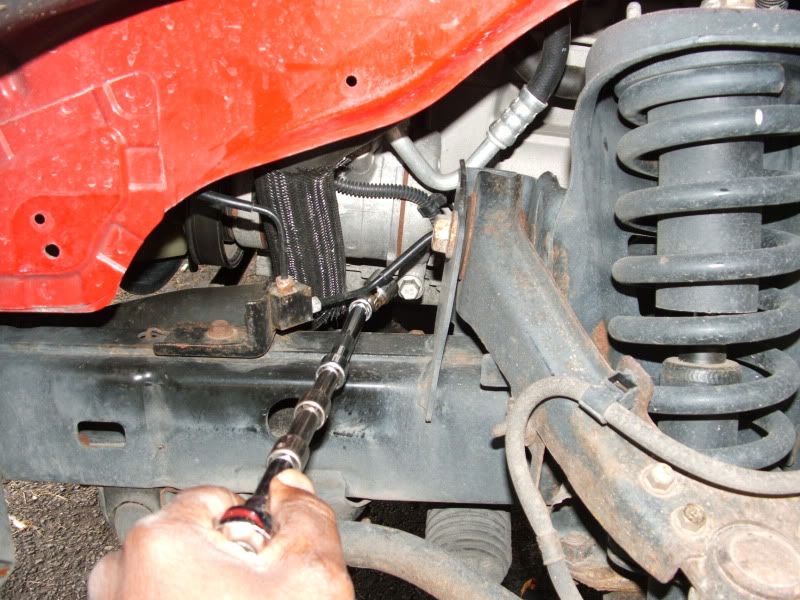
AIR COMPRESSOR REMOVAL OPTIONAL BUT MAKES JOB A LITTLE EASIER:
1. Right below the front of the alternator is a pulley that the serpentine belt rests on
![Image]()
2. Remove the front 15mm bolt and slide the pulley off....37 ft. lbs. gives top compressor
bolt wrench more throw
AIR COMPRESSOR REMOVAL WITH OR WITHOUT OPTIONAL:
1. Unscrew the bottom right compressor bolt with your offset adapter BUT leave the bolt attached to the motor for about 10 or so hand turns
![Image]()
2. Get on the ground from the front of the truck and unscrew the bottom front compressor bolt and leave it attached to the motor for 10 or so hand turns
BOTTOM COMPRESSOR BOLTS FOR SLIDING RAM TECHNIQUE:
* The trick to removing the compressor lies with the top compressor bolt. You must use a ratchet box wrench; However, after a while you cannot get the wrench off the bolt or move it without having some play somewhere. Therefore, you use the ratchet box wrench on the top bolt as far as it will go...Then you slide the compressor to the right in order to get enough play to continue removing the top bolt. YOUR BOTTOM BOLTS WERE LEFT ON IN ORDER THAT YOU COULD USE THEM AS A SLIDING RAM FOR PUSHING THE COMPRESSOR TO THE RIGHT TO GET MORE ROOM FOR THE RATCHET WRENCH ON THE TOP BOLT...W H E W!
1. Once you get the top compressor bolt off, remove the bottom bolts
2. Stand in front of the truck and pull the compressor forwards
3. Remove the alternator from the truck
* If you will only be replacing the alternator, place it in the truck T H E N reverse
the instructions.
* If you will be replacing the starter, then move on to PART II
IN ORDER for you to remove your starter is is understood that you have done PART I, "Alternator Removal". And, that you have just repositioned your Air Compressor, then removed your alternator.
NOW START HERE:
* INTAKE MANIFOLD REMOVAL
1. Do not rush but think about everything a couple of times before you perform each step.
2. Stand on the driver side fender and look at every wire-loom on that side of the car.
3. Use a large screwdriver and detach each set of wires from their round loom lock.
4. Feel towards the bottom of the intake for any looms missed.
5. Look towards the back of the intake manifold for any looms missed.
6. Did you disconnect any and all sensors, etc. attached to the intake manifold?
* DIPSTICK BRACKET AND WHITE ATTACHMENT THINGEE (4) 10mm bolts total
![Image]()
1. There is a metal bracket attached to the intake manifold.
2. There are (3) bolts holding this bracket to the manifold.
3. Carefully pry open the white plastic thingee connected to the metal bracket.
4. Remove the bolt holding the dipstick housing to the manifold. (4th bolt)
5. Metal bracket:
1st bolt at the front of metal bracket
2nd bolt at the rear of metal bracket
3rd bolt underneath and to the rear of the bracket
6. Remove the front and rear metal bracket bolts with your 1/8 socket & extension.
7. Remove the 3rd bolt with a 1/8 box wrench and don't even try to put it back.
8. You might find it easier to remove the underneath bolt (3rd) first?
9. Remove the metal bracket from the truck while taking time to remember how?
(wiggle-wiggle, slide to the front together with moving the gas/dipstick lines a bit)
WHEN REPLACING METAL BRACKET: Make sure the white thingee is properly orientated.
![Image]()
INTAKE MANIFOLD BOLT ORDER AND TORQUE ORDER
3 6 9
1 2 4 5 7 8 B O L T O R D E R
5 3 1 2 4 6 T O R Q U E O R D E R......89 inch lbs.
While keeping the bolt pattern in mind, feel under the manifold until you locate each bolt.
Start at the front bumper and keep feeling w h i l e saying to yourself, 1 23 4 56 7 89,
with (3 on top of 2), (6 on top of 5) and (9 on top of 8). #8 & 9 on left side of photo.
Your hardest bolt will be #7 because you will have to feel around and or thru the dipstick/gas lines. Keep feeling around until you feel comfee about finding # 7.
Unscrew all 9 intake bolts then lift the intake off by puling up and to the passenger side at the same time. Don't worry because the bolts will not drop out of the manifold..GO GM!
WARNING: When your torque the manifold after a new gasket, your torque wrench will have a very short throw to torque # 8&9 because they are by the firewall. Your wrench will only be able to move 3 to 5 inches total. NO 1/4 INCH TORQUE WRENCH........1/8 inch only!
WARNING: If you do not torque the bolts in the proper order the truck will run as if it has dropped a cylinder. And, you will have to go back and detorque/retorque the manifold. How do I know?
WARNING: The book says torque the manifold in stages, ie., 39, 59, 69, 89 inch lbs. or something like that. However, my second time around I went with a method of getting them all up to about 69 inch lbs. then to 89 inch lbs. (USING THE PROPER TORQUE ORDER)
* Starter View after manifold removal:
![Image]()
Starter bolts: 37 ft. lbs. small electrical contacts..tight!
SHORT TAKES:
* There are a couple of small items to remove that I may have left out but if you follow
my directions, it will be obvious what they are.
* At 100,000 miles, the cost of my starter and alternator rebuild was $216.00 and I made the decision to do the job after learning that my local GM dealer would charge me 1,000.00 plus tax for their REBUILT starter & alternator.
* My truck was out of action for a week and a half while I figured this job out. And, I hope that you enjoy these directions because I had a good-ole time preparing them....LSUBOY!
The community here at 355nation.net urges you to please use caution and seek professional assistance when performing modifications to your vehicle. Before attempting any modification it is advised that you refer to your Colorado or Canyon service manual or contact a certified mechanic as not all GMT355 trucks are the same. The staff and the associated members are in no way responsible for any damages, injuries or other harm inflicted to your vehicle or yourself which may result in attempting these modifications. The posts and content presented on this site reflect in no way the views of 355nation.net or it’s ownership.
A 355nation How To presented by
LSUBOY
Project Name
How To Remove A Colorado/Canyon Alternator or Starter
Project Description
Step by step guide to replacing the alternator and/or starter on a non V8 Canyon or Colorado
Skill Level
Moderate but VERY VERY TIME CONSUMING
Project Vehicle
Make: Chevrolet
Model: Colorado
Year: 2004
Engine: 3.5L
Power windows: No
Sun Roof: No
Tools Needed
1/8 inch and 1/4 inch
Socket Wrench Socket wrench
Torque Wrench 15mm socket
Long/short 10mm socket 15mm ratchet type box wrench from Sears or Mac Tools
10mm box wrench Long/short extensions
short & long extensions Offset socket or offset adapter
Torque wrench
You can only use a ratchet box wrench with a small diameter like the Sears or Blackhawk by Mac Tools. Harbor Freight types are too large in diameter for said job.
All big bolts are 15mm and 37 ft. lbs.
All throttle body, intake manifold and thermostat bolts are 10mm and 89 inch pounds
Project Time
* 1-1/2 days for antifreeze, plugs, throttle body, thermostat, starter & alternator removal
* 3 to 4 hours for alternator because you don't have to remove the starter or manifold
* 5 hours to all day to replace the starter because you have to remove everything
Project Cost
$215.00 plus your labor for a QUALITY rebuild starter & alternator from a QUALITY shop in your town using high-end replace parts.........This is not the time for a cheap parts
$650.00 plus tax plus towing to the GM dealer if your starter fails and you are far away from home...Rebuilt starter also
GO TO THE 355 NATION HOW TO SECTION AND READ THE FOLLOWING HOW TO'S:
1. Antifreeze replacement
2. Spark plug replacement
3. Throttle body cleaning
N O W S T A R T H E R E:
SUPPORT DRIVERS SIDE OF TRUCK ON A STAND THEN DISCONNECT AND OR REMOVE
1. Throttle body from the intake manifold....89 inch lbs.
2. Top electrical harness plastic cap

3. Carefully pry up the top electrical wiring harness from the motor using a large screwdriver

4. (6) clips holding the top fan shroud then remove the top fan shroud
5. Serpentine belt
6. Battery and battery box
7. Electrical line to the alternator
8. Compressor hose from the engine hoist bracket
9. Drivers side tire....100 ft. lbs
10. Drivers side lower inside fender well housing

11. Reach inside the drivers side fender-well housing and disconnect the electrical line to
the compressor in (2 separate) places VERY VERY IMPORTANT!
12. Engine hoist bracket bracket but you can't get it off until you unbolt the alternator
ALTERNATOR REMOVAL:
1. Remove the 3 bolts to the alternator and rest it on top of the compressor hose...37 ft.lbs
2. Remove the engine hoist bracket....37 ft. lbs.
At this point the alternator will not come out of the truck until you remove/reposition the air compressor
AIR COMPRESSOR REMOVAL OPTIONAL BUT MAKES JOB A LITTLE EASIER:
1. Right below the front of the alternator is a pulley that the serpentine belt rests on

2. Remove the front 15mm bolt and slide the pulley off....37 ft. lbs. gives top compressor
bolt wrench more throw
AIR COMPRESSOR REMOVAL WITH OR WITHOUT OPTIONAL:
1. Unscrew the bottom right compressor bolt with your offset adapter BUT leave the bolt attached to the motor for about 10 or so hand turns
2. Get on the ground from the front of the truck and unscrew the bottom front compressor bolt and leave it attached to the motor for 10 or so hand turns
BOTTOM COMPRESSOR BOLTS FOR SLIDING RAM TECHNIQUE:
* The trick to removing the compressor lies with the top compressor bolt. You must use a ratchet box wrench; However, after a while you cannot get the wrench off the bolt or move it without having some play somewhere. Therefore, you use the ratchet box wrench on the top bolt as far as it will go...Then you slide the compressor to the right in order to get enough play to continue removing the top bolt. YOUR BOTTOM BOLTS WERE LEFT ON IN ORDER THAT YOU COULD USE THEM AS A SLIDING RAM FOR PUSHING THE COMPRESSOR TO THE RIGHT TO GET MORE ROOM FOR THE RATCHET WRENCH ON THE TOP BOLT...W H E W!
1. Once you get the top compressor bolt off, remove the bottom bolts
2. Stand in front of the truck and pull the compressor forwards
3. Remove the alternator from the truck
* If you will only be replacing the alternator, place it in the truck T H E N reverse
the instructions.
* If you will be replacing the starter, then move on to PART II
IN ORDER for you to remove your starter is is understood that you have done PART I, "Alternator Removal". And, that you have just repositioned your Air Compressor, then removed your alternator.
NOW START HERE:
* INTAKE MANIFOLD REMOVAL
1. Do not rush but think about everything a couple of times before you perform each step.
2. Stand on the driver side fender and look at every wire-loom on that side of the car.
3. Use a large screwdriver and detach each set of wires from their round loom lock.
4. Feel towards the bottom of the intake for any looms missed.
5. Look towards the back of the intake manifold for any looms missed.
6. Did you disconnect any and all sensors, etc. attached to the intake manifold?
* DIPSTICK BRACKET AND WHITE ATTACHMENT THINGEE (4) 10mm bolts total

1. There is a metal bracket attached to the intake manifold.
2. There are (3) bolts holding this bracket to the manifold.
3. Carefully pry open the white plastic thingee connected to the metal bracket.
4. Remove the bolt holding the dipstick housing to the manifold. (4th bolt)
5. Metal bracket:
1st bolt at the front of metal bracket
2nd bolt at the rear of metal bracket
3rd bolt underneath and to the rear of the bracket
6. Remove the front and rear metal bracket bolts with your 1/8 socket & extension.
7. Remove the 3rd bolt with a 1/8 box wrench and don't even try to put it back.
8. You might find it easier to remove the underneath bolt (3rd) first?
9. Remove the metal bracket from the truck while taking time to remember how?
(wiggle-wiggle, slide to the front together with moving the gas/dipstick lines a bit)
WHEN REPLACING METAL BRACKET: Make sure the white thingee is properly orientated.

INTAKE MANIFOLD BOLT ORDER AND TORQUE ORDER
3 6 9
1 2 4 5 7 8 B O L T O R D E R
5 3 1 2 4 6 T O R Q U E O R D E R......89 inch lbs.
While keeping the bolt pattern in mind, feel under the manifold until you locate each bolt.
Start at the front bumper and keep feeling w h i l e saying to yourself, 1 23 4 56 7 89,
with (3 on top of 2), (6 on top of 5) and (9 on top of 8). #8 & 9 on left side of photo.
Your hardest bolt will be #7 because you will have to feel around and or thru the dipstick/gas lines. Keep feeling around until you feel comfee about finding # 7.
Unscrew all 9 intake bolts then lift the intake off by puling up and to the passenger side at the same time. Don't worry because the bolts will not drop out of the manifold..GO GM!
WARNING: When your torque the manifold after a new gasket, your torque wrench will have a very short throw to torque # 8&9 because they are by the firewall. Your wrench will only be able to move 3 to 5 inches total. NO 1/4 INCH TORQUE WRENCH........1/8 inch only!
WARNING: If you do not torque the bolts in the proper order the truck will run as if it has dropped a cylinder. And, you will have to go back and detorque/retorque the manifold. How do I know?
WARNING: The book says torque the manifold in stages, ie., 39, 59, 69, 89 inch lbs. or something like that. However, my second time around I went with a method of getting them all up to about 69 inch lbs. then to 89 inch lbs. (USING THE PROPER TORQUE ORDER)
* Starter View after manifold removal:

Starter bolts: 37 ft. lbs. small electrical contacts..tight!
SHORT TAKES:
* There are a couple of small items to remove that I may have left out but if you follow
my directions, it will be obvious what they are.
* At 100,000 miles, the cost of my starter and alternator rebuild was $216.00 and I made the decision to do the job after learning that my local GM dealer would charge me 1,000.00 plus tax for their REBUILT starter & alternator.
* My truck was out of action for a week and a half while I figured this job out. And, I hope that you enjoy these directions because I had a good-ole time preparing them....LSUBOY!
")


