Disclaimer
The community here at 355nation.net urges you to please use caution and seek professional assistance when performing modifications to your vehicle. Before attempting any modification it is advised that you refer to your Colorado or Canyon service manual or contact a certified mechanic as not all GMT355 trucks are the same. The staff and the associated members are in no way responsible for any damages, injuries or other harm inflicted to your vehicle or yourself which may result in attempting these modifications. The posts and content presented on this site reflect in no way the views of 355nation.net or it’s ownership.
![Image]()
A 355nation How To presented by
Josh
Project Name
How to replace your evap solenoid/canister to cure code P0455.
Project Description
In this How-To, I will guide you through replacing the evap solenoid/canister under your truck in hopes of curing a P0455 code, for about 1/4 the price of using the "proper" GM part.
Skill Level
Easy, 1 beer
Project Vehicle
Make: Chevrolet
Model: Colorado
Year: 2006
Engine: 2.8L
Power windows: Yes
Sun Roof: No
Tools Needed
12mm socket, ratchet
Flat screwdriver
OBDII code scanner or Scangauge (optional)
Project Time
30 minutes
Project Cost
Approximately $30
Many of the members here have recieved the code P0455. It's nothing to be afraid of, and dosen't affect the operation of the truck. If you're like me though, you don't like the CEL blaring at you, and I'm a stickler anyway and like for everything to be perfect on my truck. I've done some research on the forum here, and 90% of code P0455's are caused by an evap solenoid/vapor canister thing that's located under the truck, right behind the fuel tank. If you've replaced your fuel cap and still have the code after clearing the CEL, it could be likely this is causing the problem. It's easy to replace, and the actual part costs approximately $140, depending on where you buy it. I'm going to show you how I replaced it with the EXACT same part (modified slightly) and it only cost me $30.
First, some information that you'll find handy. The "proper" part is 10386359, cost $140. The other part, AC Delco part number 214-2147, cost $25. What is the difference? I kid you not, a plastic hose. The AC Delco part is engineered for H2 Hummers, etc, which we all know is the 355's cousin, so with a little addition this $25 part will work on YOUR truck.
Here's a picture of the "actual" part, and my engineered part.
![Image]()
See the difference? Not much of one is there? You can do what I done, and purchase a length of hose and clamps or you can opt to reuse the stock plastic hose that's on the old part. I busted my hose trying to get it off, so I had to go pick up a rubber hose and clamps.
Let's get to work.
First, you'll want to disconnect the battery cables because we will be working around fuel vapors, so safety first!
It's a world easier if you let your spare tire down, and if you've not checked the pressure in it lately, now is a good time anyway. I also took this opportunity to grease the spare tire winch cable because my spare didn't want to unwind. A little grease and all was well again.
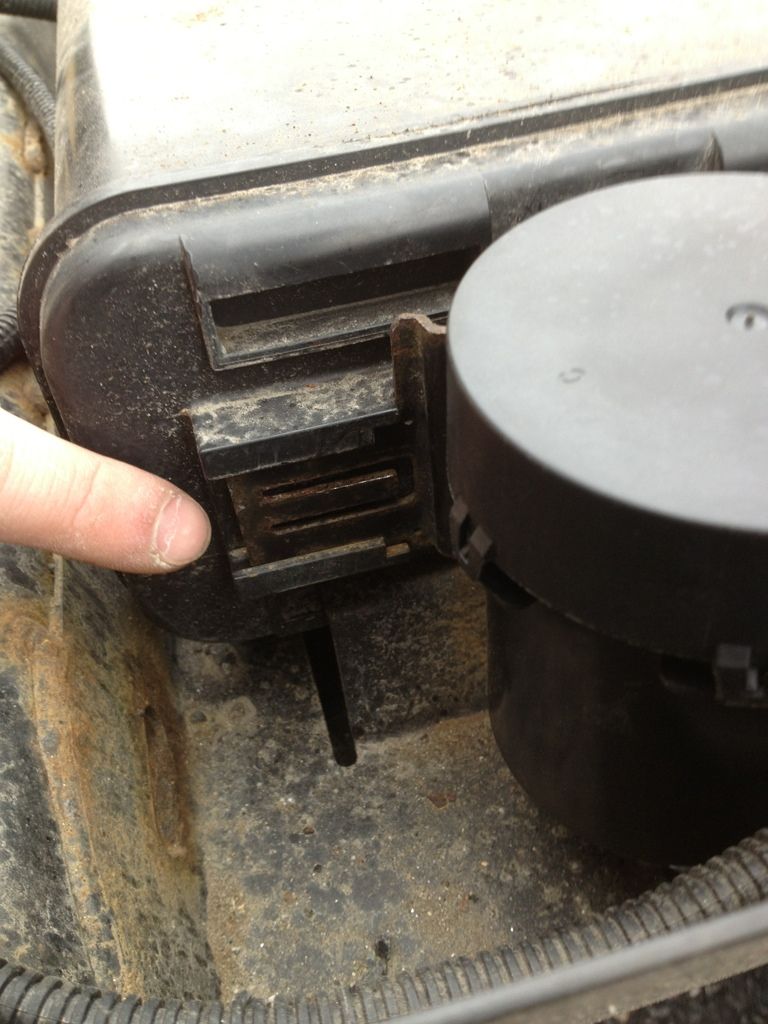
Crawl under the truck, and you'll find this.
![Image]()
This is where the little canister is located. There is a single screw holding the assembly in it's steel cradle, use a 12mm socket to remove the screw and everything will be free.
Unhook the plastic tube from the right side of the box with the flat screwdriver. It'l take a little prying, but you'll eventually get it off. Over on the far left side the canister/solenoid is attached to the left side of the plastic box with a small bracket. You'll need a flat screwdriver to pry the locking mechanism up so it will slide off. Unplug the wire harness and you're loose. Time for a beer.
On my old solenoid/canister it was quite apparant why it was throwing a code. There was a huge crack in the plastic right above where the connector plugs in. I'm sure it had gotten some water in it, corroded and caused the solenoid to stick.
Now here's where you can either remove the old plastic tube and reuse it, or do what I did. Be very careful if you try to take the plastic tube off the old one, you might heat it up a little bit to soften the plastic for an easier result. I just went down to Advance, scored some rubber hose and two clamps and went on about my business. You also need to remove the old bracket from the old canister and transfer it to the new one.
![Image]()
Now, with the hose swapped, or a new hose installed, and the bracket swapped, finish your beer (or have another?) and get back under the truck. Re-install the new canister the way you took the old one out. It just slips on the side of the big plastic box thingy using that bracket we swapped out earlier. Plug the harness back in and attach the hose to the port over on the right side of the box, where you unplugged it earlier.
![Image]()
If you're using a hose and hose clamps make sure they're all tightened good.
Now, you can remount the box using the single screw. It goes in from the top and was kinda aggravating to get to because of some other plastic lines but just take your time and you'll get it tightened up. Congratulations, you're done. Now just raise your spare tire back up, and clear the code!
![Image]()
If you don't have a code scanner, Advance will scan it and erase the code for free. A Scangauge or Ultragauge will also work, or you can purchase your very own code scanner from Advance, O'reilly or Autozone. I think Walmart even has them now.
Also, as a reference:
Evaporative Emission Canister Vent Solenoid Valve Replacement
Removal Procedure
![Image]()
The community here at 355nation.net urges you to please use caution and seek professional assistance when performing modifications to your vehicle. Before attempting any modification it is advised that you refer to your Colorado or Canyon service manual or contact a certified mechanic as not all GMT355 trucks are the same. The staff and the associated members are in no way responsible for any damages, injuries or other harm inflicted to your vehicle or yourself which may result in attempting these modifications. The posts and content presented on this site reflect in no way the views of 355nation.net or it’s ownership.
A 355nation How To presented by
Josh
Project Name
How to replace your evap solenoid/canister to cure code P0455.
Project Description
In this How-To, I will guide you through replacing the evap solenoid/canister under your truck in hopes of curing a P0455 code, for about 1/4 the price of using the "proper" GM part.
Skill Level
Easy, 1 beer
Project Vehicle
Make: Chevrolet
Model: Colorado
Year: 2006
Engine: 2.8L
Power windows: Yes
Sun Roof: No
Tools Needed
12mm socket, ratchet
Flat screwdriver
OBDII code scanner or Scangauge (optional)
Project Time
30 minutes
Project Cost
Approximately $30
Many of the members here have recieved the code P0455. It's nothing to be afraid of, and dosen't affect the operation of the truck. If you're like me though, you don't like the CEL blaring at you, and I'm a stickler anyway and like for everything to be perfect on my truck. I've done some research on the forum here, and 90% of code P0455's are caused by an evap solenoid/vapor canister thing that's located under the truck, right behind the fuel tank. If you've replaced your fuel cap and still have the code after clearing the CEL, it could be likely this is causing the problem. It's easy to replace, and the actual part costs approximately $140, depending on where you buy it. I'm going to show you how I replaced it with the EXACT same part (modified slightly) and it only cost me $30.
First, some information that you'll find handy. The "proper" part is 10386359, cost $140. The other part, AC Delco part number 214-2147, cost $25. What is the difference? I kid you not, a plastic hose. The AC Delco part is engineered for H2 Hummers, etc, which we all know is the 355's cousin, so with a little addition this $25 part will work on YOUR truck.
Here's a picture of the "actual" part, and my engineered part.

See the difference? Not much of one is there? You can do what I done, and purchase a length of hose and clamps or you can opt to reuse the stock plastic hose that's on the old part. I busted my hose trying to get it off, so I had to go pick up a rubber hose and clamps.
Let's get to work.
First, you'll want to disconnect the battery cables because we will be working around fuel vapors, so safety first!
It's a world easier if you let your spare tire down, and if you've not checked the pressure in it lately, now is a good time anyway. I also took this opportunity to grease the spare tire winch cable because my spare didn't want to unwind. A little grease and all was well again.
Crawl under the truck, and you'll find this.

This is where the little canister is located. There is a single screw holding the assembly in it's steel cradle, use a 12mm socket to remove the screw and everything will be free.
Unhook the plastic tube from the right side of the box with the flat screwdriver. It'l take a little prying, but you'll eventually get it off. Over on the far left side the canister/solenoid is attached to the left side of the plastic box with a small bracket. You'll need a flat screwdriver to pry the locking mechanism up so it will slide off. Unplug the wire harness and you're loose. Time for a beer.
On my old solenoid/canister it was quite apparant why it was throwing a code. There was a huge crack in the plastic right above where the connector plugs in. I'm sure it had gotten some water in it, corroded and caused the solenoid to stick.
Now here's where you can either remove the old plastic tube and reuse it, or do what I did. Be very careful if you try to take the plastic tube off the old one, you might heat it up a little bit to soften the plastic for an easier result. I just went down to Advance, scored some rubber hose and two clamps and went on about my business. You also need to remove the old bracket from the old canister and transfer it to the new one.

Now, with the hose swapped, or a new hose installed, and the bracket swapped, finish your beer (or have another?) and get back under the truck. Re-install the new canister the way you took the old one out. It just slips on the side of the big plastic box thingy using that bracket we swapped out earlier. Plug the harness back in and attach the hose to the port over on the right side of the box, where you unplugged it earlier.

If you're using a hose and hose clamps make sure they're all tightened good.
Now, you can remount the box using the single screw. It goes in from the top and was kinda aggravating to get to because of some other plastic lines but just take your time and you'll get it tightened up. Congratulations, you're done. Now just raise your spare tire back up, and clear the code!

If you don't have a code scanner, Advance will scan it and erase the code for free. A Scangauge or Ultragauge will also work, or you can purchase your very own code scanner from Advance, O'reilly or Autozone. I think Walmart even has them now.
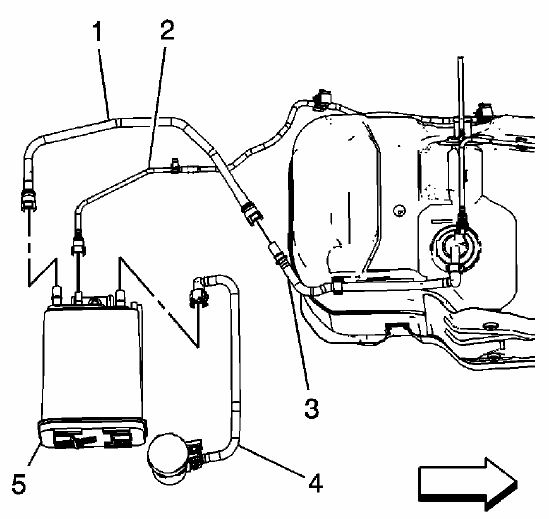
Also, as a reference:
Evaporative Emission Canister Vent Solenoid Valve Replacement
Removal Procedure
- 1. Raise and support the vehicle. Refer to Lifting and Jacking the Vehicle.
![Image]()
- Disconnect the electrical connector from the evaporative emission (EVAP) canister vent solenoid valve (4).
- Disconnect the EVAP canister vent solenoid valve (4) from the EVAP canister (5). Refer to Plastic Collar Quick Connect Fitting Service .
- Disengage the bracket retaining tab and remove the EVAP canister vent solenoid valve (4).
- Slide the EVAP canister vent solenoid valve (4) over the bracket.
Ensure the valve (4) is properly retained to the bracket.
- Connect the EVAP canister vent solenoid valve (4) to the EVAP canister (5). Refer to Plastic Collar Quick Connect Fitting Service .
- Connect the electrical connector to the EVAP canister vent solenoid valve (4).
- Lower the vehicle.