Chevrolet Colorado & GMC Canyon Forum banner

14 PSI Turbo 2.9 with pics!

30K views 93 replies 14 participants last post by  J@mu  
#1 ·
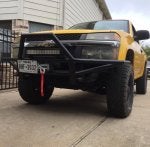
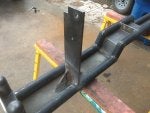
I've put a lot of work into the truck over the past few years and I figured a lot of you might be interested to get some ideas for your own builds. Quick summary of what's been done: 2.5" suspensionmaxx lift front, '85 c10 leafs and 2" shackles in the back, 31x10.5r15 BFG A/T KO2 (for now) on 15x7 rims 4" backspacing, G80 installed in the rear end with 3.73 gears, crossmember notched for clearance, glasspack exhaust, 5 speed swapped, Badlands 5000lb winch, 22" lightbar, custom welded front and rear bumpers out of 1.5" sch40 pipe, custom front skidplate, turbo.
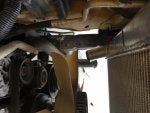
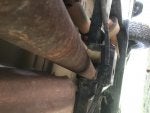
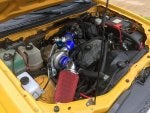
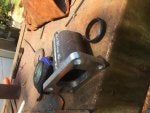
Specs on the turbo: T3/T04e 50.5mm turbo, 60lb Siemens Deka injectors, manifold welded out of 2 elbows and 2 T's of 1.5" sch40 pipe with the turbo flange out of 2 3/4" pipe cut in half and rewelded to fit the opening, no intercooler, preturbo water injection using a coolant overflow tank, washer fluid pump, 4psi oil pressure switch, and a 2gph mister, oil feed from an oil filter sandwich plate, drain is 3/4" tubing and barb into the front of the oil pan, tune by LimeSwap(highly recommend).
Note: Turbo was $120 on ebay and I only spent $1000 total with tune and parts. (Did all this in highschool, not a huge budget but learned a lot)
I'm happy to answer any questions about how/why I did what I did or where I got parts, etc.
 

Attachments

#4 ·
I LOVE THE FABRICATION!!!
Very creative thinking on the manifold and hell why not.
bumpers and cross member too.

Any mods to the inside of the engine?
ring gap? plug gap? hard parts? or just a prayer?
 
#5 ·
Motor is at 117k now so I figured rings would have opened up a tad from stock and a motor refresh is something I haven’t tackled yet. Replaced the valve cover gasket but that’s the most I’ve been inside the motor. Timing chain will need to be done sooner than later (not as tight as it should be but not exactly loose yet) so I’ll end up taking the motor out and doing a few things then. But for now a prayer is keeping the motor together on big pulls haha
 
#8 ·
Will be putting in a summit racing all aluminum radiator this weekend part number SUM-380428 and couldn’t find much about how anybody has been mounting aftermarket aluminum radiators in. I know the stock rad mounts have to be cut out for clearance, but I will be posting some detailed pics of how it comes together. I’m going to use the stock mechanical fan and shroud for now as well which I don’t think anybody has tried yet. Having two 1” rows instead of one 7/8” row should cool awesome even without e fans so I’ll try to post updates after some driving time. With the turbo, engine temps have been about 5/8-3/4 up the gauge on the highway so hopefully we can stay just below 1/2 with the new rad. Stay tuned for some updates after the weekend!
 
#11 ·
I've been chasing an exhaust leak that I will also be fixing this weekend, so I think afr has been a bit off. I had some trouble sitting in traffic before the turbo with overheating so I think this rad may just be clogged up a bit. Figured if I was going to replace it I'd go for an upgrade. Once I get everything sorted and figured out I'll post what was causing the issue. Intercooler would probably help out a lot with cooler iat.
 
#13 ·
Finally got around to posting an update. Had an exhaust leak that I got fixed up which took a bit of time but getting the old radiator out took all of about 20 minutes including drain time. Cut the old mounts out but left the bottom of the bracket intact. Bar going across is 1/8”x2” steel flat stock with 1/8” rubber gasket maker cut into strips and glued on. The new mount sits on the remnants of the old mount and then have 3 sheet metal screws on each side as well. Got the top mount made too will post about that tomorrow. Now for the big hiccup, the lower radiator neck goes right into the stock fan. With efans, no issue at all the old hose fits fine. Since I’m sticking with the stock fan I am going to get the lower neck reweld to angle to the right about 10° tomorrow. Once that’s done I’ll mount it in and the fan shroud then post pictures of it complete. Also got my front brakes done went with drilled and slotted rotors for some better cooling. Will be doing rear drum brakes tomorrow after the radiator is finished. This radiator size is perfect and looks really high quality as well so for $160 on summit racing I would highly recommend if you need some extra cooling power!
 

Attachments

#14 ·
Here’s what the final product looks like. Was able to get the stock fan shroud to work with a little cutting and some custom mounting. Stock hoses also fit with some trimming. Once I get a longer overflow hose I’ll start it up and check for leaks. If you can weld aluminum or find someone who does then it’s super simple to cut, turn, fit, and reweld the lower neck to the right angle as seen in the pics. This radiator fits perfect for this truck and should provide a lot more cooling power with the double rows. Once it’s started I’ll check for leaks and I’ll post about how it cools once I get some driving time.
 

Attachments

#15 ·
Update:

Radiator cools great! Took a 1000 mile road trip going 75-85mph the whole way sometimes sitting at 2-3 psi because of wind and the truck barely sat over the midway mark (which is a huge improvement from before when it would have overheated). One note: the way I mounted the fan shroud needs some adjusting because on bumpy roads the hook falls out of the notch. Just needs something to keep it down in the notch. E-fans would make the install much easier and cool better, but the stock fan moves enough air to prevent any overheating issues. On another note, this new radiator took over 2 gallons of premix when before it took less than 1.5 gallons. Overall very pleased with how the install turned out and would definitely recommend!
 
#16 ·
After having some drivability issues and problems with engine codes, I decided to go intercooled. I think the charge pipe now is just too short and has too much turbulence for the MAF sensor to read correctly, plus the hot air isn't helping either. The winch complicates things as there's very little room to fit an intercooler, so I went with the one in the picture with a 16x7x2.5 core. There's a chance that a 16x12x3 core would fit too, but I decided to try the smaller one as it will be much easier to fit. The turbo will not be reclocked as it is too close to the power steering fluid reservoir, so the plumbing will do a 180 off the turbo and run down the passenger side right by the headlight(will be cutting out a hole to fit the pipes) then come back up by the driverside headlight and across the engine bay into the throttle body. The piping will be 2.5" until the final stretch to the throttle body where it will neck up to 3" for the BOV then the MAF tube. I will still use the MAF tube that I cut from the original airbox, but I'll post some pictures of how I do it that. I think I've come up with a way that will work better than what I have now. The water injection system is also going away, so if anybody is interested in it let me know and you can have it, just pay for shipping. Should be done in a couple weeks or so then Jeremy with LimeSwap is going to tune me up one last time and we'll see if the issues are fixed! I'll try to post a lot of detailed pictures of how it all comes together just so people can use it as a reference for their own piping.Last thing: total was right at $300 for everything, probably another ~$20 for hardware and brackets.
 

Attachments

#20 ·
Got some time today and almost got it all done! Got to the very end and decided that I’d rather have an aluminum 135° bend instead of the silicone by the throttle body so I got that ordered(last picture). Got super lucky and only had to cut the one pipe that went to the air filter. This intercooler fits great and is just the right width, could be a little taller but I couldn’t find one that wasn’t 12” tall. Looking now, the 12” would probably fit, but the horn would be in the way and it would be very tight. The cuts I made were done with a hack saw(no access to a power outlet) and I just went from the hole for the headlight till the edge of the radiator. Used a file to clean it up and then took some 1/4” vacuum hose, cut it down one side, then glued it over the metal edge to protect the aluminum. Now for the MAF tube... I took the stock tube cut from the original air box and put it inside a 3” diameter 8” long coupler, then put a couple clamps where the ends of the tube are inside. This is a much better seal than my old setup and looks way cleaner. The MAF ended up just after the BOV which I was trying to avoid, but it’s at least a couple inches farther than before and there’s not a bend right before the tube now. Last thing: I have a huge list of extra pipe, couplers, and clamps from the kit I bought. If anybody is interested send me a pm otherwise I’ll post it on the classifieds pretty soon with some pics. Here’s the list:
Intercooler Piping
1x 3” 45° coupler(blue)
1x 3” 90° coupler(blue)
1x 2” clamp
2x 2.5” 18” straight pipe
2x 2.5” 18” 15° bend
2x 2.5” 18” 90° bend
4x 2.5” coupler(blue)
1x 3” 12” straight pipe
2x 3” coupler(blue)
10x 2.5” clamp
3x 3” clamp
 

Attachments

#21 ·
Just realized I didn’t show the actual intercooler mounts haha. I just used some flat bar from homedepot and sheet metal screws. Another note, I had to cut the very bottom middle mount of the grill or else I’d have to take off the entire bumper to fit the grill back in.
 

Attachments

#22 ·
How's it going.
I'm doing the same project.. just mounted my front intercooler..and needed some brain storming how to go about my piping from turbo to FMIC also to intake manifold..than found your pictures of your set up.. brilliant set up you got there..
Well anyway short story long..
I've come to a point where I need an exhaust manifold to finish my project..do you sell these turbo manifold..or where can I get one..
Thanks in advance

Sent from my Moto Z (2) using Tapatalk
 
#29 ·
Finally got it all thrown together and man I didn’t realize how much an intercooler could do! Engine seems much happier now, but I’m asking Jeremy to retune it again to make sure it’s alright. The 135° pipe looks clean and fit pretty well, very happy with how the piping came out. Too wet outside to get any good pulls, but even with the conditions she feels a lot more powerful. So far have had no issues at all with overheating, but it has been pretty cold outside about 35°
 

Attachments

#32 ·
Sooo… pretty embarrassing that I didn't notice this sooner, but wanted to post about it because it may help someone else. Little back story, thought I heard some rod knock, but didn't sound quite like it and only happened under load. Checked under the hood for something metal that could have caused it but didn't see anything. The turbo blanket was torn to hell(completely in 2 pieces) so I ordered a new one and went to change it out. Got the old one off and then saw it... 3 of the 4 bolts holding the turbo to the flange on the manifold WERE GONE! Gasket completely blew out. Craziest thing is the truck runs better than it ever has before so I never even considered an exhaust leak. I think since its a pre-turbo leak, its under high pressure so the gas flows out, air doesn't get in, and it's not throwing off the O2 sensors... I hope. Needless to say the truck is parked now. The cheap eBay turbo has about 6000 miles or so on it and has some shaft play (about 0.5mm-1mm) so instead of just ordering a new gasket, I got a whole new turbo, flange gasket, oil feed gasket, oil drain gasket, and v-band clamp for $108 on eBay. Same exact one as before so no modifications should be needed, just bolt the new one in. I was impressed with the quality of the last one and it made good boost. I had flange bolts and flange nuts with the serrations on the back of the nuts, but I'm looking for ideas on what to use now. Any input is greatly appreciated, right now I think I'm leaning towards M10x1.25 grade 10.9 standard hex bolts, washers, split washers, and a metal lock nut(no nylon). Turbo will be here Monday so I'll go to Fastenal this weekend.