Disclaimer
The community here at 355nation.net urges you to please use caution and seek professional assistance when performing modifications to your vehicle. Before attempting any modification it is advised that you refer to your Colorado or Canyon service manual or contact a certified mechanic as not all GMT355 trucks are the same. The staff and the associated members are in no way responsible for any damages, injuries or other harm inflicted to your vehicle or yourself which may result in attempting these modifications. The posts and content presented on this site reflect in no way the views of 355nation.net or it’s ownership.
![Image]()
A 355nation How To presented by
Captain Rab, 1BADI5
Project Name
How-To LED Cluster Conversions
Project Description
Converting stock cluster LEDS to an Led color of your choice.
Skill Level
Advanced
Project Vehicle
Make: Chevrolet
Model: Colorado
Year: 2007
Engine: 2.9L
Power windows: Yes
Sun Roof: No
Tools Needed
Torx Bit Screwdriver
Needle Nose Pliers
Soldering Iron
Solder
Permanent Marker
Wick Wire
(2O) 3 mm LEDs form Oznium.com Get several more in case you mess up or kill one because of too much heat
Project Time
1-3 hours
Project Cost
Roughly $25.00
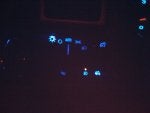
FINISHED Product
![Image]()
Colorado Xtreme Cluster
![Image]()
Hummer H3 Cluster
The community here at 355nation.net urges you to please use caution and seek professional assistance when performing modifications to your vehicle. Before attempting any modification it is advised that you refer to your Colorado or Canyon service manual or contact a certified mechanic as not all GMT355 trucks are the same. The staff and the associated members are in no way responsible for any damages, injuries or other harm inflicted to your vehicle or yourself which may result in attempting these modifications. The posts and content presented on this site reflect in no way the views of 355nation.net or it’s ownership.
A 355nation How To presented by
Captain Rab, 1BADI5
Project Name
How-To LED Cluster Conversions
Project Description
Converting stock cluster LEDS to an Led color of your choice.
Skill Level
Advanced
Project Vehicle
Make: Chevrolet
Model: Colorado
Year: 2007
Engine: 2.9L
Power windows: Yes
Sun Roof: No
Tools Needed
Torx Bit Screwdriver
Needle Nose Pliers
Soldering Iron
Solder
Permanent Marker
Wick Wire
(2O) 3 mm LEDs form Oznium.com Get several more in case you mess up or kill one because of too much heat
Project Time
1-3 hours
Project Cost
Roughly $25.00
- Remove cluster by following procedure http://www.355nation.net/forum/how-interior/7408-how-remove-cluster.html
- Disconnect rear cable of Cluster and take the cluster to a well lit work bench.
- Disassemble cluster by removing all torx bit screws from cluster.
- Carefully remove clear lens assembly and gently remove pointers by pinching and pulling at the same time.
- Remove circuit board from cluster.
- Locate each of the Anode (+) and mark the positive on the led by placing a mark on the board. Refer to the below picture and look for the red + mark near each led.


Figure A
- Take each replacement led and sand the top flat but be careful not to sand too deep. I check the diodes after sanding with a standard fluke multimeter set on ohms and it should have enough power to light the led. Keep in mind that diodes are polarity conscious so black goes to the Cathode (-) and red to the Anode (+). See Picture below:
![Image]()
FIGURE B
- Bend the led legs of the LED’s as close to flush as you can. Height is very critical or you will have issues with the DIC or the LED’s hitting things that they shouldn’t. See figure C
![Image]()
FIGURE C
- Heat the old diodes solder joints and remove them off the board. Be careful not to use too much heat and damage the PCB. If necessary use the wick wire to draw any excess solder off of the board. See link below for a soldering primer and how to use wick wire. Soldering Guide
- Once all old diodes are off the board begin replacing them with the new LED’s. Paying attention to the polarity. (Remember – (positive or anode) goes to the black dot.) If you get confused hold the diode into the light. The largest piece of metal in the led is negative or cathode. See figure B or C.
- Once all LEDS are installed Reverse the assembly process and check for fit. If any diodes are too high the DIC may not work and you will have to redo the PRNDL12 LEDS.
 Figure D
- If you are satisfied that the LED’s are all good remove the board and check all the LED’s by plugging it back into the truck. If an LED doesn’t work then the polarity may be wrong or the LED died from too much heat. Repeat the process until all LEDS are functional.
- Assembly the rear of the display first but do not put the lens cover back on.
- Calibrate gauges by turning the ignition key to the first position with the display plugged in. Install needles by gingerly pressing them onto the shaft until you feel a slight click. Naturally at the zero location.
- Turn key off then back on to make sure the needle is positioned correctly.
- Repeat for all needles then start the truck and verify they all work and are zeroed or reading properly.
- Remove cluster and attach the plastic housing then install and enjoy.
If you don't want to try this yourself, attached is the link to my service page
http://www.355nation.net/forum/limi...ndors/47612-custom-leds-clusters-4x4-modules-hvac-headlight-control-airbag.html


FINISHED Product

Colorado Xtreme Cluster

Hummer H3 Cluster