UPDATED: 18 April, 2009
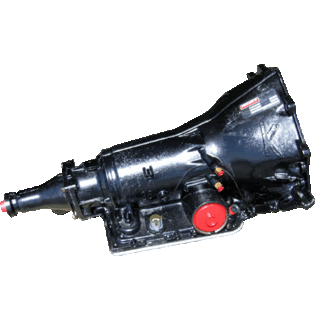
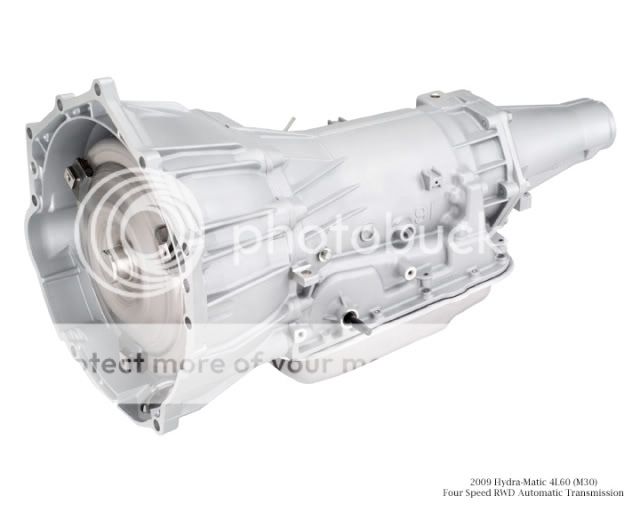
In late 1981, GM introduced a 4 speed automatic transmission for the 1982 model year and designated it the 700R4. In 1992, GM began using an electronically controlled version dubbed the 4L60E.
For 1997, the 'late' version of this tranny came into use and is still in widespread use today. The version used in the Twins has an RPO code of M30.
![Image]()
![Image]()
![Image]()
I won't get deep into the history or specs; the following websites offer good descriptions of how this transmission evolved.
The GM 4L60E Transmission -
GM 4L60-E transmission - Wikipedia, the free encyclopedia
700R4 / 4L60 Transmission Information/ History - GmTruckHQ
![Image]()
![Image]()
Although there are folks who hate the 4L60 with a passion and the 4L80 is recognized as a much stronger unit, the 4L60 has gained much fame in the performance and aftermarket arenas. It is easy to rebuild and can be strengthened to handle significant horsepower and torque.
While growing up and early on in my 'driving' years, I preferred manual trannys over automatics. Eventually I ended up buying a used S-10 Blazer. It had a new GM Goodwrench engine, but the 700 R4 tranny was on its way out. I got the tranny rebuilt (with a basic shift kit) and almost 200K miles later, it was still going strong. I slowly began to realize that a 700R4 would last a long time if it wasn't abused and was
given proper maintenance.
After buying my Colly I would occasionally think about ways to improve the 4L60E in terms of durability. I don't consider myself to be an expert; no doubt there are members who could take a 4L60 apart and put it back together blindfolded. My intent is to share what I have learned about performance upgrades with other members who like myself were not aware.
Servos
In 2007, I installed aftermarket servos to improve shifting and prolong the life of the band and clutch packs. Before I go any further, let me give a brief description of how servos work.
Servo -a control system that converts a small mechanical motion into one requiring much greater power.
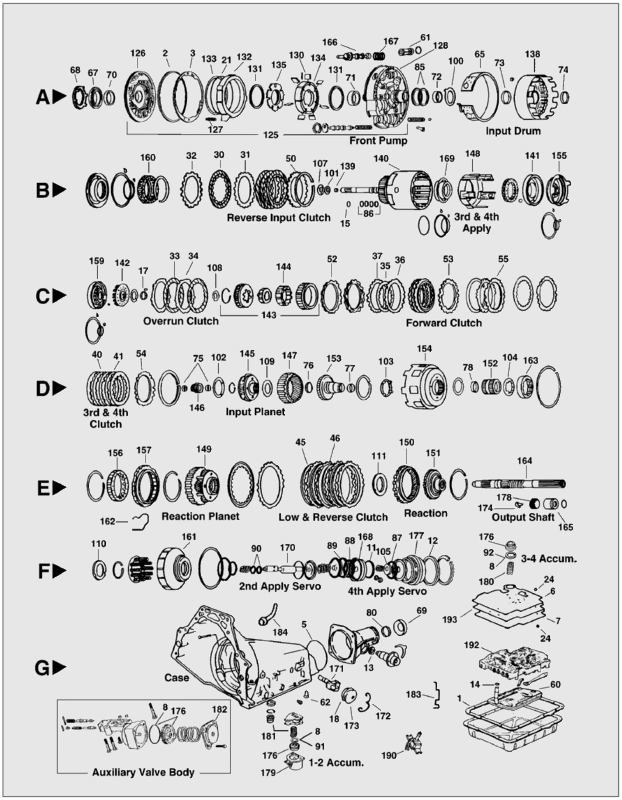
Servos are essentially aluminum pistons that apply and release the clutch band. Without getting too technical, applying and releasing clutch packs determines power flow through the planetary gearset and the end result is 1st, 2nd, 3rd, and 4th gears. The servos in the 4L60 are located on the front passenger side of the tranny housing just above the oil pan. The outer cover is circular and is held in place by a snap ring. Inside the cover is the 4th apply piston aka 'overdrive' servo. It controls the 3-4 upshift and the 4-3 downshift. Immediately behind this servo is the two piece 2nd apply servo aka 'intermediate' servo. It controls the 1-2-3 upshifts and 3-2-1 downshifts. Inside the 2nd apply servo is a stout spring; there is also another spring between the overdrive servo and the intermediate. Going lengthwise through the center of all servos is a servo pin. The outer end of the pin rests inside the overdrive servo. The opposite end is tapered and rests against the clutch band. When fluid under pressure is routed through one of several circuits, the servo(s) move in or out applying or releasing the band. This animated schematic shows how fluid flows and the servos move: 700R4 / 4L60E Animated Servo Operation
2nd Apply Servo (Intermediate)
![Image]()
4th Apply Servo (Overdrive)
![Image]()
2nd Apply Servo and Pin
![Image]()
3-4 Clutch Plates
![Image]()
Servo/Clutch Band
![Image]()
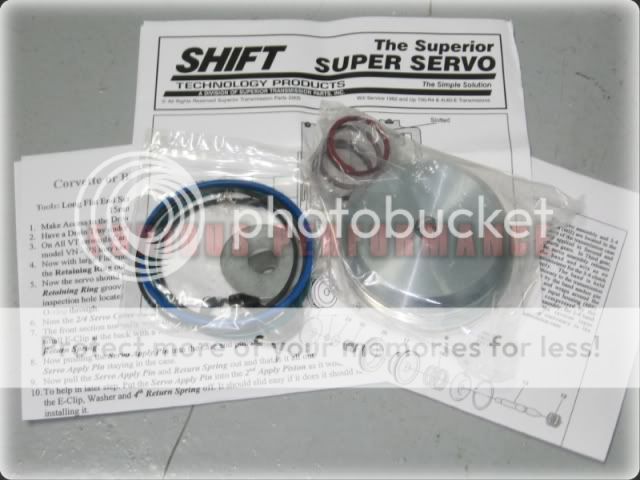
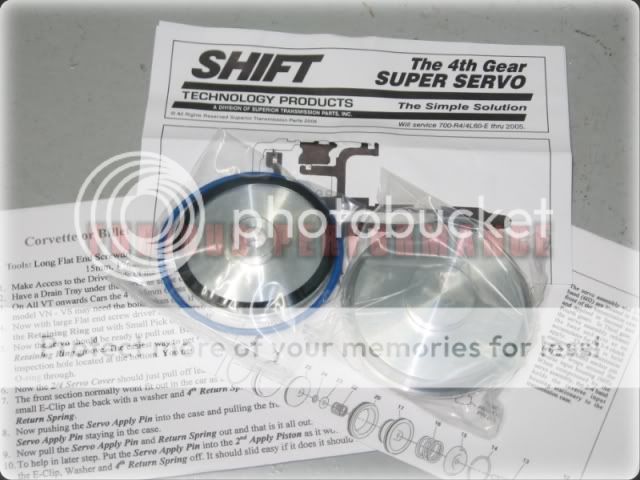
As I mentioned earlier, fluid pressure moves the servos. If the area of the servo that the fluid comes in contact with is increased, the servo will move with greater force. When GM began using the 700R4 in Corvettes and some Camaros, it featured an upgraded 2nd apply servo. This servo has a larger apply area and gives firmer 1-2-3 and 3-2-1 shifts. Over time it became known simply as the 'Corvette servo'. There are several different manufacterers of this servo but the dimensions are the same. In recent years, an upgrade for the 4th apply servo became available through aftermarket suppliers. It enhanced the 3-4 and 4-3 shifts.
So to sum up: the 2nd apply piston/servo is often advertised as the 'Corvette servo' or 'intermediate' servo and affects the 1-2 and 2-3 shifts. The 4th apply piston/servo or 'overdrive' servo affects the 3-4 shifts. Jet, Superior, Sonnax, and a few others make upgraded servos. Superior calls their's 'Super' servos because the intermediate has even more apply area than the Corvette servo and the overdrive has 40% more apply area than the OEM.
Servo Part Numbers:
2nd (Intermediate)
Jet Powr Servo (Corvette) 750211
Jet Billet Powr Servo 750212
Sonnax Corvette Servo 77701-04K
Sonnax 'Super Hold' Servo 77911-03K
Superior 'Super' Servo K012
TCI High Performance Servo 376005
4th (Overdrive)
Jet Billet Powr Servo 750213
Sonnax 'Super Hold' Servo 77767K
Superior 'Super' Servo K034
TCI High performance Servo 376006
Here are the websites for the above named manufacterers;
Jet Performance: JET Performance Products, Import & Domestic Performance, Performance Kits, Fuel Systems, Transmissions
Sonnax: Sonnax - Aftermarket replacement transmission, torque converter, and high performance automotive parts
Superior: Superior Transmission Parts, Inc. - Automatic Transmission Parts
TCI: TCI - Performance Transmissions and Torque Converters
Shift Kits
Shift kits aka shift improver kits, shift performance kits, or reprogramming kits have been available for years. Some include parts to directly affect shifting by modifying fluid pressure, some contain parts to correct 'weak' areas or design flaws, others allow the tranny to be shifted like a manual tranny by moving the gear shift lever, and the list goes on. Sonnax, Superior, and Transgo make basic kits for the 4L60E. B&M makes kits for 2002 and older trannys. Transgo also makes a kit called the 'HD2' - "Crisp muscle car or full race shifts. Puts the driver in command. Holds 1st, 2nd, 3rd to any speed. Backshifts to 3rd, 2nd & 1st by moving the lever". This kit doesn't work on '98 and up unless you remove torque management.
My research originally centered around a shift kit for my Colly. But then I began to realize that for my situation, it might not be money well spent. Here's why. During the mid to late '90s, vehicles with the 4L60E would sometimes throw a 'P1870' code for the torque converter. Turns out the valve that supplies fluid to the converter when it locked up would wear prematurely. Fluid would leak by the valve and the torque converter wasn't getting adequate pressure. In January 1999, GM began using an improved valve to remedy the problem. Over the years, GM also made minor performance upgrades to other areas in the transmission. When I looked more closely at the contents of the Sonnax, Superior, and Transgo kits it became apparent that the kits contained the improved valve and other parts that GM had already put into use. The kits also came with some new accumulator springs. So I would be buying and installing a collection of parts that with a few exceptions were already in late model 4L60Es.
Transgo Shift Kit
![Image]()
Superior Shift Kit
![Image]()
Sonnax Shift Kit
![Image]()
Typical Valve Body
![Image]()
Link to a video showing removal of the valve body: YouTube - Automatic Transmission Valve Body removal - 4L60E Shift Kit
Note: The valve body can be removed with the tranny in the truck. It isn't necessary to completely rmove the harness from the transmission either. Just unhook the connectors from the solenoids and move the harness out of the way.
I ran across two 'schools of thought' concerning shift kits. One is that shift kits are great for racing and high performance use. See here for the opinion of the Procare Performance tech:
eBay Store - Procare Performance Transmissions: 4L60, 700R4, 4L60E. The second is unless you have an early 4L60E that needs the improved parts, don't install a kit.
I made a few phone calls and ended up talking to the 4L60E tech at PATC (Performance Automotive and Transmission Center). I fully expected him to try and sell me a bill of goods that I would need to rob a bank to pay for. :lol: I explained that I owned an '05 Colly, that on rare occasions I towed or hauled with it, that 80-90% of my driving consists of short trips, and because of stop and go driving, my tranny was constantly shifting up and down between 1-2-3. What minor upgrades if any could I do to increase the life of the tranny? Will I get any benefit from installing a shift kit? The tech, Jim, told me to start with installing the Superior servos. I said I had already done that. He then said to install the Sonnax boost valve. (I will talk more about the boost valve later). I would see an increase in line pressure by about 10% and together with the servos would result in less clutch pack wear due to faster/firmer shifts. I also mentioned the pcm was tuned and I believed the tuner had either greatly reduced the torque mangement or eliminated it altogether. I know there are pros and cons concerning torque management and various arguments about keeping, modifying, or removing it. My opinion is this: modifying the TM function through tuning is okay as long as you take a common sense approach. The powertrain control module (pcm) controls the electronic pressure solenoid (force motor) and this directly affects line pressure. Unless you are experienced in tuning and understand how tunes can affect TM and pressure, leave that to the experts.
Ok, back to the boost valve. The boost valve sets in the pump and helps regulate line pressure along with the electronic pressure control solenoid. The valve assembly consists of a calibrated spring, the valve itself, a retaining sleeve, and a snap ring. Here's a pic of an aftermarket boost valve:
![Image]()
The OEM boost valve is .470" in diameter and over the last decade, GM made several design changes. The valve can be replaced with the tranny in the truck, but picking the correct replacement can be tricky. 4L60E trannys through 2004 use an early pump design. For 2005, GM changed the design (late pump). Sonnax (and there may be others) makes a boost valve that is .490" in diameter. "The Sonnax oversized (.490"/77898E-K, -7K) valves were designed to result in a slight/moderate boost in line pressure at mid-range (over the .470"/E-4K). They result in approximately 10-15% higher pressure line at the same EPC duty cycle over various OEM diameters".
For 2004 you would use Sonnax part number: 77898E-K and for 2005 and later use part number 77898E-7K. So if you have a Twin built in late '04 or early '05 which one do you choose? Well, the techs at Sonnax don't know the breakpoint when GM started using the late style pump. So I called the folks at PATC again. Since my Colly was built in April 2005, we are assuming that it uses the late pump boost valve. The parts tech said that if in doubt, a customer could order both and return whichever one they didn't use.
So how do you tell the difference? The boost valve for 2005 and up is slightly shorter. This link shows a pic of the valves, the difference in length, and install instructions:
http://www.powerglide.com/instructions/77898E-K-IN.pdf
A member asked me this question. "What if I install just the servos or the servos and boost valve without getting a tune"? "Will I still notice a difference"? The answer is yes.
Even without a tune, you will notice a difference in shifts. During light throttle acceleration, shifts will be slightly firmer than stock. When you really get on the throttle shifts get even more firm.
Accumulators
An accumulator acts like a 'shock absorber' for the tranny. The 4L60E has three accumulators; one for the 1-2 shift, one for the 3-4 shift, and one for Forward-Reverse. Think of a cylinder closed off on one end. Inside the cylinder is a piston and between the piston and closed end is a spring. The area above the piston is filled with fluid which can flow in or out of the cylinder through a small opening on the other end. When the tranny shifts, the excess fluid pressure enters the cylinder, momentarily pushing against the piston and compressing the spring. After the shift is complete the piston and spring transfer the accumulated energy back to the fluid outside the cylinder.
Problems may arise with OEM accumulator pistons. In the 1-2 and 3-4 accumulators, the piston is usually aluminum, is short in length, and has only one seal. Once the walls of the accumulator cylinder get worn the piston can become canted and bind up. The piston in the Forward-Reverse accumulator is usually plastic and may crack in the center where the pin rides. The resulting fluid loss causes delayed shift engagement, slips, burned clutches and / or band. Repeated back and forth movement of the accumulator piston causes the piston pin bore to wear. A fluid loss through the piston pin bore or cracks will cause the forward clutch to slip. The OEM accumulator piston may develop a large pressure leak at the pin area over a period of 50 to 100 thousand miles. The symptoms described above often appear on high mileage transmissions.
An upgrade is available. Sonnax offers 'pinless' pistons that feature dual seals and a longer length. Since they are pinless, there is no center bore, eliminating the possibility of bore wear or cracks. The dual seals and longer length prevents the piston from canting in the accumulator. The 1-2 and 3-4 accumulator use part number 77998-03K; the Forward-Reverse accumulator takes part number 77987-01K. An excellent time to consider changing pistons is during the 100K mile service.
Sonnax 1-2 Accumulator
![Image]()
Transmission Oil Coolers
The Twins have a factory transmission oil cooler built into the bottom of the radiator (where coolant temps are at their lowest). On the passenger side and near the top of the tranny are two 3/8" ID tubes. One tube carries fluid to the radiator cooler and the other is the return to the transmission. Having a cooler built into the radiator does have one advantage. In cold weather, as the engine warms up and coolant flows through the radiator, the cold tranny picks up some of the heat. This helps the tranny warm up faster; until the fluid reaches a certain temp, the torque converter will not lock up.
There are two disadvantages to this type of cooler. First, on rare occasions the cooler inside the radiator can stress fracture and allow tranny fluid to contaminate the coolant. Second, in hot weather conditions, when driving up steep hills or towing, it's normal for the tranny fluid to get hotter than usual. At the same time the engine, because it's working harder, also runs slightly hotter. The tranny fluid isn't able to give off its' heat to the coolant like it normally would. Why is this situation potentially harmful? To answer this question, lets look at where the heat in the tranny comes from. Since the tranny bolts to the back of the engine some of the heat from the engine is conducted through the bellhousing. The biggest source of heat is from the torque converter. The torque converter impeller receives high pressure fluid from the tranny pump. The fins inside the impeller 'sling' this fluid against the fins of the turbine. The turbine is splined to the input shaft of the tranny. Since the torque converter is bolted to the flywheel, this allows the transfer of power from the engine to the transmission. Because of the laws of physics, when you force tranny fluid to move in this manner, heat is produced. This webpage gives a good description of how a torque converter works and shows the internal parts: TCI - TECHNICAL INFORMATION: Torque Converters Explained
When petroleum based tranny fluid gets to temps of 250 degrees Fahrenheit or higher, it begins to breakdown. It then begins to lose its' special properties so the friction material on clutch plates starts to wear quicker and seals start to soften. Fluid temps below 225 degrees are ideal. Experts claim that a 20 degree drop in fluid temp can double the life of a tranny.
![Image]()
Aftermarket oil coolers are available to prevent or eliminate high fluid temps. They come in three basic styles: tube and fin, sandwiched plate, and a combination cooler with electric fan.
Tube and Fin
![Image]()
Sandwiched Plate
![Image]()
Cooler with Electric Fan
![Image]()
These coolers are typically mounted in front of the radiator/AC condenser to ensure maximum airflow when the truck is moving. The dimensions of some coolers allows them to be mounted to the frame to save space. Again, having adequate clearance for airflow is important. Size for size, the tube and fin type is usually least expensive, then the plate type, with the cooler fan combo costing the most. I would recommend the plate type over the tube and fin for three reasons. The plate cooler is more resistant to damage from road debris thrown up by vehicle tires. This type of cooler is also more thermally efficient; it does a better job of transferring heat from the fluid to the moving air. Last, it's rumored that the tube and fin type can restrict fluid flow One note of caution: in extreme cold, petroleum based tranny fluid will thicken.
The small passages in the plate cooler may restrict fluid flow until the fluid warms up. B&M and Tru-Cool both offer plate coolers with a bypass feature. Cold fluid coming in bypasses the main portion of the cooler and goes directly to the return line.
So what size cooler would you need? Cooler sizes are based on gross vehicle weight (GVW). Add the curb weight of your Canyon/Colly + the weight of the trailer you plan to tow + the weight of the items on the trailer to get your GVW. Keep in mind the curb weight of your truck includes passengers, cargo in the bed of the truck, plus added accessories like brush guards, lift kits, etc.
Once you determine your GVW, round it up to the nearest thousand. This is the minimum size cooler to use. If you go a size or two bigger, thats fine as long as you have the space to mount it. I only tow on rare occasions but I installed a cooler anyway. Even if you never tow or haul, an aftermarket cooler is still a good investment.
Coolers can be mounted in one of several ways. Some coolers come with long straps that go through the radiator/condenser. This is the easiest but least preferred method, since it damages the fins. Coolers may also come with metal straps that can be used to mount it to the radiator support. Or you can custom fabricate your own brackets. Here are a few pics of my install with homemade brackets.
![Image]()
![Image]()
![Image]()
![Image]()
The experts recommend that you install an aftermarket cooler in 'series' with the factory. It's relatively easy. Get underneath your truck and find where the tranny cooler lines attach to the bottom of the radiator. The passenger side line is the return to the transmission. You cut this line, add a fitting, and then run a length of rubber hose to one of the fittings on your new cooler.
Then run a piece of rubber hose from the other fitting back to the other half of the cut return line. Fluid flows like this: it leaves the tranny and goes to the driver's side of the radiator; leaves the passenger side and flows to the aftermarket cooler; leaves the cooler and goes back to the tranny. Installing the cooler in this manner won't void the factory warranty on new trucks and it allows the tranny fluid to get warmed up by the radiator in cold weather. Here are the 'How To' links for doing an install: How-To: Install an auxillary transmission cooler on your truck - 355Nation Chevy Colorado & GMC Canyon • View topic - How to install a transmission cooler in your Colorado 3.5
In addition, a cooler with barb fittings for 3/8" hose makes installing it easier since the oil cooler lines are the same size.
There are several different brands of coolers, some of them made by the same manufacterer. For example, the B&M, Long, and Tru-Cool plate style.
I've compiled a list of the major brands and their websites/catalogs:
B&M: Coolers
Derale: http://www.derale.com/catalog.pdf
Hayden/Imperial: Hayden Products Catalogs
Perma Cool: Thin Line Trans Cooler Kits
Heavy Duty Trans Cooler Kits
Long/Tru Cool: http://www.dana.com.br/Automotivo/GerenciamentoTermico/images/TC_Brochure_2004_Website.pdf
Transmission Cooler Quick Guide: Cooling products Cooler Quick Guide Makco Transmission Parts
Remote Oil Filter
![Image]()
![Image]()
Installing a remote oil filter for the tranny fluid increases filtration efficiency up to 5 times that of the stock filter in the pan. A basic kit comes with the filter, mounting base, and some fiitings. Depending on your budget you can upgrade to a kit that comes with several feet of hose and even a temp gauge. When installing a remote oil filter, here are some tips to remember. First, try to mount the filter so it isn't any higher than the oil cooler lines; this prevents the pump inside the tranny from having to overcome gravity. I have mine fastened to the frame just to the rear of the fan shroud. Second, the filter can be mounted vertically with the filter element below the mounting base, in a horizontal position, or any angle in between. But never mount it upside down or at an angle above the horizontal plane. Third, when selecting a location for the filter, try to keep it near the transmission oil cooler lines. Once you have the filter mounted, all that's left is to tap into the line carrying fluid from the tranny to the oil cooler. Most kits come with instructions on how to do this. You will cut the line and install a fitting, normally the type that has barbs for rubber hose. Next, you run a length of hose from the fitting to the inlet on the filter. You repeat the process with another fitting and hose from the filter outlet back to the oil cooler line. Fluid will flow from the tranny into the filter; out of the filter and on to the radiator cooler. An added benefit comes about if your transmission is slipping and friction material from the clutch plates rapidly wears off. The filter will catch most of this and prevent contamination of the oil cooler and return lines.
Remote filter mounted to passenger side frame (hose in from tranny and hose out to radiator cooler)
![Image]()
The top hose in this pic is from the tranny to the filter; the middle hose is from the filter to the radiator cooler; the bottom hose is from the radiator cooler to the aftermarket cooler behind the grille.
![Image]()
The hose attached to the metal line is the return from the aftermarket cooler to the tranny; the hose just underneath is from the radiator cooler to the aftermarket cooler (you can't see it in the pic but it loops up and back).
![Image]()
Side close up of filter.
![Image]()
Hoses to and from aftermarket cooler.
![Image]()
Fittings & Hose
Regardless of whether you install an aftermarket oil cooler or remote oil filter, chances are you will need fittings and/or hose. Many of these kits are universal fit so you will need specific items to complete the install on your Canyon or Colly. As I mentioned earlier, when selecting an oil cooler look for one that has 3/8" hose barb fittings already on it. Our trucks use 3/8 metallic tubing for the oil cooler lines. I found a handy fitting called a Smart Connect that mates 11/32" ID or 3/8" ID hose to 3/8" tubing. I picked them up from Makco Distributing, the part number is 'CBF38B'. Here's the webpage: Cooling products Fitting kits Makco Transmission Parts
Here's a pic.
![Image]()
On the threaded end, inside the nut is a brass sleeve sometimes referred to as a 'wedding band'. Here's how to use it: after you cut the metal tube, unscrew the nut from the fitting and slide it onto the tube. Then you slide the brass sleeve on next. The end of the fitting goes over the tube and while holding it in place you tighten the nut. The nut compresses the sleeve and tube inside the fitting to make a leakproof seal. On the opposite end of the fitting you slide on the hose and clamp it down.
Common sizes for transmission oil cooler hose are 11/32" ID, 3/8" ID, and 1/2" ID. The 11/32" hose is becoming increasingly popular because it will work on both 5/16" and 3/8" fittings. While some kits come with a four to six foot length of hose, if you need hose, most auto parts stores sell it. You can also purchase it online.
![Image]()
The factory oil cooler lines use a special 'quick disconnect' where they attach to the factory oil cooler in the radiator. A retaining clip hold them in place and a plastic collar keeps the clip from falling out. The fitting pictured below (Hayden 397) attaches to the radiator cooler in the same manner and features a hose barb, making it easy to connect a hose.
![Image]()
The cooler line fittings on the transmission itself are very similar.
![Image]()
![Image]()
If you are installing a remote oil filter kit, it should come with the fittings to attach two hoses to the mounting base. The two most common styles are 'straight hose barb' and '90 degree hose barb'. One end has tapered pipe threads.
![Image]()
![Image]()
Synthetic Automatic Transmission Fluid (ATF)
Synthetic automatic transmission fluid offers several potential benefits versus petroleum based fluid:
1. Excellent 'low temperature fluidity' resulting in both improved flow through the valve body and improved shifting in cold weather.
2. Enhanced frictional properties for smoother, more consistent shifts and longer clutch life.
3. Longer overall transmission life.
4. Better torque transfer
5. Prevents torque converter clutch shudder.
6. Higher film and shear strength.
7. Excellent resistance to thermal breakdown under extreme driving conditions and higher transmission temps.
8. Enhanced wear, rust, and corrosion protection.
9. Slightly improved fuel economy due to lower viscous drag.
10. Extended drain intervals.
Some of the more well known brands of synthetic ATF include Amsoil, Mobil 1, Red Line, and Royal Purple.
Amsoil: AMSOIL - Synthetic Universal Automatic Transmission Fluid (ATF)
Mobil 1: Mobil 1 Synthetic ATF
Red Line: Red Line Oil: Gear Lubricants
Royal Purple: Royal Purple Transmission Fluid
Dexron-VI
Traditional clutch packs utilize a combination of smooth plates and friction plates. The clutch packs on the 6L80 are entirely composed of friction plates. While designing the 6L80 6 speed automatic transmission, GM realized the need for an improved transmission fluid with special friction properties. In conjunction with two lubricant companies, GM introduced an all new Dexron for the 2006 model year. This new fluid, Dexron-VI, proved to be significantly better than previous Dexron fluids in nearly every performance category during validation testing. Further GM testing demonstrated more than twice the durability and stability in friction tests compared to Dexron-III. LUBE REPORT: GM Rolls Out Dexron-VI
Since 2006, all GM Hydramatic transmissions use Dexron-VI. In practical terms, all Canyons/Colorados built from 2006 to the present came factory filled with Dexron-VI synthetic. It is also suitable for use in earlier transmissions that called for Dexron-II or Dexron-III.
Go to this webpage and click on 'Dexron-VI for more info: GM | General Motors: Powertrain: Transmissions
It includes a list of GM approved brands of Dexron-VI. Amsoil, Red Line, and Royal Purple were not on the list. According to Amsoil's website, their Universal Synthetic Automatic Transmission FLuid (ATF) meets Dexron-III H specs. I did find several online Amsoil dealers advertising that the ATF meets Dexron-VI specs. So I emailed Amsoil and asked. The reply I received: "In January 2007, Amsoil reformulated their Universal Synthetic Automatic Transmission Fluid to meet the requirements of Dexron-VI. However, we will not be seeking GM certification". In order to receive an endorsement from GM, Amsoil would be required to pay a certification fee. To add to the confusion, Amsoils's latest 'Product Recommendation and Drain Interval Chart', dated April 2009, lists a 'Synthetic Low Viscosity Automatic Transmission Fluid' (ATL). "Recommended for automatic transmissions and other applications requiring DEXRON-VI, MERCON-LV, SP or Toyota WS. Backwards compatible and replaces DEXRON-III fluids in older GM automatic transmissions. (DEXRON-VI specification supersedes the obsolete DEXRON-III in GM vehicles.)" Nowhere on Amsoil's website could I find this new fluid. So I sent off another email to Amsoil asking for clarification. In addition, when I use the Amsoil 'Product Lookup Guide' online for my 2005 Colorado, under the listing for automatic transmission fluid, it says: "No Amsoil Product Recommendation". So the mystery continues. At this point in time, the Amsoil Universal Synthetic Automatic Transmission Fluid (ATF) should be fine for 2005 and prior model year GM transmissions requiring Dexron-III.
Red Line Oil's website shows their 'D6 ATF' is a Dexron-VI replacement.
More to follow. I am just 'scratching the surface' with this info, if I miss something important, please post it up.
In late 1981, GM introduced a 4 speed automatic transmission for the 1982 model year and designated it the 700R4. In 1992, GM began using an electronically controlled version dubbed the 4L60E.
For 1997, the 'late' version of this tranny came into use and is still in widespread use today. The version used in the Twins has an RPO code of M30.
I won't get deep into the history or specs; the following websites offer good descriptions of how this transmission evolved.
The GM 4L60E Transmission -
GM 4L60-E transmission - Wikipedia, the free encyclopedia
700R4 / 4L60 Transmission Information/ History - GmTruckHQ


Although there are folks who hate the 4L60 with a passion and the 4L80 is recognized as a much stronger unit, the 4L60 has gained much fame in the performance and aftermarket arenas. It is easy to rebuild and can be strengthened to handle significant horsepower and torque.
While growing up and early on in my 'driving' years, I preferred manual trannys over automatics. Eventually I ended up buying a used S-10 Blazer. It had a new GM Goodwrench engine, but the 700 R4 tranny was on its way out. I got the tranny rebuilt (with a basic shift kit) and almost 200K miles later, it was still going strong. I slowly began to realize that a 700R4 would last a long time if it wasn't abused and was
given proper maintenance.
After buying my Colly I would occasionally think about ways to improve the 4L60E in terms of durability. I don't consider myself to be an expert; no doubt there are members who could take a 4L60 apart and put it back together blindfolded. My intent is to share what I have learned about performance upgrades with other members who like myself were not aware.
Servos
In 2007, I installed aftermarket servos to improve shifting and prolong the life of the band and clutch packs. Before I go any further, let me give a brief description of how servos work.
Servo -a control system that converts a small mechanical motion into one requiring much greater power.
Servos are essentially aluminum pistons that apply and release the clutch band. Without getting too technical, applying and releasing clutch packs determines power flow through the planetary gearset and the end result is 1st, 2nd, 3rd, and 4th gears. The servos in the 4L60 are located on the front passenger side of the tranny housing just above the oil pan. The outer cover is circular and is held in place by a snap ring. Inside the cover is the 4th apply piston aka 'overdrive' servo. It controls the 3-4 upshift and the 4-3 downshift. Immediately behind this servo is the two piece 2nd apply servo aka 'intermediate' servo. It controls the 1-2-3 upshifts and 3-2-1 downshifts. Inside the 2nd apply servo is a stout spring; there is also another spring between the overdrive servo and the intermediate. Going lengthwise through the center of all servos is a servo pin. The outer end of the pin rests inside the overdrive servo. The opposite end is tapered and rests against the clutch band. When fluid under pressure is routed through one of several circuits, the servo(s) move in or out applying or releasing the band. This animated schematic shows how fluid flows and the servos move: 700R4 / 4L60E Animated Servo Operation
2nd Apply Servo (Intermediate)
4th Apply Servo (Overdrive)
2nd Apply Servo and Pin

3-4 Clutch Plates

Servo/Clutch Band

As I mentioned earlier, fluid pressure moves the servos. If the area of the servo that the fluid comes in contact with is increased, the servo will move with greater force. When GM began using the 700R4 in Corvettes and some Camaros, it featured an upgraded 2nd apply servo. This servo has a larger apply area and gives firmer 1-2-3 and 3-2-1 shifts. Over time it became known simply as the 'Corvette servo'. There are several different manufacterers of this servo but the dimensions are the same. In recent years, an upgrade for the 4th apply servo became available through aftermarket suppliers. It enhanced the 3-4 and 4-3 shifts.
So to sum up: the 2nd apply piston/servo is often advertised as the 'Corvette servo' or 'intermediate' servo and affects the 1-2 and 2-3 shifts. The 4th apply piston/servo or 'overdrive' servo affects the 3-4 shifts. Jet, Superior, Sonnax, and a few others make upgraded servos. Superior calls their's 'Super' servos because the intermediate has even more apply area than the Corvette servo and the overdrive has 40% more apply area than the OEM.
Servo Part Numbers:
2nd (Intermediate)
Jet Powr Servo (Corvette) 750211
Jet Billet Powr Servo 750212
Sonnax Corvette Servo 77701-04K
Sonnax 'Super Hold' Servo 77911-03K
Superior 'Super' Servo K012
TCI High Performance Servo 376005
4th (Overdrive)
Jet Billet Powr Servo 750213
Sonnax 'Super Hold' Servo 77767K
Superior 'Super' Servo K034
TCI High performance Servo 376006
Here are the websites for the above named manufacterers;
Jet Performance: JET Performance Products, Import & Domestic Performance, Performance Kits, Fuel Systems, Transmissions
Sonnax: Sonnax - Aftermarket replacement transmission, torque converter, and high performance automotive parts
Superior: Superior Transmission Parts, Inc. - Automatic Transmission Parts
TCI: TCI - Performance Transmissions and Torque Converters
Shift Kits
Shift kits aka shift improver kits, shift performance kits, or reprogramming kits have been available for years. Some include parts to directly affect shifting by modifying fluid pressure, some contain parts to correct 'weak' areas or design flaws, others allow the tranny to be shifted like a manual tranny by moving the gear shift lever, and the list goes on. Sonnax, Superior, and Transgo make basic kits for the 4L60E. B&M makes kits for 2002 and older trannys. Transgo also makes a kit called the 'HD2' - "Crisp muscle car or full race shifts. Puts the driver in command. Holds 1st, 2nd, 3rd to any speed. Backshifts to 3rd, 2nd & 1st by moving the lever". This kit doesn't work on '98 and up unless you remove torque management.
My research originally centered around a shift kit for my Colly. But then I began to realize that for my situation, it might not be money well spent. Here's why. During the mid to late '90s, vehicles with the 4L60E would sometimes throw a 'P1870' code for the torque converter. Turns out the valve that supplies fluid to the converter when it locked up would wear prematurely. Fluid would leak by the valve and the torque converter wasn't getting adequate pressure. In January 1999, GM began using an improved valve to remedy the problem. Over the years, GM also made minor performance upgrades to other areas in the transmission. When I looked more closely at the contents of the Sonnax, Superior, and Transgo kits it became apparent that the kits contained the improved valve and other parts that GM had already put into use. The kits also came with some new accumulator springs. So I would be buying and installing a collection of parts that with a few exceptions were already in late model 4L60Es.
Transgo Shift Kit

Superior Shift Kit

Sonnax Shift Kit

Typical Valve Body

Link to a video showing removal of the valve body: YouTube - Automatic Transmission Valve Body removal - 4L60E Shift Kit
Note: The valve body can be removed with the tranny in the truck. It isn't necessary to completely rmove the harness from the transmission either. Just unhook the connectors from the solenoids and move the harness out of the way.
I ran across two 'schools of thought' concerning shift kits. One is that shift kits are great for racing and high performance use. See here for the opinion of the Procare Performance tech:
eBay Store - Procare Performance Transmissions: 4L60, 700R4, 4L60E. The second is unless you have an early 4L60E that needs the improved parts, don't install a kit.
I made a few phone calls and ended up talking to the 4L60E tech at PATC (Performance Automotive and Transmission Center). I fully expected him to try and sell me a bill of goods that I would need to rob a bank to pay for. :lol: I explained that I owned an '05 Colly, that on rare occasions I towed or hauled with it, that 80-90% of my driving consists of short trips, and because of stop and go driving, my tranny was constantly shifting up and down between 1-2-3. What minor upgrades if any could I do to increase the life of the tranny? Will I get any benefit from installing a shift kit? The tech, Jim, told me to start with installing the Superior servos. I said I had already done that. He then said to install the Sonnax boost valve. (I will talk more about the boost valve later). I would see an increase in line pressure by about 10% and together with the servos would result in less clutch pack wear due to faster/firmer shifts. I also mentioned the pcm was tuned and I believed the tuner had either greatly reduced the torque mangement or eliminated it altogether. I know there are pros and cons concerning torque management and various arguments about keeping, modifying, or removing it. My opinion is this: modifying the TM function through tuning is okay as long as you take a common sense approach. The powertrain control module (pcm) controls the electronic pressure solenoid (force motor) and this directly affects line pressure. Unless you are experienced in tuning and understand how tunes can affect TM and pressure, leave that to the experts.
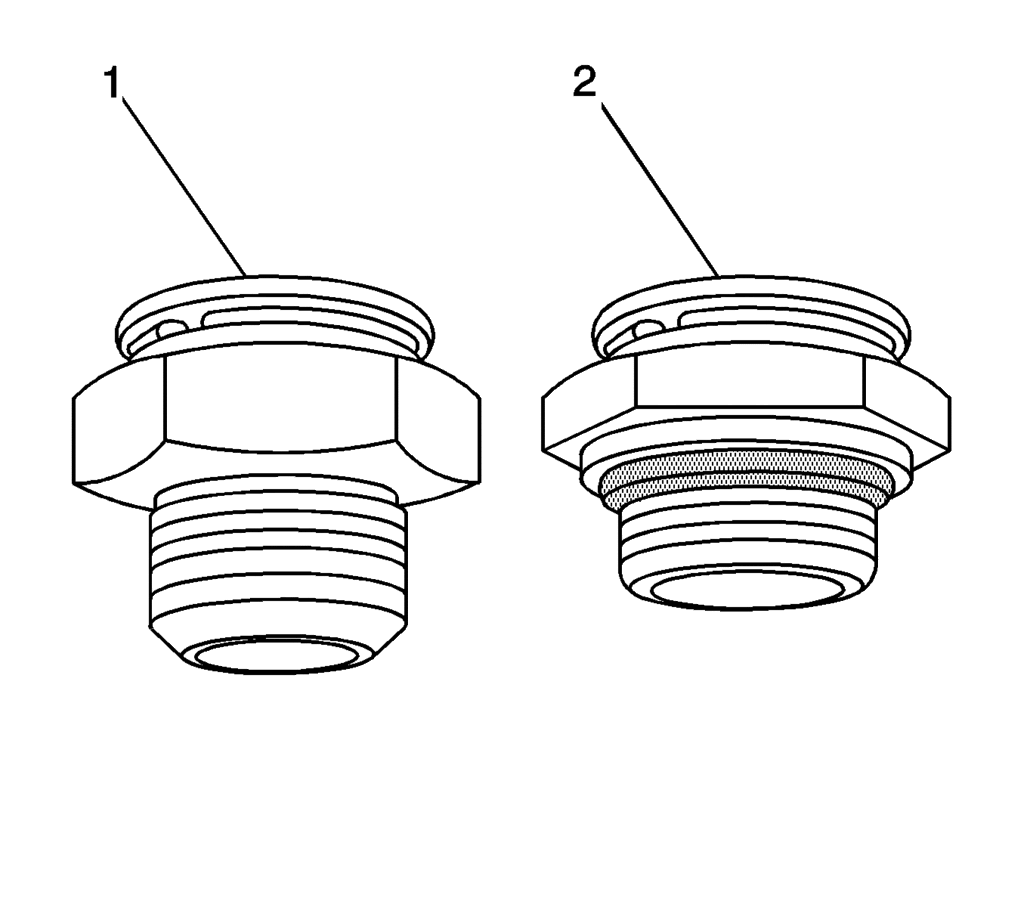
Ok, back to the boost valve. The boost valve sets in the pump and helps regulate line pressure along with the electronic pressure control solenoid. The valve assembly consists of a calibrated spring, the valve itself, a retaining sleeve, and a snap ring. Here's a pic of an aftermarket boost valve:

The OEM boost valve is .470" in diameter and over the last decade, GM made several design changes. The valve can be replaced with the tranny in the truck, but picking the correct replacement can be tricky. 4L60E trannys through 2004 use an early pump design. For 2005, GM changed the design (late pump). Sonnax (and there may be others) makes a boost valve that is .490" in diameter. "The Sonnax oversized (.490"/77898E-K, -7K) valves were designed to result in a slight/moderate boost in line pressure at mid-range (over the .470"/E-4K). They result in approximately 10-15% higher pressure line at the same EPC duty cycle over various OEM diameters".
For 2004 you would use Sonnax part number: 77898E-K and for 2005 and later use part number 77898E-7K. So if you have a Twin built in late '04 or early '05 which one do you choose? Well, the techs at Sonnax don't know the breakpoint when GM started using the late style pump. So I called the folks at PATC again. Since my Colly was built in April 2005, we are assuming that it uses the late pump boost valve. The parts tech said that if in doubt, a customer could order both and return whichever one they didn't use.
So how do you tell the difference? The boost valve for 2005 and up is slightly shorter. This link shows a pic of the valves, the difference in length, and install instructions:
http://www.powerglide.com/instructions/77898E-K-IN.pdf
A member asked me this question. "What if I install just the servos or the servos and boost valve without getting a tune"? "Will I still notice a difference"? The answer is yes.
Even without a tune, you will notice a difference in shifts. During light throttle acceleration, shifts will be slightly firmer than stock. When you really get on the throttle shifts get even more firm.
Accumulators
An accumulator acts like a 'shock absorber' for the tranny. The 4L60E has three accumulators; one for the 1-2 shift, one for the 3-4 shift, and one for Forward-Reverse. Think of a cylinder closed off on one end. Inside the cylinder is a piston and between the piston and closed end is a spring. The area above the piston is filled with fluid which can flow in or out of the cylinder through a small opening on the other end. When the tranny shifts, the excess fluid pressure enters the cylinder, momentarily pushing against the piston and compressing the spring. After the shift is complete the piston and spring transfer the accumulated energy back to the fluid outside the cylinder.
Problems may arise with OEM accumulator pistons. In the 1-2 and 3-4 accumulators, the piston is usually aluminum, is short in length, and has only one seal. Once the walls of the accumulator cylinder get worn the piston can become canted and bind up. The piston in the Forward-Reverse accumulator is usually plastic and may crack in the center where the pin rides. The resulting fluid loss causes delayed shift engagement, slips, burned clutches and / or band. Repeated back and forth movement of the accumulator piston causes the piston pin bore to wear. A fluid loss through the piston pin bore or cracks will cause the forward clutch to slip. The OEM accumulator piston may develop a large pressure leak at the pin area over a period of 50 to 100 thousand miles. The symptoms described above often appear on high mileage transmissions.
An upgrade is available. Sonnax offers 'pinless' pistons that feature dual seals and a longer length. Since they are pinless, there is no center bore, eliminating the possibility of bore wear or cracks. The dual seals and longer length prevents the piston from canting in the accumulator. The 1-2 and 3-4 accumulator use part number 77998-03K; the Forward-Reverse accumulator takes part number 77987-01K. An excellent time to consider changing pistons is during the 100K mile service.
Sonnax 1-2 Accumulator

Transmission Oil Coolers
The Twins have a factory transmission oil cooler built into the bottom of the radiator (where coolant temps are at their lowest). On the passenger side and near the top of the tranny are two 3/8" ID tubes. One tube carries fluid to the radiator cooler and the other is the return to the transmission. Having a cooler built into the radiator does have one advantage. In cold weather, as the engine warms up and coolant flows through the radiator, the cold tranny picks up some of the heat. This helps the tranny warm up faster; until the fluid reaches a certain temp, the torque converter will not lock up.
There are two disadvantages to this type of cooler. First, on rare occasions the cooler inside the radiator can stress fracture and allow tranny fluid to contaminate the coolant. Second, in hot weather conditions, when driving up steep hills or towing, it's normal for the tranny fluid to get hotter than usual. At the same time the engine, because it's working harder, also runs slightly hotter. The tranny fluid isn't able to give off its' heat to the coolant like it normally would. Why is this situation potentially harmful? To answer this question, lets look at where the heat in the tranny comes from. Since the tranny bolts to the back of the engine some of the heat from the engine is conducted through the bellhousing. The biggest source of heat is from the torque converter. The torque converter impeller receives high pressure fluid from the tranny pump. The fins inside the impeller 'sling' this fluid against the fins of the turbine. The turbine is splined to the input shaft of the tranny. Since the torque converter is bolted to the flywheel, this allows the transfer of power from the engine to the transmission. Because of the laws of physics, when you force tranny fluid to move in this manner, heat is produced. This webpage gives a good description of how a torque converter works and shows the internal parts: TCI - TECHNICAL INFORMATION: Torque Converters Explained
When petroleum based tranny fluid gets to temps of 250 degrees Fahrenheit or higher, it begins to breakdown. It then begins to lose its' special properties so the friction material on clutch plates starts to wear quicker and seals start to soften. Fluid temps below 225 degrees are ideal. Experts claim that a 20 degree drop in fluid temp can double the life of a tranny.

Aftermarket oil coolers are available to prevent or eliminate high fluid temps. They come in three basic styles: tube and fin, sandwiched plate, and a combination cooler with electric fan.
Tube and Fin

Sandwiched Plate

Cooler with Electric Fan

These coolers are typically mounted in front of the radiator/AC condenser to ensure maximum airflow when the truck is moving. The dimensions of some coolers allows them to be mounted to the frame to save space. Again, having adequate clearance for airflow is important. Size for size, the tube and fin type is usually least expensive, then the plate type, with the cooler fan combo costing the most. I would recommend the plate type over the tube and fin for three reasons. The plate cooler is more resistant to damage from road debris thrown up by vehicle tires. This type of cooler is also more thermally efficient; it does a better job of transferring heat from the fluid to the moving air. Last, it's rumored that the tube and fin type can restrict fluid flow One note of caution: in extreme cold, petroleum based tranny fluid will thicken.
The small passages in the plate cooler may restrict fluid flow until the fluid warms up. B&M and Tru-Cool both offer plate coolers with a bypass feature. Cold fluid coming in bypasses the main portion of the cooler and goes directly to the return line.
So what size cooler would you need? Cooler sizes are based on gross vehicle weight (GVW). Add the curb weight of your Canyon/Colly + the weight of the trailer you plan to tow + the weight of the items on the trailer to get your GVW. Keep in mind the curb weight of your truck includes passengers, cargo in the bed of the truck, plus added accessories like brush guards, lift kits, etc.
Once you determine your GVW, round it up to the nearest thousand. This is the minimum size cooler to use. If you go a size or two bigger, thats fine as long as you have the space to mount it. I only tow on rare occasions but I installed a cooler anyway. Even if you never tow or haul, an aftermarket cooler is still a good investment.
Coolers can be mounted in one of several ways. Some coolers come with long straps that go through the radiator/condenser. This is the easiest but least preferred method, since it damages the fins. Coolers may also come with metal straps that can be used to mount it to the radiator support. Or you can custom fabricate your own brackets. Here are a few pics of my install with homemade brackets.


The experts recommend that you install an aftermarket cooler in 'series' with the factory. It's relatively easy. Get underneath your truck and find where the tranny cooler lines attach to the bottom of the radiator. The passenger side line is the return to the transmission. You cut this line, add a fitting, and then run a length of rubber hose to one of the fittings on your new cooler.
Then run a piece of rubber hose from the other fitting back to the other half of the cut return line. Fluid flows like this: it leaves the tranny and goes to the driver's side of the radiator; leaves the passenger side and flows to the aftermarket cooler; leaves the cooler and goes back to the tranny. Installing the cooler in this manner won't void the factory warranty on new trucks and it allows the tranny fluid to get warmed up by the radiator in cold weather. Here are the 'How To' links for doing an install: How-To: Install an auxillary transmission cooler on your truck - 355Nation Chevy Colorado & GMC Canyon • View topic - How to install a transmission cooler in your Colorado 3.5
In addition, a cooler with barb fittings for 3/8" hose makes installing it easier since the oil cooler lines are the same size.
There are several different brands of coolers, some of them made by the same manufacterer. For example, the B&M, Long, and Tru-Cool plate style.
I've compiled a list of the major brands and their websites/catalogs:
B&M: Coolers
Derale: http://www.derale.com/catalog.pdf
Hayden/Imperial: Hayden Products Catalogs
Perma Cool: Thin Line Trans Cooler Kits
Heavy Duty Trans Cooler Kits
Long/Tru Cool: http://www.dana.com.br/Automotivo/GerenciamentoTermico/images/TC_Brochure_2004_Website.pdf
Transmission Cooler Quick Guide: Cooling products Cooler Quick Guide Makco Transmission Parts
Remote Oil Filter


Installing a remote oil filter for the tranny fluid increases filtration efficiency up to 5 times that of the stock filter in the pan. A basic kit comes with the filter, mounting base, and some fiitings. Depending on your budget you can upgrade to a kit that comes with several feet of hose and even a temp gauge. When installing a remote oil filter, here are some tips to remember. First, try to mount the filter so it isn't any higher than the oil cooler lines; this prevents the pump inside the tranny from having to overcome gravity. I have mine fastened to the frame just to the rear of the fan shroud. Second, the filter can be mounted vertically with the filter element below the mounting base, in a horizontal position, or any angle in between. But never mount it upside down or at an angle above the horizontal plane. Third, when selecting a location for the filter, try to keep it near the transmission oil cooler lines. Once you have the filter mounted, all that's left is to tap into the line carrying fluid from the tranny to the oil cooler. Most kits come with instructions on how to do this. You will cut the line and install a fitting, normally the type that has barbs for rubber hose. Next, you run a length of hose from the fitting to the inlet on the filter. You repeat the process with another fitting and hose from the filter outlet back to the oil cooler line. Fluid will flow from the tranny into the filter; out of the filter and on to the radiator cooler. An added benefit comes about if your transmission is slipping and friction material from the clutch plates rapidly wears off. The filter will catch most of this and prevent contamination of the oil cooler and return lines.
Remote filter mounted to passenger side frame (hose in from tranny and hose out to radiator cooler)

The top hose in this pic is from the tranny to the filter; the middle hose is from the filter to the radiator cooler; the bottom hose is from the radiator cooler to the aftermarket cooler behind the grille.

The hose attached to the metal line is the return from the aftermarket cooler to the tranny; the hose just underneath is from the radiator cooler to the aftermarket cooler (you can't see it in the pic but it loops up and back).

Side close up of filter.

Hoses to and from aftermarket cooler.

Fittings & Hose
Regardless of whether you install an aftermarket oil cooler or remote oil filter, chances are you will need fittings and/or hose. Many of these kits are universal fit so you will need specific items to complete the install on your Canyon or Colly. As I mentioned earlier, when selecting an oil cooler look for one that has 3/8" hose barb fittings already on it. Our trucks use 3/8 metallic tubing for the oil cooler lines. I found a handy fitting called a Smart Connect that mates 11/32" ID or 3/8" ID hose to 3/8" tubing. I picked them up from Makco Distributing, the part number is 'CBF38B'. Here's the webpage: Cooling products Fitting kits Makco Transmission Parts
Here's a pic.

On the threaded end, inside the nut is a brass sleeve sometimes referred to as a 'wedding band'. Here's how to use it: after you cut the metal tube, unscrew the nut from the fitting and slide it onto the tube. Then you slide the brass sleeve on next. The end of the fitting goes over the tube and while holding it in place you tighten the nut. The nut compresses the sleeve and tube inside the fitting to make a leakproof seal. On the opposite end of the fitting you slide on the hose and clamp it down.
Common sizes for transmission oil cooler hose are 11/32" ID, 3/8" ID, and 1/2" ID. The 11/32" hose is becoming increasingly popular because it will work on both 5/16" and 3/8" fittings. While some kits come with a four to six foot length of hose, if you need hose, most auto parts stores sell it. You can also purchase it online.

The factory oil cooler lines use a special 'quick disconnect' where they attach to the factory oil cooler in the radiator. A retaining clip hold them in place and a plastic collar keeps the clip from falling out. The fitting pictured below (Hayden 397) attaches to the radiator cooler in the same manner and features a hose barb, making it easy to connect a hose.

The cooler line fittings on the transmission itself are very similar.

If you are installing a remote oil filter kit, it should come with the fittings to attach two hoses to the mounting base. The two most common styles are 'straight hose barb' and '90 degree hose barb'. One end has tapered pipe threads.


Synthetic Automatic Transmission Fluid (ATF)
Synthetic automatic transmission fluid offers several potential benefits versus petroleum based fluid:
1. Excellent 'low temperature fluidity' resulting in both improved flow through the valve body and improved shifting in cold weather.
2. Enhanced frictional properties for smoother, more consistent shifts and longer clutch life.
3. Longer overall transmission life.
4. Better torque transfer
5. Prevents torque converter clutch shudder.
6. Higher film and shear strength.
7. Excellent resistance to thermal breakdown under extreme driving conditions and higher transmission temps.
8. Enhanced wear, rust, and corrosion protection.
9. Slightly improved fuel economy due to lower viscous drag.
10. Extended drain intervals.
Some of the more well known brands of synthetic ATF include Amsoil, Mobil 1, Red Line, and Royal Purple.
Amsoil: AMSOIL - Synthetic Universal Automatic Transmission Fluid (ATF)
Mobil 1: Mobil 1 Synthetic ATF
Red Line: Red Line Oil: Gear Lubricants
Royal Purple: Royal Purple Transmission Fluid
Dexron-VI
Traditional clutch packs utilize a combination of smooth plates and friction plates. The clutch packs on the 6L80 are entirely composed of friction plates. While designing the 6L80 6 speed automatic transmission, GM realized the need for an improved transmission fluid with special friction properties. In conjunction with two lubricant companies, GM introduced an all new Dexron for the 2006 model year. This new fluid, Dexron-VI, proved to be significantly better than previous Dexron fluids in nearly every performance category during validation testing. Further GM testing demonstrated more than twice the durability and stability in friction tests compared to Dexron-III. LUBE REPORT: GM Rolls Out Dexron-VI
Since 2006, all GM Hydramatic transmissions use Dexron-VI. In practical terms, all Canyons/Colorados built from 2006 to the present came factory filled with Dexron-VI synthetic. It is also suitable for use in earlier transmissions that called for Dexron-II or Dexron-III.
Go to this webpage and click on 'Dexron-VI for more info: GM | General Motors: Powertrain: Transmissions
It includes a list of GM approved brands of Dexron-VI. Amsoil, Red Line, and Royal Purple were not on the list. According to Amsoil's website, their Universal Synthetic Automatic Transmission FLuid (ATF) meets Dexron-III H specs. I did find several online Amsoil dealers advertising that the ATF meets Dexron-VI specs. So I emailed Amsoil and asked. The reply I received: "In January 2007, Amsoil reformulated their Universal Synthetic Automatic Transmission Fluid to meet the requirements of Dexron-VI. However, we will not be seeking GM certification". In order to receive an endorsement from GM, Amsoil would be required to pay a certification fee. To add to the confusion, Amsoils's latest 'Product Recommendation and Drain Interval Chart', dated April 2009, lists a 'Synthetic Low Viscosity Automatic Transmission Fluid' (ATL). "Recommended for automatic transmissions and other applications requiring DEXRON-VI, MERCON-LV, SP or Toyota WS. Backwards compatible and replaces DEXRON-III fluids in older GM automatic transmissions. (DEXRON-VI specification supersedes the obsolete DEXRON-III in GM vehicles.)" Nowhere on Amsoil's website could I find this new fluid. So I sent off another email to Amsoil asking for clarification. In addition, when I use the Amsoil 'Product Lookup Guide' online for my 2005 Colorado, under the listing for automatic transmission fluid, it says: "No Amsoil Product Recommendation". So the mystery continues. At this point in time, the Amsoil Universal Synthetic Automatic Transmission Fluid (ATF) should be fine for 2005 and prior model year GM transmissions requiring Dexron-III.
Red Line Oil's website shows their 'D6 ATF' is a Dexron-VI replacement.
More to follow. I am just 'scratching the surface' with this info, if I miss something important, please post it up.