

Disclaimer
The community here at 355nation.net urges you to please use caution and seek professional assistance when performing modifications to your vehicle. Before attempting any modification it is advised that you refer to your Colorado or Canyon service manual or contact a certified mechanic as not all GMT355 trucks are the same. The staff and the associated members are in no way responsible for any damages, injuries or other harm inflicted to your vehicle or yourself which may result in attempting these modifications. The posts and content presented on this site reflect in no way the views of 355nation.net or it’s ownership.
![Image]()
A 355nation HOW TO presented by
Canyon08Z71 & Ssgjurista
with additional information contributed by philmiami and jlong
Project Name
How To: HVAC Fan Motor Resistor & Connector Replacement, Fan Motor Ground Reconditioning & Repair
Project Description
HVAC Fan Motor: Resistor & Connector replacement.
Skill Level
Moderate
Project Vehicle
Make: GMC
Model: Canyon
Year: 2004
Engine: 3.5L
Power windows: Yes
Sun Roof: No
Tools
Wire cutter/stripper/crimper
10mm 1/4" drive socket
Sandpaper or flat file or dremel tool with a sanding disc
Optional: 7mm socket, 1/4" drive extension, and 1/4" drive ratchet OR 7mm wrench
Soldering iron and solder
Pliers or vice grips
M6 X 1.50 tap
Stainless steel M6 X 25mm bolt
Parts needed
Touchup paint or RTV silicone
Shakeproof ('Star') washers to fit M6 bolt
Optional: Crimp type or solder type ring terminals for 10-12 guage wire
GM Parts List:
Note:
The resistor needs to be purchased to complete the repair. You can either decide to splice in a replacement connector or replace the entire wiring harness.
Another option is to buy the resistor, connector and harness as a package. See photos below.
Resistor- p/n 15218254 $9.57*
Connector- p/n 15306069 $30.70*
Complete wiring harness - p/n 89019124 $23.52* (no splicing required)
Package deal (p/n PK15218254) $31.97 * Same P/N on GMPartsDirect.com NOW $34.87
![Image]()
* listed on GM Parts Direct: Your direct source for Genuine GM Parts
Project Time
30 minutes
Project Cost
See above under Parts Needed
Fan Motor Electrical Schematics Review
Please refer to the first schematic at the end of this 'How To'.
There is battery voltage at all times to the 'IGN 3 HVAC Relay 59' in the fuse block. With the ignition switch in the 'ACC' or 'ON' positions, the Body Control Module (BCM) provides ground on the Orange wire. The relay energizes and voltage flows through the Blower Fuse 41 (30A) and leaves the fuse block on the Brown wire and travels to the Blower Motor. It passes through the Blower Motor and follows the Orange wire until it reaches the splice S202. With the fan speed set to #4 (High), the voltage goes to the HVAC Module (HVAC controls below the radio) on the Orange wire, through the Blower Motor Switch on the High circuit, and then exits the HVAC Module on the Black wire and ends up at Location 'F' on the Splice Pack (SP 106). The Blower Motor runs at High speed.
Let's go back to Splice S202 again and this time the fan speed is set to #3 (M2). Voltage now travels the opposite Orange wire to the Blower Motor Resistor Assembly.
After passing through a resistor, a reduced voltage follows the Light Blue wire to the HVAC Module, goes through the Switch on the M2 circuit, and exits on the Black wire to SP 106. The Blower Motor runs at a lower speed.
For fan speeds #2 (M1) and #1 (Low) the voltage still goes to the Resistor Assembly but passes through resistors in series and exits on the Tan and Yellow wires, respectively, before going to the HVAC Module and Blower Motor Switch and then to SP 106.
Please refer to the Ground Distribution Part 5 & 6 Schematics.
Splice Pack 106 consists of a small black plastic box where several ground wires meet. Inside the box, the wires are attached to a metal ground strap. The strap is bolted to a sheet metal ground and is known as Ground 106 (G106). On the previous schematic, the Black ground wire from the HVAC Module entered SP 106 at Location 'F'. On these schematics, it shows two Locations: 'F' and 'G'. 'F' is for the Blower Motor and 'G' is for the Logic circuit within the module. SP 106 and G106 are located on the inside of the right front fender behind the air cleaner. The first pic shows the lid removed from the air cleaner. The next two pics show the air cleaner removed for clarity.
![Image]()
![Image]()
![Image]()
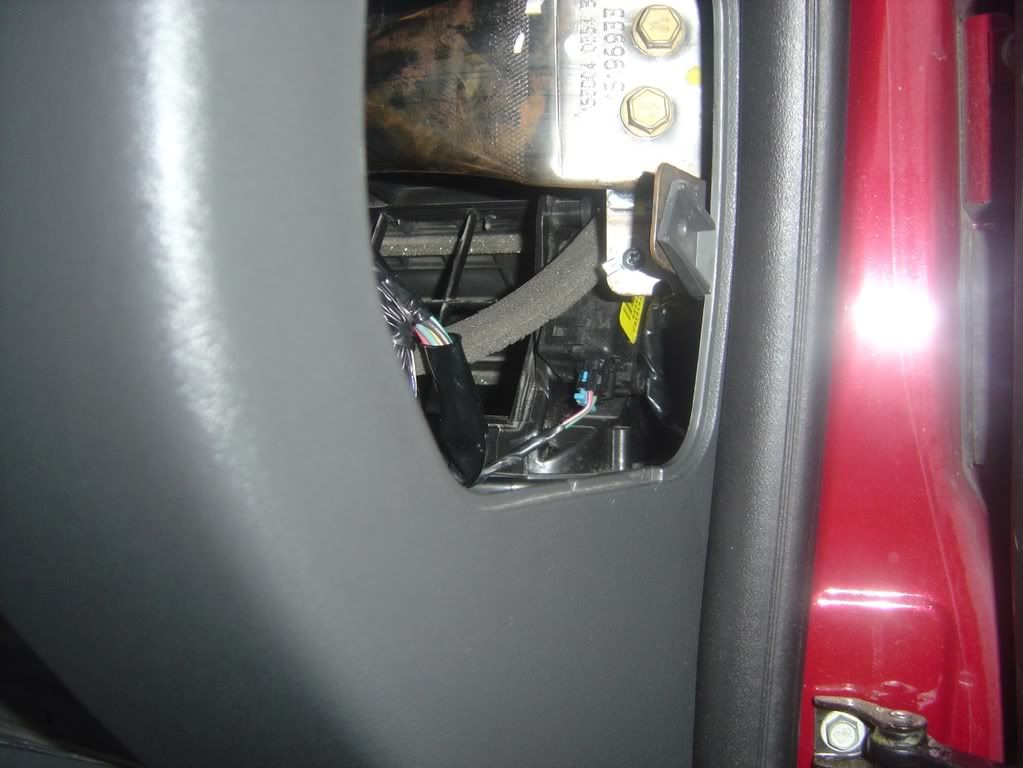
HVAC Fan Motor Legend:
--------------------------
1 - Resistor
2 - Blower Motor Cooling Tube
3 - Blower Motor
4 - Blower Motor Electrical Connector
5 - HVAC system
![Image]()
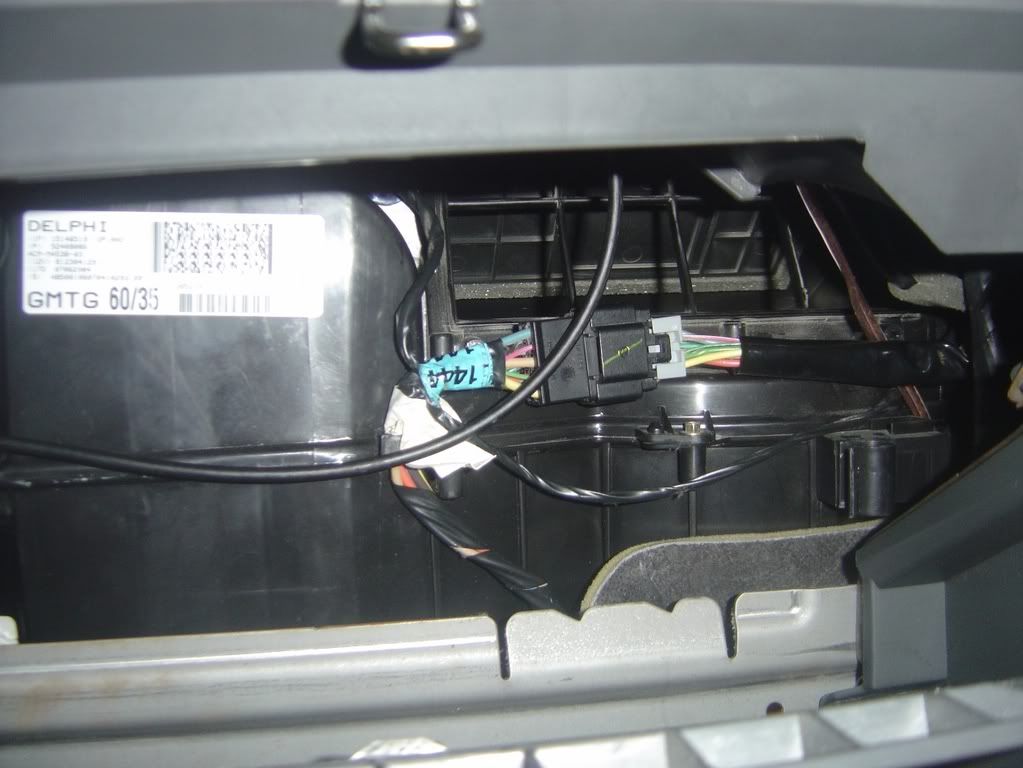
Legend:
--------
1 - Blower motor resistor electrical connector
2 - Blower motor resistor
3 - Blower motor
![Image]()
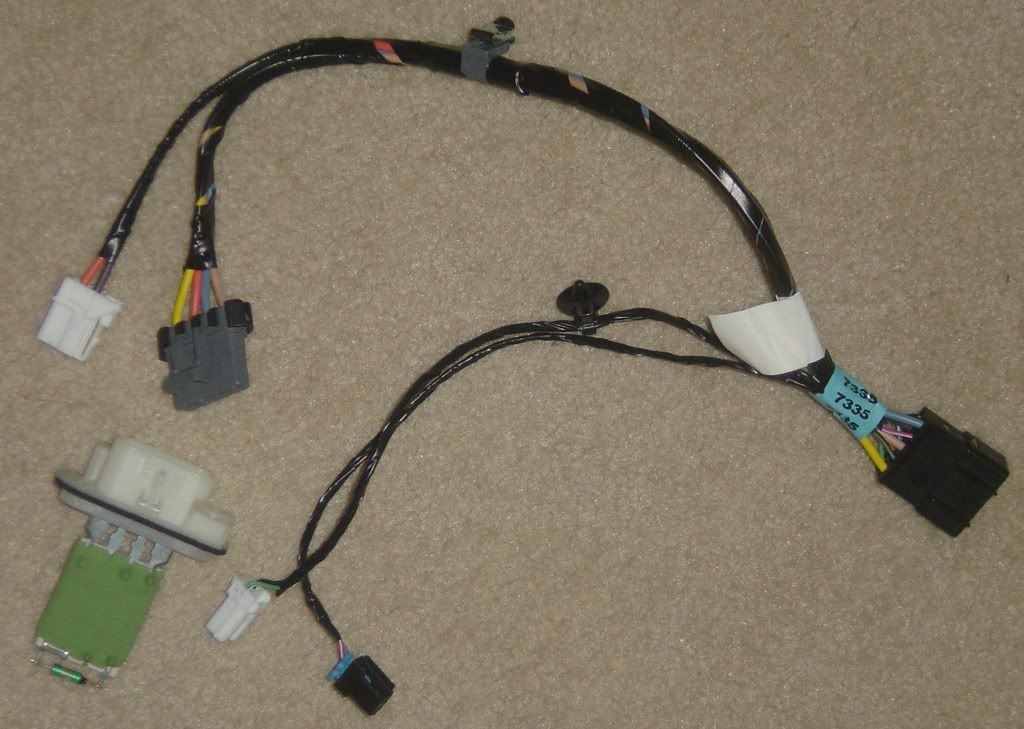
HVAC Resistor Wiring Harness Legend:
------------------------------------
1) Evaporator Temperature Sensor (C60)
(2) C203 (I/P Harness to the HVAC Harness)
(3) Recirculation Actuator (C60)
(4) Blower Motor
(5) S202
(6) Blower Motor Resistor Assembly
![Image]()
Location: Passenger side part of the dash (underneath glove box).
Canyon08Z71's Repair
Symptoms: When starting my truck for the first time on cold Winter days, the fan motor didn't work on setting #1, #2, or #3. Only setting #4 (High) worked to turn on the fan. Once the truck warmed up, the HVAC fan motor settings #1 through #4 worked fine.
Problem found: Burnt up terminals for the resistor and connector. Plastic housing for resistor and connector melted.
![Image]()
![Image]()
![Image]()
![Image]()
philmiami's Repair
My fan control quit working on setting number 3. The problem began after I had a dealership replace the blower motor because of the whining noise it made when it was still under the 3-year/36K mile warranty. Sometimes I would have to reach under the dash and push up the connector because the fan would quit working, most of the time while driving. It was very annoying. I went and looked and the blue wire was changing to a burnt-looking color. I knew it was the resistor going bad and it really melted the connector. I went to rockauto.com to find the parts; their catalog is superb for finding parts for most vehicles.
I ordered the parts; a new connector (which cost 3 times the price of the resistor) and resistor and had them shipped 2-day FedEx. The connector comes with gray wires so don't mix up the colors when you cut and splice to the original harness. It comes with 4 butt connectors so this was an easy fix.
![Image]()
![Image]()
![Image]()
![Image]()
![Image]()
![Image]()
jlong's Repair (using replacement harness):
Note:
jlong dropped the glovebox and access panel from the side of the dash to make it easier to install the new harness. To take the glovebox out, do the following.
Support the glovebox with one hand and remove the three screws along the bottom edge of the glovebox. Open the glovebox to the full open position while continuing to support it. Now squeeze the sides of the glovebox toward each other so they clear the dash and pull the glovebox free. Reach up inside the dash and push the side panel out.
When finished with repairs, reverse the steps above to reinstall.
![Image]()
![Image]()
![Image]()
Ground Reconditioning & Repair
The Splice Pack (SP 106) and the Ground (G106) are suspected to be the primary cause for the resistor, connector, and harness overheating, arcing, and getting burned.
This is what 'hrkart66' posted on CFans in December 2008:
Quote: Hello everyone. I'm new here but I do have some tips. I am the fleet manager for a Miller dist.
TRY THIS BEFORE BUYING MORE DELPHI CR@P
1. If you haven't already, replace the connector to the blower motor resistor.
2. If the blower has stopped working altogether.
A. Pull the connector out of the blower motor and check the orange wire for continuity to ground with the a/c control set to any fan speed.
B. If there is no ground present go under the hood and looking over the passenger fender between the air box and the inner fender you will see a small
black box with at least 4 wires coming out of it and it will be bolted to the fender with a 10mm bolt. This is a ground distribution point and it SUCKS. It
will be about 1.5 inches by .5 in thick. I have found the first time that scuffing the area around where the bolt goes to bare metal will work but now
I just cut them all as close to the dist. block as possible and use 2 ring terminals big enough for 2 wires and bolt it back on.
Also, they don't tell you this but the burnt resistor connector is caused by the intermittent grounding issue and we also have found that the trucks that we did this to before doing the brake switch recall haven't had that problem. If you notice that with the wires cut from the dist. block or if you take the top part of it off and break the connections and turn on the key you will get all sorts of messages from the inst. cluster like brake and abs fault. End quote
Method 1
Can be done without removing the air cleaner.
1. Remove the bolt holding the splice pack and ground from the inside of the fender. The bolt will stay with the strap.
2. Using sandpaper, a flat file, or a dremel tool, remove the coating on both sides of the ground strap until you can see brass showing.
3. Remove the paint around the hole where the strap rests against the fender.
4. Place a 'star' washer on the bolt and slide it against the strap.
5. Reinstall the bolt, splice pack, and ground to the fender and tighten.
6. Apply several light coats of touch-up paint or a bead of RTV to seal the connection.
Method 2
This is the method I used and requires removing the air cleaner.
1. Remove the bolt holding the splice pack and ground from the inside of the fender. The bolt will stay with the strap.
2. Work the bolt out of the strap; this requires a bit of patience, and discard the bolt.
3. Using sandpaper, a flat file, or a dremel tool, remove the coating on both sides of the ground strap until you can see brass showing.
4. Remove the paint around the hole where the strap rests against the fender.
5. Run an M6 X 1.50 tap through the threads of the hole in the fender.
6. Place a star washer on a stainless steel M6 X 25mm bolt.
7. Put the bolt through the strap and place another star washer on the bolt.
8. Reinstall the bolt, splice pack, and ground to the fender and tighten.
9. Apply several light coats of touch-up paint or a bead of RTV to seal the connection.
Method 3
1. Remove the bolt holding the splice pack and ground from the inside of the fender. The bolt will stay with the strap.
2. Work the bolt out of the strap; this requires a bit of patience, and save the bolt.
3. Using sandpaper, a flat file, or a dremel tool, remove the coating on both sides of the ground strap until you can see brass showing.
4. Carefully break open the plastic box on the splice pack.
5. Cut off the wires where they connect inside and discard the plastic box and strap.
6. Strip off about 1/2"-3/4" of the insulation from each wire.
7. Divide the wires into two groups.
8. Place one group of wires into a ring terminal and crimp the terminal onto the wires.
9. Repeat Step 8 for the second group of wires.
10. Place a 'star' washer on the bolt and put it through the ring terminals.
11. Place another star washer on the bolt.
12. Install the bolt, washers, and terminals to the fender and tighten.
13. Apply several light coats of touch-up paint or a bead of RTV to seal the connection.
If you desire, instead of using the crimp type terminals, you can use the non-insulated type and solder them to the wires.
How To: HVAC Fan Motor Resistor & Connector Replacement
The community here at 355nation.net urges you to please use caution and seek professional assistance when performing modifications to your vehicle. Before attempting any modification it is advised that you refer to your Colorado or Canyon service manual or contact a certified mechanic as not all GMT355 trucks are the same. The staff and the associated members are in no way responsible for any damages, injuries or other harm inflicted to your vehicle or yourself which may result in attempting these modifications. The posts and content presented on this site reflect in no way the views of 355nation.net or it’s ownership.
A 355nation HOW TO presented by
Canyon08Z71 & Ssgjurista
with additional information contributed by philmiami and jlong
Project Name
How To: HVAC Fan Motor Resistor & Connector Replacement, Fan Motor Ground Reconditioning & Repair
Project Description
HVAC Fan Motor: Resistor & Connector replacement.
Skill Level
Moderate
Project Vehicle
Make: GMC
Model: Canyon
Year: 2004
Engine: 3.5L
Power windows: Yes
Sun Roof: No
Tools
Wire cutter/stripper/crimper
10mm 1/4" drive socket
Sandpaper or flat file or dremel tool with a sanding disc
Optional: 7mm socket, 1/4" drive extension, and 1/4" drive ratchet OR 7mm wrench
Soldering iron and solder
Pliers or vice grips
M6 X 1.50 tap
Stainless steel M6 X 25mm bolt
Parts needed
Touchup paint or RTV silicone
Shakeproof ('Star') washers to fit M6 bolt
Optional: Crimp type or solder type ring terminals for 10-12 guage wire
GM Parts List:
Note:
The resistor needs to be purchased to complete the repair. You can either decide to splice in a replacement connector or replace the entire wiring harness.
Another option is to buy the resistor, connector and harness as a package. See photos below.
Resistor- p/n 15218254 $9.57*
Connector- p/n 15306069 $30.70*
Complete wiring harness - p/n 89019124 $23.52* (no splicing required)
Package deal (p/n PK15218254) $31.97 * Same P/N on GMPartsDirect.com NOW $34.87

* listed on GM Parts Direct: Your direct source for Genuine GM Parts
Project Time
30 minutes
Project Cost
See above under Parts Needed
Fan Motor Electrical Schematics Review
Please refer to the first schematic at the end of this 'How To'.
There is battery voltage at all times to the 'IGN 3 HVAC Relay 59' in the fuse block. With the ignition switch in the 'ACC' or 'ON' positions, the Body Control Module (BCM) provides ground on the Orange wire. The relay energizes and voltage flows through the Blower Fuse 41 (30A) and leaves the fuse block on the Brown wire and travels to the Blower Motor. It passes through the Blower Motor and follows the Orange wire until it reaches the splice S202. With the fan speed set to #4 (High), the voltage goes to the HVAC Module (HVAC controls below the radio) on the Orange wire, through the Blower Motor Switch on the High circuit, and then exits the HVAC Module on the Black wire and ends up at Location 'F' on the Splice Pack (SP 106). The Blower Motor runs at High speed.
Let's go back to Splice S202 again and this time the fan speed is set to #3 (M2). Voltage now travels the opposite Orange wire to the Blower Motor Resistor Assembly.
After passing through a resistor, a reduced voltage follows the Light Blue wire to the HVAC Module, goes through the Switch on the M2 circuit, and exits on the Black wire to SP 106. The Blower Motor runs at a lower speed.
For fan speeds #2 (M1) and #1 (Low) the voltage still goes to the Resistor Assembly but passes through resistors in series and exits on the Tan and Yellow wires, respectively, before going to the HVAC Module and Blower Motor Switch and then to SP 106.
Please refer to the Ground Distribution Part 5 & 6 Schematics.
Splice Pack 106 consists of a small black plastic box where several ground wires meet. Inside the box, the wires are attached to a metal ground strap. The strap is bolted to a sheet metal ground and is known as Ground 106 (G106). On the previous schematic, the Black ground wire from the HVAC Module entered SP 106 at Location 'F'. On these schematics, it shows two Locations: 'F' and 'G'. 'F' is for the Blower Motor and 'G' is for the Logic circuit within the module. SP 106 and G106 are located on the inside of the right front fender behind the air cleaner. The first pic shows the lid removed from the air cleaner. The next two pics show the air cleaner removed for clarity.


HVAC Fan Motor Legend:
--------------------------
1 - Resistor
2 - Blower Motor Cooling Tube
3 - Blower Motor
4 - Blower Motor Electrical Connector
5 - HVAC system

Legend:
--------
1 - Blower motor resistor electrical connector
2 - Blower motor resistor
3 - Blower motor

HVAC Resistor Wiring Harness Legend:
------------------------------------
1) Evaporator Temperature Sensor (C60)
(2) C203 (I/P Harness to the HVAC Harness)
(3) Recirculation Actuator (C60)
(4) Blower Motor
(5) S202
(6) Blower Motor Resistor Assembly

Location: Passenger side part of the dash (underneath glove box).
Canyon08Z71's Repair
Symptoms: When starting my truck for the first time on cold Winter days, the fan motor didn't work on setting #1, #2, or #3. Only setting #4 (High) worked to turn on the fan. Once the truck warmed up, the HVAC fan motor settings #1 through #4 worked fine.
Problem found: Burnt up terminals for the resistor and connector. Plastic housing for resistor and connector melted.


philmiami's Repair
My fan control quit working on setting number 3. The problem began after I had a dealership replace the blower motor because of the whining noise it made when it was still under the 3-year/36K mile warranty. Sometimes I would have to reach under the dash and push up the connector because the fan would quit working, most of the time while driving. It was very annoying. I went and looked and the blue wire was changing to a burnt-looking color. I knew it was the resistor going bad and it really melted the connector. I went to rockauto.com to find the parts; their catalog is superb for finding parts for most vehicles.
I ordered the parts; a new connector (which cost 3 times the price of the resistor) and resistor and had them shipped 2-day FedEx. The connector comes with gray wires so don't mix up the colors when you cut and splice to the original harness. It comes with 4 butt connectors so this was an easy fix.


jlong's Repair (using replacement harness):
Note:
jlong dropped the glovebox and access panel from the side of the dash to make it easier to install the new harness. To take the glovebox out, do the following.
Support the glovebox with one hand and remove the three screws along the bottom edge of the glovebox. Open the glovebox to the full open position while continuing to support it. Now squeeze the sides of the glovebox toward each other so they clear the dash and pull the glovebox free. Reach up inside the dash and push the side panel out.
When finished with repairs, reverse the steps above to reinstall.
Ground Reconditioning & Repair
The Splice Pack (SP 106) and the Ground (G106) are suspected to be the primary cause for the resistor, connector, and harness overheating, arcing, and getting burned.
This is what 'hrkart66' posted on CFans in December 2008:
Quote: Hello everyone. I'm new here but I do have some tips. I am the fleet manager for a Miller dist.
TRY THIS BEFORE BUYING MORE DELPHI CR@P
1. If you haven't already, replace the connector to the blower motor resistor.
2. If the blower has stopped working altogether.
A. Pull the connector out of the blower motor and check the orange wire for continuity to ground with the a/c control set to any fan speed.
B. If there is no ground present go under the hood and looking over the passenger fender between the air box and the inner fender you will see a small
black box with at least 4 wires coming out of it and it will be bolted to the fender with a 10mm bolt. This is a ground distribution point and it SUCKS. It
will be about 1.5 inches by .5 in thick. I have found the first time that scuffing the area around where the bolt goes to bare metal will work but now
I just cut them all as close to the dist. block as possible and use 2 ring terminals big enough for 2 wires and bolt it back on.
Also, they don't tell you this but the burnt resistor connector is caused by the intermittent grounding issue and we also have found that the trucks that we did this to before doing the brake switch recall haven't had that problem. If you notice that with the wires cut from the dist. block or if you take the top part of it off and break the connections and turn on the key you will get all sorts of messages from the inst. cluster like brake and abs fault. End quote
Method 1
Can be done without removing the air cleaner.
1. Remove the bolt holding the splice pack and ground from the inside of the fender. The bolt will stay with the strap.
2. Using sandpaper, a flat file, or a dremel tool, remove the coating on both sides of the ground strap until you can see brass showing.
3. Remove the paint around the hole where the strap rests against the fender.
4. Place a 'star' washer on the bolt and slide it against the strap.
5. Reinstall the bolt, splice pack, and ground to the fender and tighten.
6. Apply several light coats of touch-up paint or a bead of RTV to seal the connection.
Method 2
This is the method I used and requires removing the air cleaner.
1. Remove the bolt holding the splice pack and ground from the inside of the fender. The bolt will stay with the strap.
2. Work the bolt out of the strap; this requires a bit of patience, and discard the bolt.
3. Using sandpaper, a flat file, or a dremel tool, remove the coating on both sides of the ground strap until you can see brass showing.
4. Remove the paint around the hole where the strap rests against the fender.
5. Run an M6 X 1.50 tap through the threads of the hole in the fender.
6. Place a star washer on a stainless steel M6 X 25mm bolt.
7. Put the bolt through the strap and place another star washer on the bolt.
8. Reinstall the bolt, splice pack, and ground to the fender and tighten.
9. Apply several light coats of touch-up paint or a bead of RTV to seal the connection.
Method 3
1. Remove the bolt holding the splice pack and ground from the inside of the fender. The bolt will stay with the strap.
2. Work the bolt out of the strap; this requires a bit of patience, and save the bolt.
3. Using sandpaper, a flat file, or a dremel tool, remove the coating on both sides of the ground strap until you can see brass showing.
4. Carefully break open the plastic box on the splice pack.
5. Cut off the wires where they connect inside and discard the plastic box and strap.
6. Strip off about 1/2"-3/4" of the insulation from each wire.
7. Divide the wires into two groups.
8. Place one group of wires into a ring terminal and crimp the terminal onto the wires.
9. Repeat Step 8 for the second group of wires.
10. Place a 'star' washer on the bolt and put it through the ring terminals.
11. Place another star washer on the bolt.
12. Install the bolt, washers, and terminals to the fender and tighten.
13. Apply several light coats of touch-up paint or a bead of RTV to seal the connection.
If you desire, instead of using the crimp type terminals, you can use the non-insulated type and solder them to the wires.
How To: HVAC Fan Motor Resistor & Connector Replacement


")


