

Disclaimer
The community here at 355nation.net urges you to please use caution and seek professional assistance when performing modifications to your vehicle. Before attempting any modification it is advised that you refer to your Colorado or Canyon service manual or contact a certified mechanic as not all GMT355 trucks are the same. The staff and the associated members are in no way responsible for any damages, injuries or other harm inflicted to your vehicle or yourself which may result in attempting these modifications. The posts and content presented on this site reflect in no way the views of 355nation.net or it’s ownership.
![Image]()
A 355nation How To presented by
ssgjurista
Project Name
How To Change Coolant and Inspect Cooling System
Project Description
Perform scheduled maintenance on your 355 by changing the coolant. Although relatively simple, there are some members who may have questions about doing a coolant change themselves or inspecting the cooling system.
Skill Level
Easy-Moderate
Project Vehicle
Make: Chevrolet
Model: Colorado
Year: 2005
Engine: 3.5L
Power windows: No
Sun Roof: No
Tools Needed
Drain Pan
Channel Lock Pliers
Small Flat Tip Screwdriver
Ratchet, Metric Sockets, Extensions, and U-Joint
Funnel
Compressed Air
Rags or Shop Towels
Latex Gloves
Jack (Optional)
Jackstands (Optional)
Parts Needed
Dexcool Antifreeze
Clean, drinkable tap water or Distilled water
Radiator Cap
Upper Radiator Hose (Optional)
Lower Radiator Hose (Optional)
Heater Hoses (Optional)
Water Wetter (Optional)
Overflow Reservoir, GM Part Number 15099956
Dielectric Grease
Hose Clamps
Project Time
2 hour or less
Project Cost
$25 USD +
NOTES
Coolant Capacities
2.8L/2.9L Engine: 10.4 Quarts/9.8L
3.5L/3.7L Engine: 10.6 Quarts/10.0L
5.3L Engine: 13.7 quarts/13.0L
A. GM began using Dexcool antifreeze during the 1996 model year. Unlike the traditional 'green' antifreeze with a service life of 3 years/36,000 miles/57,600km, Dexcool offers a service life of 5 years/150,000 miles/240,000 km. Like the 'green' stuff, Dexcool is ethylene glycol based but with different corrosion inhibitors. Dexcool is also phosphate and silicate free. Not having phosphate helps prevent mineral deposits in the cooling system and not having silicates is thought to extend the life of water pump seals.
Dexcool is 93% ethylene glycol, the other 7% consists of anti-corrosion and anti-foaming additives that wear out over time.
B. During the early years of Dexcool use in GM vehicles, numerous coolant related issues developed. So much so that Dexcool earned the nickname of 'Deathcool'. If you do an Internet search using the terms Dexcool or Deathcool, a whole plethora of info/articles is available on these issues.
Some members may have witnessed firsthand the effects of Dexcool use in other GM vehicles. In the case of the Atlas engines and the V8 used in the 355s, Dexcool does not appear to be causing any negative effects. With that in mind, always maintain the proper coolant level in your engine.
C. My Colorado was built in April 2005 and I purchased it new in July that year. Although I am nowhere near the 150,000 mile/240,000 km mark, my truck will be five years old this year. Since I will be deploying in a few weeks, I decided to change the coolant now so my wife has one less thing to worry about while I'm gone.
D. I personally have the habit of changing both radiator hoses, radiator cap, thermostat, and overflow reservoir when doing a coolant change. At a minimum I recommend a new cap. Changing the hoses is optional since they seem to have a long service life. The constant cooling and heating may weaken the plastic overflow reservoir.
E. Dexcool is readily available at autoparts stores and places like Walmart. It comes in gallon jugs (4 quarts/3.7 liters) and is available full strength or pre-mixed. When doing a coolant change the full strength version is more cost effective since one gallon of Dexcool + one gallon of water makes 8 quarts/7.5 liters of coolant. The pre-mixed comes already mixed with water at a 50/50 ratio and is handy to have when topping off or to take on a trip.
F. A 50/50 mix of Dexcool and water provides freezing protection down to -34 degrees F (-37 degrees Celcius). It provides boilover protection up to 265 degrees F (129 degrees Celcius). When mixing the antifreeze with water, clean drinkable tap water is sufficient. However, the use of distilled water works in conjunction with the phosphate free formula to prevent mineral deposits.
G. 'Water Wetter' is a liquid chemical additive available at most autoparts stores and online. You add it to the coolant; its' job is to increase the rate of heat transfer from the cylinders and head to the coolant and from the coolant to the radiator fins. While Water Wetter does not make your engine run cooler it does help a hot engine cool off quicker. One example of this benefit would be towing a trailer thru a mountainous area on a hot summer day.
With the engine working harder than normal it will produce more heat. The Water Wetter helps speed up the heat transfer to the coolant so it lessens the possibility of overheating. Once you crest the last hill and start down the other side, the engine temp returns to normal faster.
H. Safety: work safely when changing the coolant or inspecting the cooling system. If the engine is hot allow it to cool to avoid potential burns.
Don't spill coolant, especially full strength antifreeze on hot engine parts as it is flammable. Always wear wraparound safety glasses, goggles, or a face shield when adding or draining coolant. The use of rubber gloves is recommended to keep coolant from contacting the skin. The main ingredient in Dexcool, ethylene glycol, is toxic to the nervous system. Do not leave unopened containers of coolant where small children or pets can come in contact with it. Although Dexcool contains a 'bittering agent', the sweet syrupy smell can lead to accidental swallowing.
I. Disposal of Used Coolant: most autoparts stores or dealers have facilities available for the disposal of used coolant. Do not dispose of coolant by dumping it on the ground, into public sewer systems, or in a storm drain.
Cooling System Components and System Operation
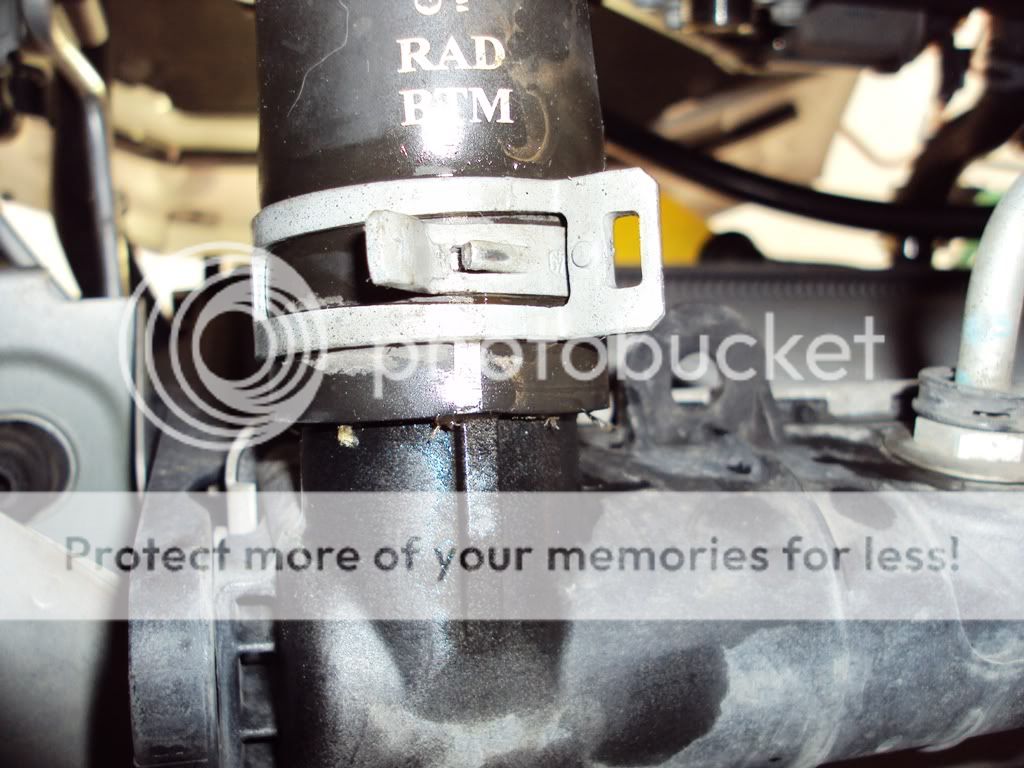
Inside the block, surrounding the cylinders and head are water 'jackets'. The coolant in the jackets absorbs some of the heat from the combustion process. The coolant is supplied by upper and lower hoses connecting the engine to the radiator. The heated coolant is continuously circulated thru the engine and radiator by a water pump. As the coolant moves thru the radiator it is cooled by the engine fan and also by outside air traveling thru the radiator as your 355 is moving. Inside the radiator core are rows of tubes that allow the coolant to flow in one direction, while outside air passing thru the radiator fins removes heat from the coolant. The radiator is basically a heat exchanger.
Thermostat: The t-stat closes when the coolant temp is low (cold) and opens when the temp is high (typically above 180 degrees F (82 degrees C)) to allow coolant to circulate thru the entire system. The t-stat aids in faster engine warmup and helps keep the engine at normal operating temp. A t-stat stuck in the closed position would cause overheating. If stuck in the open position, it would delay engine warmup, lower the operating temp, and reduce heat output from the HVAC system. Most GM vehicles since the early '90s have the thermostat located at the inlet side of the water pump from the lower radiator hose. Our engines feature this design. The logic is coolant traveling from the radiator thru the lower hose to the engine is generally at a more stable and cooler temp and doesn't cause the t-stats operation to move between open and closed as often.
![Image]()
![Image]()
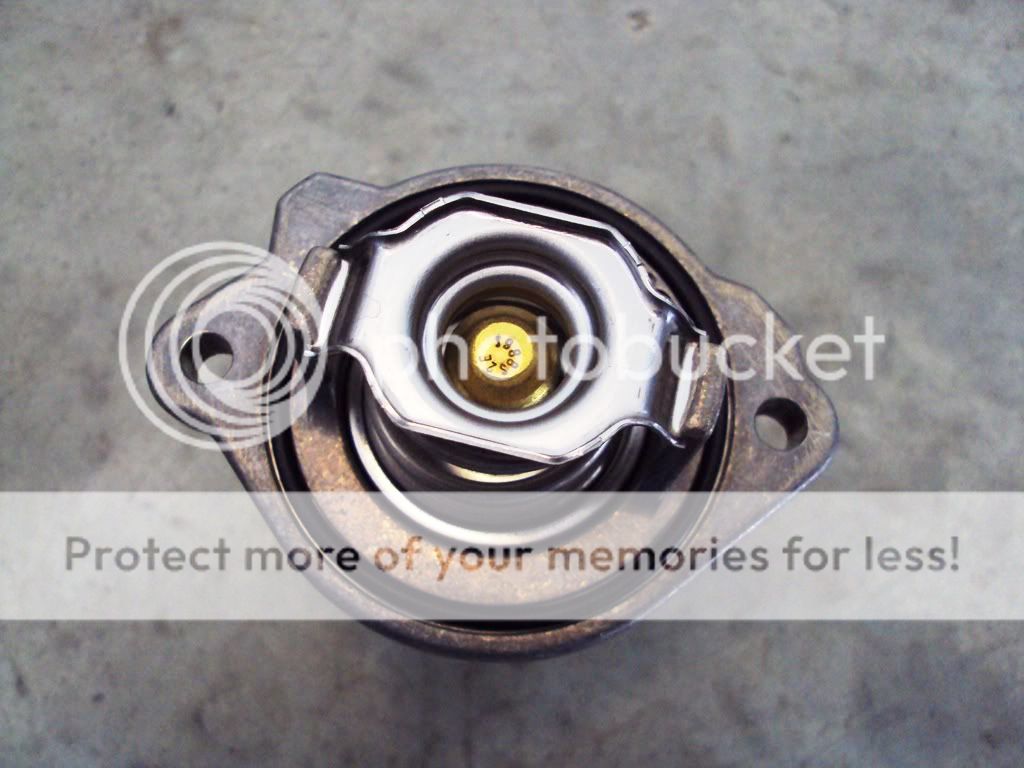
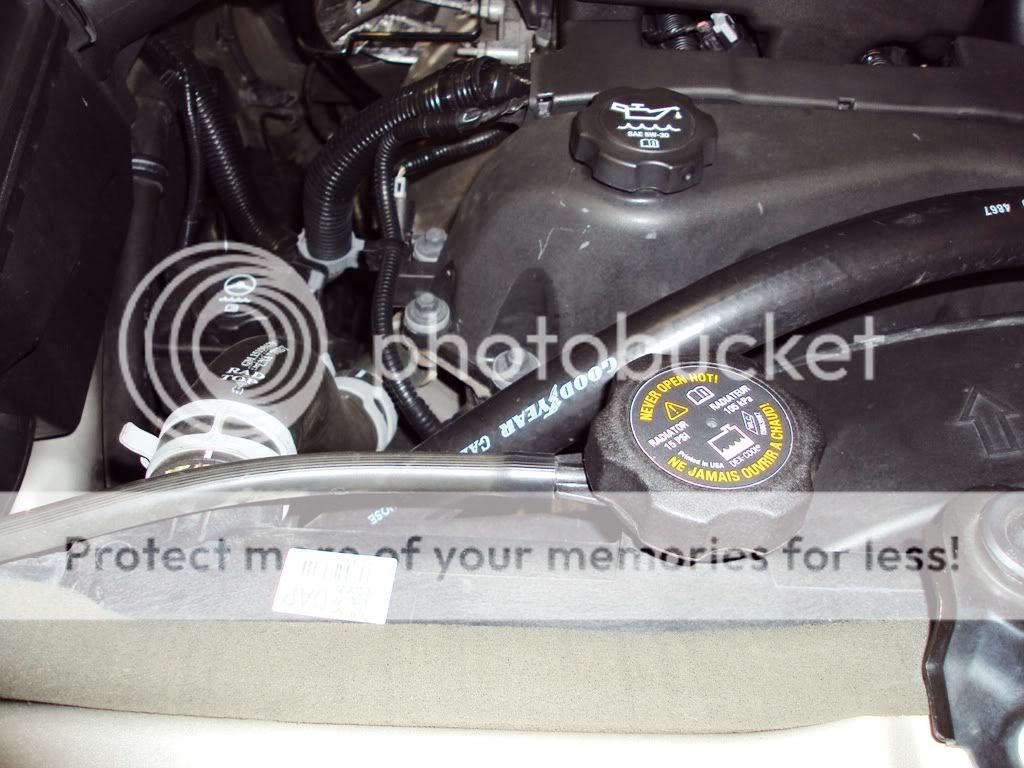
Pressure-Type Radiator Cap: The radiator cap does more than just keep coolant in the system. If the system were left open to the atmosphere, the temp of the coolant would never rise above 212 degrees F (100 degrees C) because water in the coolant would boil out of the radiator and turn to steam. The radiator cap maintains pressure in the system; as pressure increases so does the boiling point of water. The antifreeze in the coolant helps to raise the boiling point even further. The radiator cap contains relief and vacuum valves. The relief valve allows pressure in the system to bleed off if it rises above the preset value of 15 lbs. When the engine heats up, the coolant temp rises and the coolant expands; the excess pressure opens the valve and allows coolant to move thru the overflow hose. As the engine cools down, the vacuum valve allows coolant to flow back into the radiator by opening when the internal system pressure falls below atmospheric pressure.
![Image]()
![Image]()
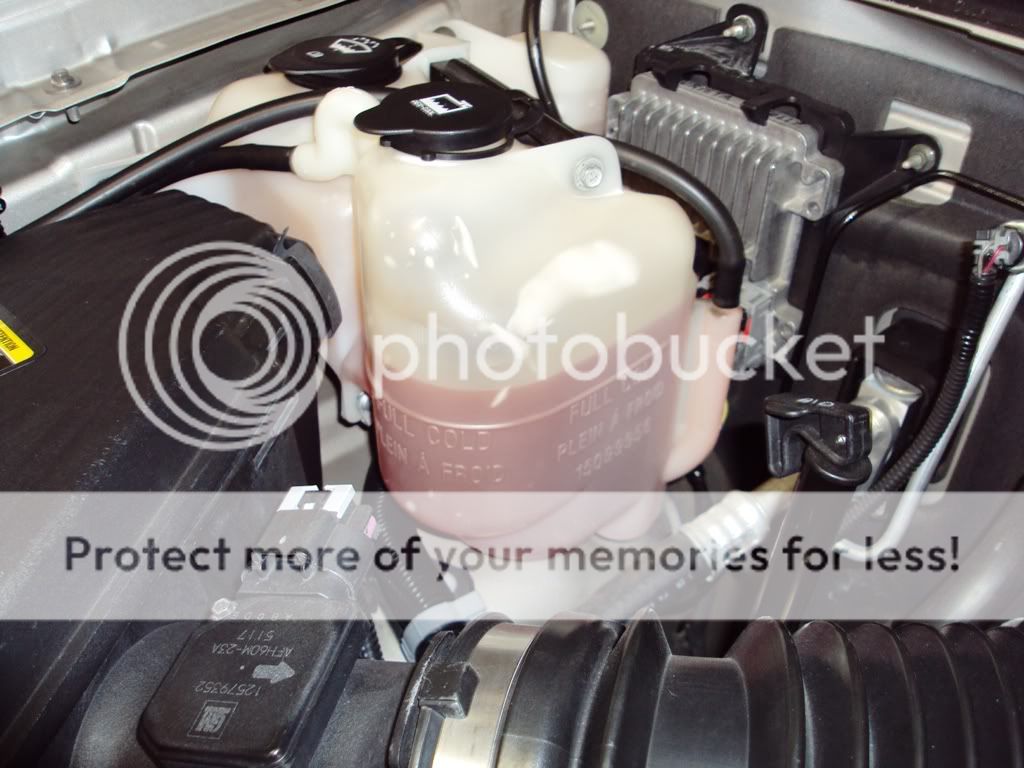
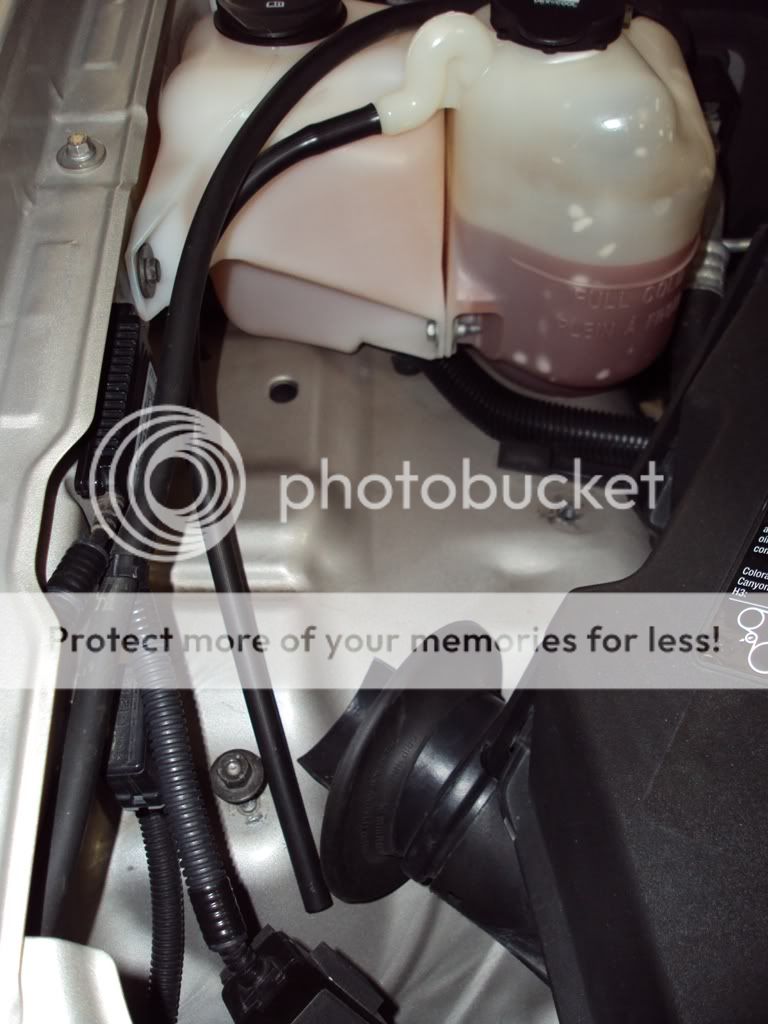
Overflow Reservoir: The overflow reservoir is mounted on the inside of the passenger wheelwell next to the washer fluid reservoir. It consists of a semi-transparent plastic jug, a hose between the reservoir and the radiator, and a vent hose. The vent hose runs off the top of the reservoir and down under the air cleaner. The overflow reservoir serves two purposes. First, when the relief valve in the radiator cap opens, excess pressure and coolant flows thru the hose from the radiator to the reservoir. When the system cools off and the vacuum valve in the cap opens, coolant returns to the radiator.
As long as the jug has sufficient coolant this ensures the radiator always stays full. Second, it serves as a 'backup' supply of coolant. In the case of a small leak, coolant from the reservoir helps keep the radiator topped off.
![Image]()
![Image]()
Crossflow Radiator: The radiator consists of a set of horizontal aluminum tubes sandwiched between plastic tanks on either side. The tubes are sealed to the tanks with o-rings. One tank receives hot coolant from the upper radiator hose and passes it into the cooling tubes. The opposite tank receives the colder coolant from the tubes and passes it to the lower radiator hose.
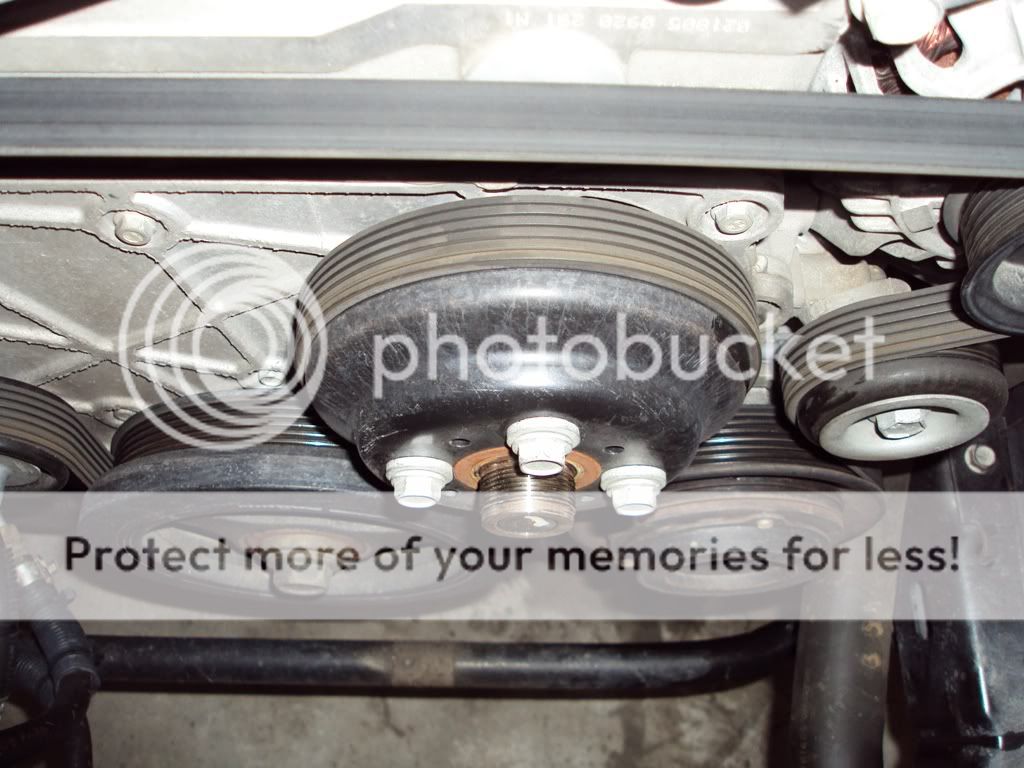
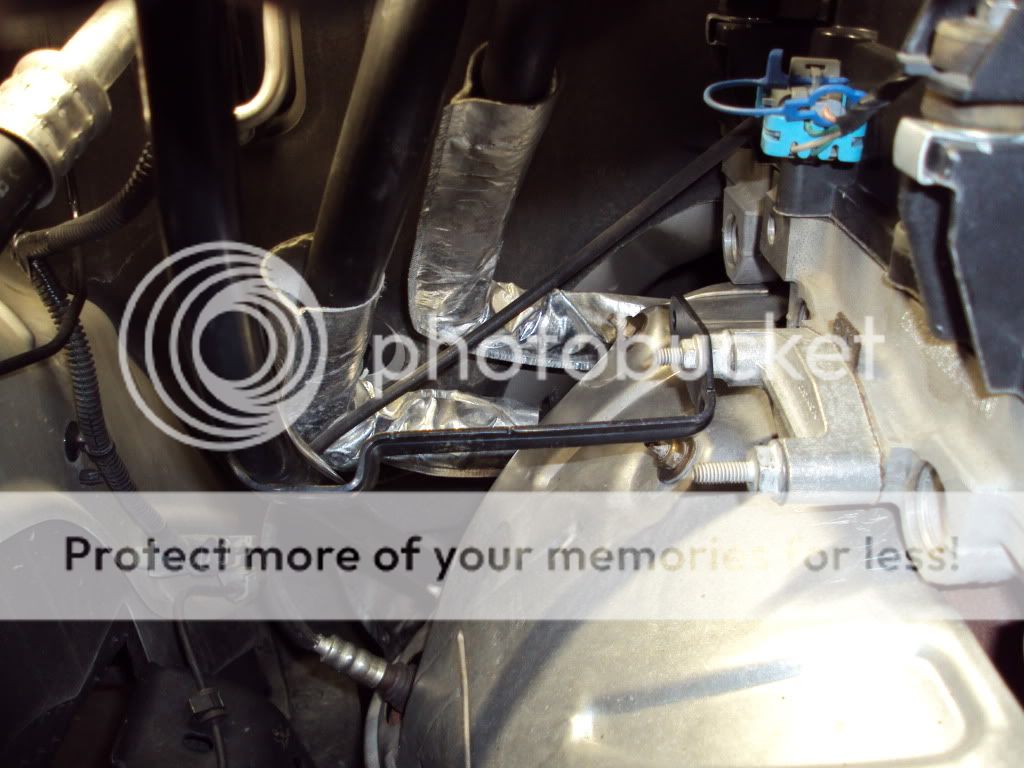
Water Pump: The water pump forces or pumps coolant thru the entire system. The speed the water pump turns (for a given engine speed) depends on the size of both the crankshaft and water pump pulleys. The smaller the water pump pulley, the faster the impeller inside the pump turns and the faster the flow rate of coolant thru the system. If the pump turns to fast, cooling efficiency actually suffers because the coolant moves too fast for optimal heat transfer. Most water pumps are overdriven 10-40% of the crankshaft speed and consume a surprising amount of engine power. On a typical LS1 engine, the water pump will use 12-15 hp at 6,000 rpm. The water pump features a 'weep' hole leading directly to the shaft that drives the impeller. If the pump bearings and/or seals fail, coolant will leak from the weep hole as a visual indicator to replace the pump.
![Image]()
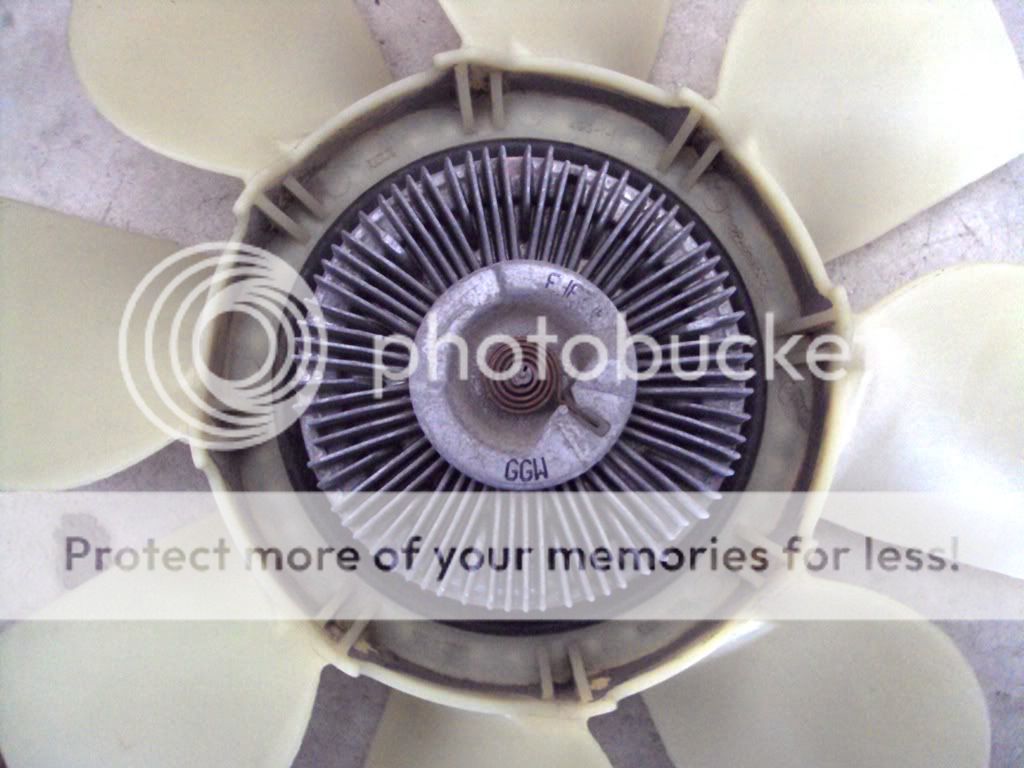
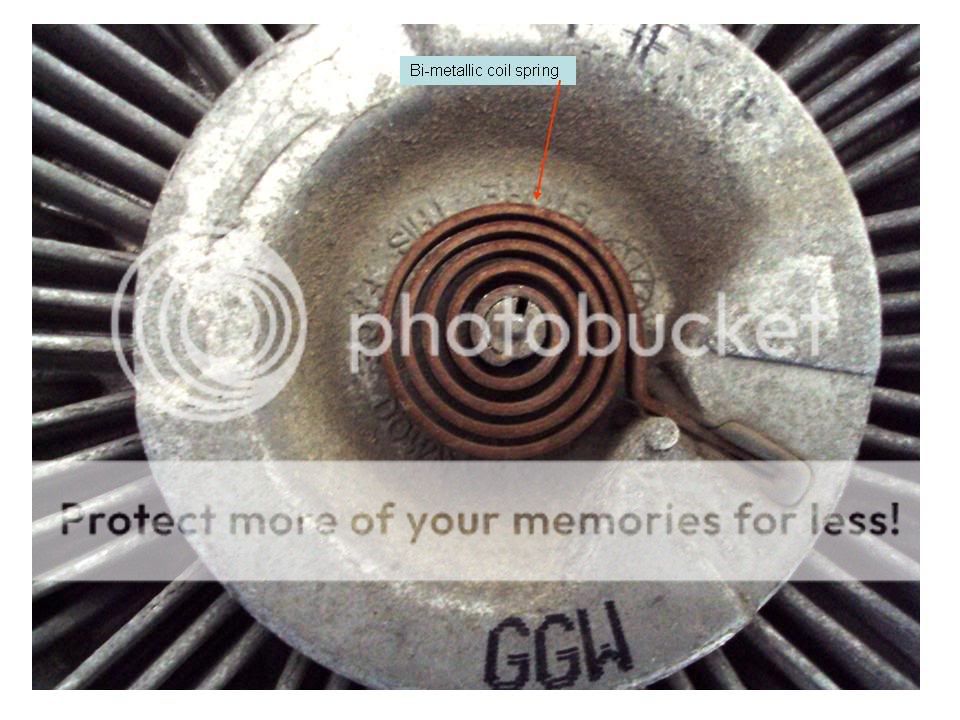
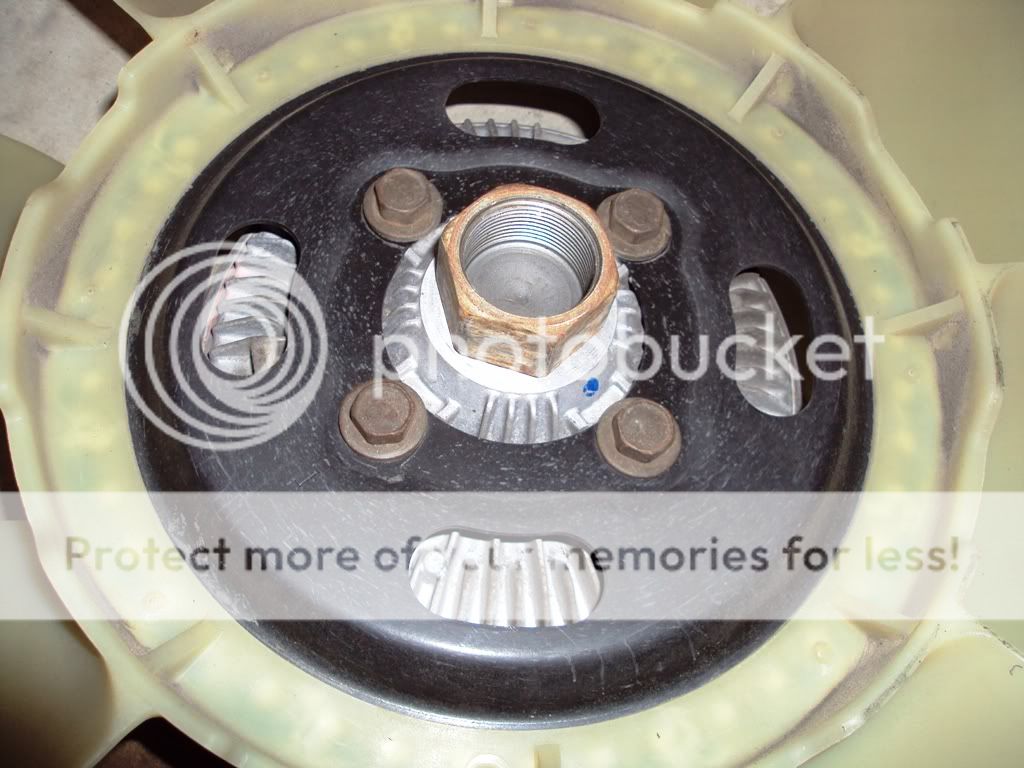
Fan: The belt driven fan pulls ambient air thru the radiator when the engine is idling or the truck is being driven at low speeds. Fan speed is controlled by a thermal fan clutch. The clutch allows for the use of a high volume fan to insure adequate cooling at reduced engine speeds while eliminating over cooling, excessive noise, and power loss at high speeds. It is located on the end of the water pump shaft and the fan is attached to it. The thermal clutch works similar to a torque converter. Thermal fan clutches have a temperature-sensitive bimetal coil spring on the front that reacts to temperature changes. When the air coming through the radiator is hot, the spring expands and opens an internal valve that reduces clutch slippage. This causes the fan to spin faster for increased cooling. As the air cools, the spring contracts and closes the valve. This increases the amount of clutch slippage, allowing the fan to slow down and decrease cooling. The clutch consists of a fluid coupling filled with a silicone based oil. The area between the teeth on the clutch plates is filled with silicone fluid. An internal valve opens and closes a passage between the main fluid cavity and a fluid reservoir. When the passage is open, fluid enters the clutch and makes the fan to turn faster. When the valve is shut, fluid flows back to the reservoir but doesn't return, causing the clutch to slip and the fan to turn more slowly. Upon starting a cold engine it is common to hear a loud roar or 'whooshing' sound while accelerating during the first few minutes. This is normal and is due to the silicone fluid settling in the bottom of the reservoir, causing the clutch to engage. Centrifigul force then redistributes the fluid and it operates normally.
![Image]()
![Image]()
![Image]()
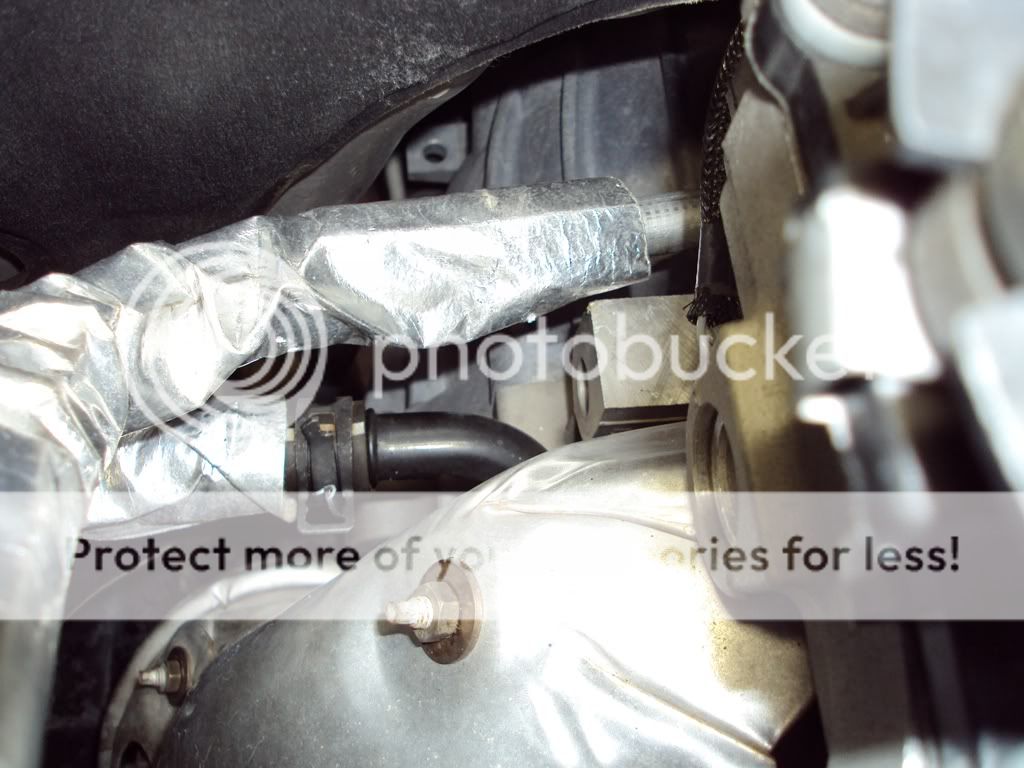
Heater: The heater core inside the HVAC module looks much like a smaller version of the radiator and serves as a mini heat exchanger. As the water pump circulates coolant through the engine block, some coolant is routed out of a fitting on the back of the block and thru a 3/4" (19mm) hose to the heater core inlet on the firewall. Coolant moves thru the heater core and air moving over the core from the blower motor absorbs heat. The coolant exits the core through a 5/8" (15mm) hose. The hose connects to a metallic tube which routes around the driver's side of the block where it connects to a second hose. This hose attaches to a fitting on the block next to the thermostat.
![Image]()
![Image]()
![Image]()
Fan Shroud: The main purpose is to maximize the amount of air being pulled thru the radiator by the fan. It prevents the fan from pulling air from around the sides or bottom of the radiator.
Cooling System Inspection
Before changing the coolant, it's a good idea to inspect the cooling system to see if any hoses or other components need changing before starting the job.
This video gives a good explanation of what to look for when checking the hoses: How to Check Radiator Hoses: Car Maintenance Tips | eHow.com
Some common problems with a fan clutch are listed below:
1) As a fan clutch ages, fluid deterioration gradually causes an increase in slippage (about 200 rpm per year). After a number of years of service, the clutch may slip so badly that the fan can't keep up with the cooling needs of the engine and the engine overheats. At this point, replacement is necessary.
2) Any looseness in the clutch (check for fan wobble), or oil streaks radiating outward from the clutch hub.
When checking the fan clutch, look for the following:
1) A good clutch should offer a certain amount of resistance when spun by hand (engine off, of course!). But if the fan spins with little resistance (more than 1 to 1-1/2 turns), the fan clutch is slipping too much and needs to be replaced.
2) If the fan binds, does not turn or offers a lot of resistance, it has seized and also needs to be replaced.
3) You should also try to wiggle the fan blades by hand. If there is any wobble in the fan, there is a bad bearing in the fan clutch, or a worn bearing on the water pump shaft. A bad water pump bearing will usually cause the water pump to leak and/or make noise, but not always. Remove the fan clutch and see if the play is in the water pump shaft. If it feels tight (no play or wobble), replace the fan clutch.
Experts recommend changing the fan clutch anytime you change the water pump. They both age at about the same rate, so if the water pump fails, the fan clutch will likely fail soon after.
Changing Coolant & Hoses/Thermostat
NOTES: If the engine has been recently run, allow it to cool. If you own a lowered truck you may need to put it on jackstands in order to access the lower radiator hose.
1) Remove the driver's side splash guard from the inside of the fender.
2) Remove the skidplate if equipped and place a drain pan under the lower radiator hose.
3) Squeeze the clamp and slide it back on the lower hose.
![Image]()
4) Insert a small flat tip screwdriver between the hose and the outlet to break the seal. Caution: do not pry on the hose as damage to the outlet may result.
5) Reach in thru the driver's side wheelhouse and pull the lower hose off the radiator outlet.
6) Remove the radiator cap.
7) After the radiator is drained slide the drain pan back under the driver's side corner of the engine.
8) Loosen but do not remove the bolts holding the thermostat housing to the block. Pull the housing loose and allow the block to drain.
![Image]()
9) NOTE: If replacing the lower hose and/or thermostat do the following:
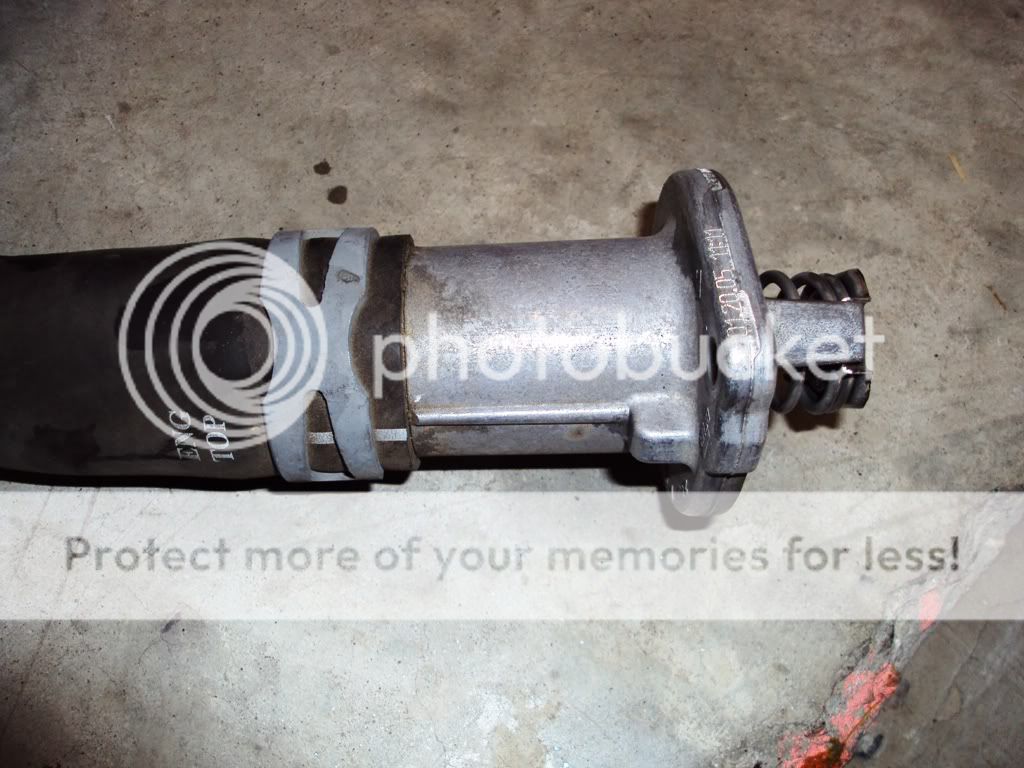
A) Remove the thermostat bolts and remove the lower hose/thermostat assembly from the truck. Remove the clamp and hose from the thermostat housing.
![Image]()
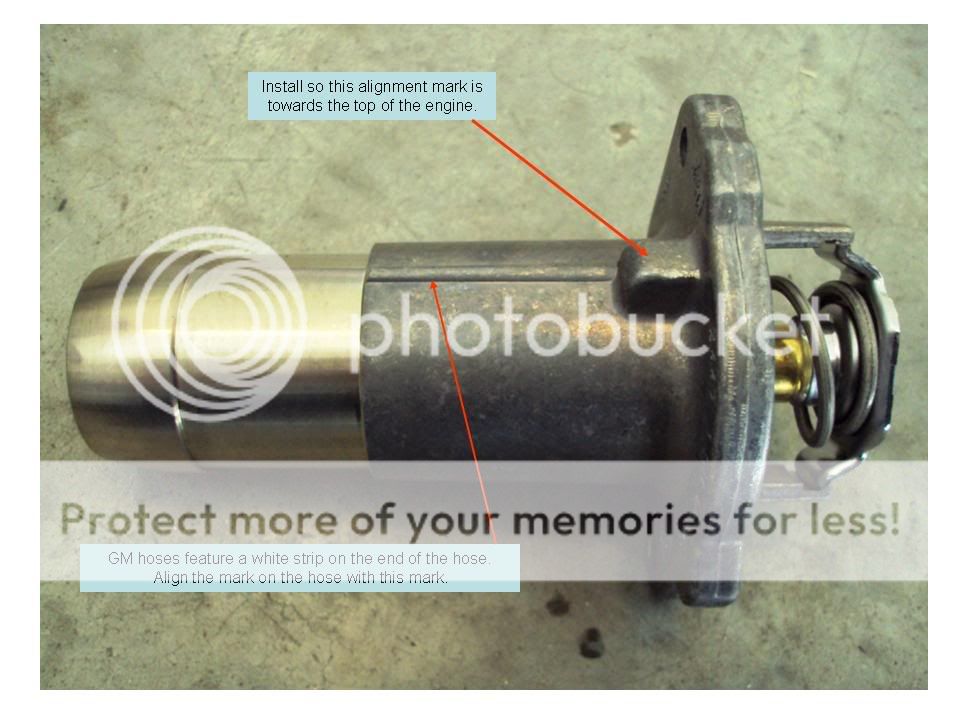
B) Apply a thin film of dielectric grease to the inside of the hose ends and assemble new hose and/or thermostat, making sure you align the thermostat correctly and the o-ring is either on the housing or on the engine block.
![Image]()
C) Place lower hose/thermostat assembly in truck; slide lower hose onto radiator outlet. Install the bottom thermostat housing bolt but do not tighten.
D) Install the upper thermostat bolt.
10) Hold the thermostat housing in place and tighten the bolts to 10 ft lbs.
For more information on changing your thermostat please reference:How to: Changing your Thermostat
11) NOTE: If replacing the upper radiator hose, do the following:
A) Loosen and slide the clamps back from both ends of the upper hose.
![Image]()
B) Slide a small flat tip screwdriver between the hose and the radiator inlet to break the seal. Caution: do not pry on the hose as damage to the inlet may result.
C) Slide the hose off the inlet and twist the hose to break it loose from the engine nipple. You may also use a razor knife to cut the hose lengthwise to free it.
D) The new replacement hose may be the 'cut to fit' type. If so, place the engine end on the nipple and measure/mark where you need to cut the opposite end so it fits the radiator inlet. Cut off the excess and wipe out any debris from inside the hose.
![Image]()
E) Apply a thin film of dielectric grease to the inside of the hose ends. Place the hose clamps onto the hose and slide them towards the center of the hose.
F) Slide the hose onto the engine nipple and then slide the opposite end onto the radiator. Slide both clamps into place and tighten.
12) Add clean drinkable water to the radiator; once it is full, start the engine and add more water as necessary.
13) Install the radiator cap and let the engine idle or go for a drive until the engine reaches operating temp.
14) Once the engine has cooled, repeat Steps 3 thru 8 and Step 10.
15) Remove the air cleaner; then remove the three bolts holding the overflow reservoir to the washer fluid reservoir and inner fender.
![Image]()
![Image]()
16) Open the three retainers holding the overflow hose to the inside of the fender and remove the hose from the radiator neck.
17) Remove the reservoir from the truck and empty the old coolant.
18) Rinse any sediment from the reservoir.
![Image]()
19) Reinstall the reservoir and air cleaner.
20) Add the Water Wetter (optional) followed by equal amounts of Dexcool and clean water/distilled water to the radiator.
21) Once the radiator is full, replace the cap and then add equal amounts of Dexcool and water to the overflow reservoir until the coolant level is about 1" above the cold mark.
22) Look for leaks then drive your truck until the engine reaches operating temp. Once the system cools down and the air pockets are worked out, the coolant level in the reservoir should be at the cold mark.
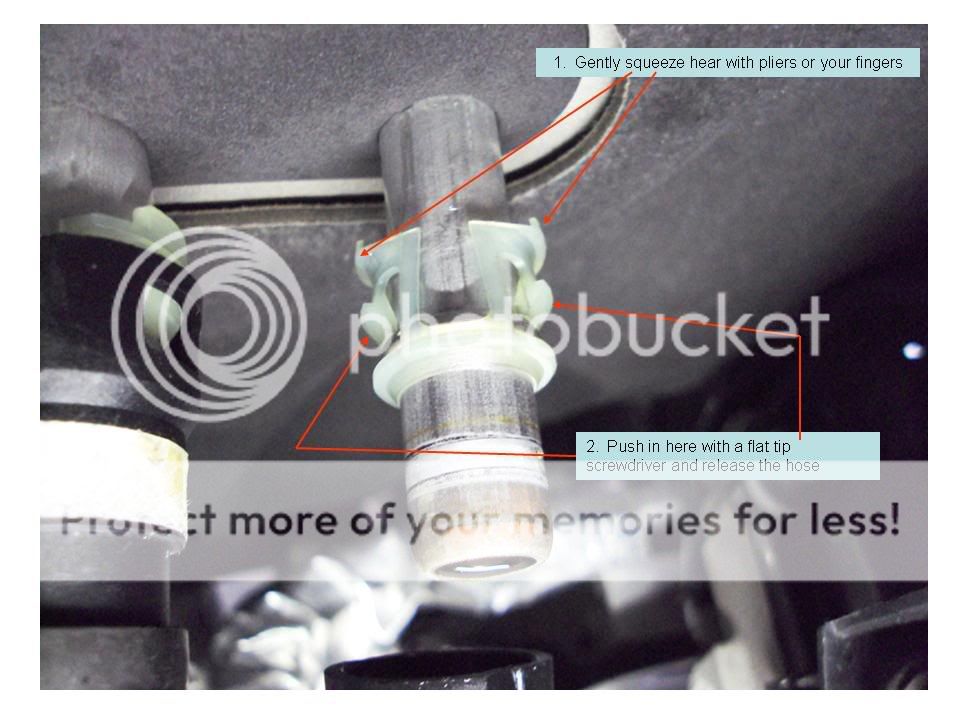
Heater Hoses & Quick Connectors
To replace heater hoses or flush the heater core: Carefully undo the quick connectors by following the instructions in the pic. Applying silicone spray to the disconnects will aid in disassembly. Caution: Do not apply sideways force to the heater core inlet and outlet when removing the hoses. The heater core is fragile and damage may result.
![Image]()
1) To remove the quick connectors from either hose, loosen the clamp and slide it back. The insert a small flat tip between the hose and disconnect to break the seal. Caution: do not pry on the hose as damage to the connector may result. Replace heater hoses as needed by loosening the clamp(s) and removing the hose(s).
2) You may flush the heater core with water from a garden hose or with low pressure shop air.
The community here at 355nation.net urges you to please use caution and seek professional assistance when performing modifications to your vehicle. Before attempting any modification it is advised that you refer to your Colorado or Canyon service manual or contact a certified mechanic as not all GMT355 trucks are the same. The staff and the associated members are in no way responsible for any damages, injuries or other harm inflicted to your vehicle or yourself which may result in attempting these modifications. The posts and content presented on this site reflect in no way the views of 355nation.net or it’s ownership.
A 355nation How To presented by
ssgjurista
Project Name
How To Change Coolant and Inspect Cooling System
Project Description
Perform scheduled maintenance on your 355 by changing the coolant. Although relatively simple, there are some members who may have questions about doing a coolant change themselves or inspecting the cooling system.
Skill Level
Easy-Moderate
Project Vehicle
Make: Chevrolet
Model: Colorado
Year: 2005
Engine: 3.5L
Power windows: No
Sun Roof: No
Tools Needed
Drain Pan
Channel Lock Pliers
Small Flat Tip Screwdriver
Ratchet, Metric Sockets, Extensions, and U-Joint
Funnel
Compressed Air
Rags or Shop Towels
Latex Gloves
Jack (Optional)
Jackstands (Optional)
Parts Needed
Dexcool Antifreeze
Clean, drinkable tap water or Distilled water
Radiator Cap
Upper Radiator Hose (Optional)
Lower Radiator Hose (Optional)
Heater Hoses (Optional)
Water Wetter (Optional)
Overflow Reservoir, GM Part Number 15099956
Dielectric Grease
Hose Clamps
Project Time
2 hour or less
Project Cost
$25 USD +
NOTES
Coolant Capacities
2.8L/2.9L Engine: 10.4 Quarts/9.8L
3.5L/3.7L Engine: 10.6 Quarts/10.0L
5.3L Engine: 13.7 quarts/13.0L
A. GM began using Dexcool antifreeze during the 1996 model year. Unlike the traditional 'green' antifreeze with a service life of 3 years/36,000 miles/57,600km, Dexcool offers a service life of 5 years/150,000 miles/240,000 km. Like the 'green' stuff, Dexcool is ethylene glycol based but with different corrosion inhibitors. Dexcool is also phosphate and silicate free. Not having phosphate helps prevent mineral deposits in the cooling system and not having silicates is thought to extend the life of water pump seals.
Dexcool is 93% ethylene glycol, the other 7% consists of anti-corrosion and anti-foaming additives that wear out over time.
B. During the early years of Dexcool use in GM vehicles, numerous coolant related issues developed. So much so that Dexcool earned the nickname of 'Deathcool'. If you do an Internet search using the terms Dexcool or Deathcool, a whole plethora of info/articles is available on these issues.
Some members may have witnessed firsthand the effects of Dexcool use in other GM vehicles. In the case of the Atlas engines and the V8 used in the 355s, Dexcool does not appear to be causing any negative effects. With that in mind, always maintain the proper coolant level in your engine.
C. My Colorado was built in April 2005 and I purchased it new in July that year. Although I am nowhere near the 150,000 mile/240,000 km mark, my truck will be five years old this year. Since I will be deploying in a few weeks, I decided to change the coolant now so my wife has one less thing to worry about while I'm gone.
D. I personally have the habit of changing both radiator hoses, radiator cap, thermostat, and overflow reservoir when doing a coolant change. At a minimum I recommend a new cap. Changing the hoses is optional since they seem to have a long service life. The constant cooling and heating may weaken the plastic overflow reservoir.
E. Dexcool is readily available at autoparts stores and places like Walmart. It comes in gallon jugs (4 quarts/3.7 liters) and is available full strength or pre-mixed. When doing a coolant change the full strength version is more cost effective since one gallon of Dexcool + one gallon of water makes 8 quarts/7.5 liters of coolant. The pre-mixed comes already mixed with water at a 50/50 ratio and is handy to have when topping off or to take on a trip.
F. A 50/50 mix of Dexcool and water provides freezing protection down to -34 degrees F (-37 degrees Celcius). It provides boilover protection up to 265 degrees F (129 degrees Celcius). When mixing the antifreeze with water, clean drinkable tap water is sufficient. However, the use of distilled water works in conjunction with the phosphate free formula to prevent mineral deposits.
G. 'Water Wetter' is a liquid chemical additive available at most autoparts stores and online. You add it to the coolant; its' job is to increase the rate of heat transfer from the cylinders and head to the coolant and from the coolant to the radiator fins. While Water Wetter does not make your engine run cooler it does help a hot engine cool off quicker. One example of this benefit would be towing a trailer thru a mountainous area on a hot summer day.
With the engine working harder than normal it will produce more heat. The Water Wetter helps speed up the heat transfer to the coolant so it lessens the possibility of overheating. Once you crest the last hill and start down the other side, the engine temp returns to normal faster.
H. Safety: work safely when changing the coolant or inspecting the cooling system. If the engine is hot allow it to cool to avoid potential burns.
Don't spill coolant, especially full strength antifreeze on hot engine parts as it is flammable. Always wear wraparound safety glasses, goggles, or a face shield when adding or draining coolant. The use of rubber gloves is recommended to keep coolant from contacting the skin. The main ingredient in Dexcool, ethylene glycol, is toxic to the nervous system. Do not leave unopened containers of coolant where small children or pets can come in contact with it. Although Dexcool contains a 'bittering agent', the sweet syrupy smell can lead to accidental swallowing.
I. Disposal of Used Coolant: most autoparts stores or dealers have facilities available for the disposal of used coolant. Do not dispose of coolant by dumping it on the ground, into public sewer systems, or in a storm drain.
Cooling System Components and System Operation
Inside the block, surrounding the cylinders and head are water 'jackets'. The coolant in the jackets absorbs some of the heat from the combustion process. The coolant is supplied by upper and lower hoses connecting the engine to the radiator. The heated coolant is continuously circulated thru the engine and radiator by a water pump. As the coolant moves thru the radiator it is cooled by the engine fan and also by outside air traveling thru the radiator as your 355 is moving. Inside the radiator core are rows of tubes that allow the coolant to flow in one direction, while outside air passing thru the radiator fins removes heat from the coolant. The radiator is basically a heat exchanger.
Thermostat: The t-stat closes when the coolant temp is low (cold) and opens when the temp is high (typically above 180 degrees F (82 degrees C)) to allow coolant to circulate thru the entire system. The t-stat aids in faster engine warmup and helps keep the engine at normal operating temp. A t-stat stuck in the closed position would cause overheating. If stuck in the open position, it would delay engine warmup, lower the operating temp, and reduce heat output from the HVAC system. Most GM vehicles since the early '90s have the thermostat located at the inlet side of the water pump from the lower radiator hose. Our engines feature this design. The logic is coolant traveling from the radiator thru the lower hose to the engine is generally at a more stable and cooler temp and doesn't cause the t-stats operation to move between open and closed as often.

Pressure-Type Radiator Cap: The radiator cap does more than just keep coolant in the system. If the system were left open to the atmosphere, the temp of the coolant would never rise above 212 degrees F (100 degrees C) because water in the coolant would boil out of the radiator and turn to steam. The radiator cap maintains pressure in the system; as pressure increases so does the boiling point of water. The antifreeze in the coolant helps to raise the boiling point even further. The radiator cap contains relief and vacuum valves. The relief valve allows pressure in the system to bleed off if it rises above the preset value of 15 lbs. When the engine heats up, the coolant temp rises and the coolant expands; the excess pressure opens the valve and allows coolant to move thru the overflow hose. As the engine cools down, the vacuum valve allows coolant to flow back into the radiator by opening when the internal system pressure falls below atmospheric pressure.

Overflow Reservoir: The overflow reservoir is mounted on the inside of the passenger wheelwell next to the washer fluid reservoir. It consists of a semi-transparent plastic jug, a hose between the reservoir and the radiator, and a vent hose. The vent hose runs off the top of the reservoir and down under the air cleaner. The overflow reservoir serves two purposes. First, when the relief valve in the radiator cap opens, excess pressure and coolant flows thru the hose from the radiator to the reservoir. When the system cools off and the vacuum valve in the cap opens, coolant returns to the radiator.
As long as the jug has sufficient coolant this ensures the radiator always stays full. Second, it serves as a 'backup' supply of coolant. In the case of a small leak, coolant from the reservoir helps keep the radiator topped off.
Crossflow Radiator: The radiator consists of a set of horizontal aluminum tubes sandwiched between plastic tanks on either side. The tubes are sealed to the tanks with o-rings. One tank receives hot coolant from the upper radiator hose and passes it into the cooling tubes. The opposite tank receives the colder coolant from the tubes and passes it to the lower radiator hose.
Water Pump: The water pump forces or pumps coolant thru the entire system. The speed the water pump turns (for a given engine speed) depends on the size of both the crankshaft and water pump pulleys. The smaller the water pump pulley, the faster the impeller inside the pump turns and the faster the flow rate of coolant thru the system. If the pump turns to fast, cooling efficiency actually suffers because the coolant moves too fast for optimal heat transfer. Most water pumps are overdriven 10-40% of the crankshaft speed and consume a surprising amount of engine power. On a typical LS1 engine, the water pump will use 12-15 hp at 6,000 rpm. The water pump features a 'weep' hole leading directly to the shaft that drives the impeller. If the pump bearings and/or seals fail, coolant will leak from the weep hole as a visual indicator to replace the pump.
Fan: The belt driven fan pulls ambient air thru the radiator when the engine is idling or the truck is being driven at low speeds. Fan speed is controlled by a thermal fan clutch. The clutch allows for the use of a high volume fan to insure adequate cooling at reduced engine speeds while eliminating over cooling, excessive noise, and power loss at high speeds. It is located on the end of the water pump shaft and the fan is attached to it. The thermal clutch works similar to a torque converter. Thermal fan clutches have a temperature-sensitive bimetal coil spring on the front that reacts to temperature changes. When the air coming through the radiator is hot, the spring expands and opens an internal valve that reduces clutch slippage. This causes the fan to spin faster for increased cooling. As the air cools, the spring contracts and closes the valve. This increases the amount of clutch slippage, allowing the fan to slow down and decrease cooling. The clutch consists of a fluid coupling filled with a silicone based oil. The area between the teeth on the clutch plates is filled with silicone fluid. An internal valve opens and closes a passage between the main fluid cavity and a fluid reservoir. When the passage is open, fluid enters the clutch and makes the fan to turn faster. When the valve is shut, fluid flows back to the reservoir but doesn't return, causing the clutch to slip and the fan to turn more slowly. Upon starting a cold engine it is common to hear a loud roar or 'whooshing' sound while accelerating during the first few minutes. This is normal and is due to the silicone fluid settling in the bottom of the reservoir, causing the clutch to engage. Centrifigul force then redistributes the fluid and it operates normally.
Heater: The heater core inside the HVAC module looks much like a smaller version of the radiator and serves as a mini heat exchanger. As the water pump circulates coolant through the engine block, some coolant is routed out of a fitting on the back of the block and thru a 3/4" (19mm) hose to the heater core inlet on the firewall. Coolant moves thru the heater core and air moving over the core from the blower motor absorbs heat. The coolant exits the core through a 5/8" (15mm) hose. The hose connects to a metallic tube which routes around the driver's side of the block where it connects to a second hose. This hose attaches to a fitting on the block next to the thermostat.
Fan Shroud: The main purpose is to maximize the amount of air being pulled thru the radiator by the fan. It prevents the fan from pulling air from around the sides or bottom of the radiator.
Cooling System Inspection
Before changing the coolant, it's a good idea to inspect the cooling system to see if any hoses or other components need changing before starting the job.
This video gives a good explanation of what to look for when checking the hoses: How to Check Radiator Hoses: Car Maintenance Tips | eHow.com
Some common problems with a fan clutch are listed below:
1) As a fan clutch ages, fluid deterioration gradually causes an increase in slippage (about 200 rpm per year). After a number of years of service, the clutch may slip so badly that the fan can't keep up with the cooling needs of the engine and the engine overheats. At this point, replacement is necessary.
2) Any looseness in the clutch (check for fan wobble), or oil streaks radiating outward from the clutch hub.
When checking the fan clutch, look for the following:
1) A good clutch should offer a certain amount of resistance when spun by hand (engine off, of course!). But if the fan spins with little resistance (more than 1 to 1-1/2 turns), the fan clutch is slipping too much and needs to be replaced.
2) If the fan binds, does not turn or offers a lot of resistance, it has seized and also needs to be replaced.
3) You should also try to wiggle the fan blades by hand. If there is any wobble in the fan, there is a bad bearing in the fan clutch, or a worn bearing on the water pump shaft. A bad water pump bearing will usually cause the water pump to leak and/or make noise, but not always. Remove the fan clutch and see if the play is in the water pump shaft. If it feels tight (no play or wobble), replace the fan clutch.
Experts recommend changing the fan clutch anytime you change the water pump. They both age at about the same rate, so if the water pump fails, the fan clutch will likely fail soon after.
Changing Coolant & Hoses/Thermostat
NOTES: If the engine has been recently run, allow it to cool. If you own a lowered truck you may need to put it on jackstands in order to access the lower radiator hose.
1) Remove the driver's side splash guard from the inside of the fender.
2) Remove the skidplate if equipped and place a drain pan under the lower radiator hose.
3) Squeeze the clamp and slide it back on the lower hose.
4) Insert a small flat tip screwdriver between the hose and the outlet to break the seal. Caution: do not pry on the hose as damage to the outlet may result.
5) Reach in thru the driver's side wheelhouse and pull the lower hose off the radiator outlet.
6) Remove the radiator cap.
7) After the radiator is drained slide the drain pan back under the driver's side corner of the engine.
8) Loosen but do not remove the bolts holding the thermostat housing to the block. Pull the housing loose and allow the block to drain.

9) NOTE: If replacing the lower hose and/or thermostat do the following:
A) Remove the thermostat bolts and remove the lower hose/thermostat assembly from the truck. Remove the clamp and hose from the thermostat housing.
B) Apply a thin film of dielectric grease to the inside of the hose ends and assemble new hose and/or thermostat, making sure you align the thermostat correctly and the o-ring is either on the housing or on the engine block.
C) Place lower hose/thermostat assembly in truck; slide lower hose onto radiator outlet. Install the bottom thermostat housing bolt but do not tighten.
D) Install the upper thermostat bolt.
10) Hold the thermostat housing in place and tighten the bolts to 10 ft lbs.
For more information on changing your thermostat please reference:How to: Changing your Thermostat
11) NOTE: If replacing the upper radiator hose, do the following:
A) Loosen and slide the clamps back from both ends of the upper hose.
B) Slide a small flat tip screwdriver between the hose and the radiator inlet to break the seal. Caution: do not pry on the hose as damage to the inlet may result.
C) Slide the hose off the inlet and twist the hose to break it loose from the engine nipple. You may also use a razor knife to cut the hose lengthwise to free it.
D) The new replacement hose may be the 'cut to fit' type. If so, place the engine end on the nipple and measure/mark where you need to cut the opposite end so it fits the radiator inlet. Cut off the excess and wipe out any debris from inside the hose.
E) Apply a thin film of dielectric grease to the inside of the hose ends. Place the hose clamps onto the hose and slide them towards the center of the hose.
F) Slide the hose onto the engine nipple and then slide the opposite end onto the radiator. Slide both clamps into place and tighten.
12) Add clean drinkable water to the radiator; once it is full, start the engine and add more water as necessary.
13) Install the radiator cap and let the engine idle or go for a drive until the engine reaches operating temp.
14) Once the engine has cooled, repeat Steps 3 thru 8 and Step 10.
15) Remove the air cleaner; then remove the three bolts holding the overflow reservoir to the washer fluid reservoir and inner fender.
16) Open the three retainers holding the overflow hose to the inside of the fender and remove the hose from the radiator neck.
17) Remove the reservoir from the truck and empty the old coolant.
18) Rinse any sediment from the reservoir.

19) Reinstall the reservoir and air cleaner.
20) Add the Water Wetter (optional) followed by equal amounts of Dexcool and clean water/distilled water to the radiator.
21) Once the radiator is full, replace the cap and then add equal amounts of Dexcool and water to the overflow reservoir until the coolant level is about 1" above the cold mark.
22) Look for leaks then drive your truck until the engine reaches operating temp. Once the system cools down and the air pockets are worked out, the coolant level in the reservoir should be at the cold mark.
Heater Hoses & Quick Connectors
To replace heater hoses or flush the heater core: Carefully undo the quick connectors by following the instructions in the pic. Applying silicone spray to the disconnects will aid in disassembly. Caution: Do not apply sideways force to the heater core inlet and outlet when removing the hoses. The heater core is fragile and damage may result.
1) To remove the quick connectors from either hose, loosen the clamp and slide it back. The insert a small flat tip between the hose and disconnect to break the seal. Caution: do not pry on the hose as damage to the connector may result. Replace heater hoses as needed by loosening the clamp(s) and removing the hose(s).
2) You may flush the heater core with water from a garden hose or with low pressure shop air.


