Chevrolet Colorado & GMC Canyon Forum banner

How do I remove this??

39K views 28 replies 13 participants last post by  cart7881  
#1 ·
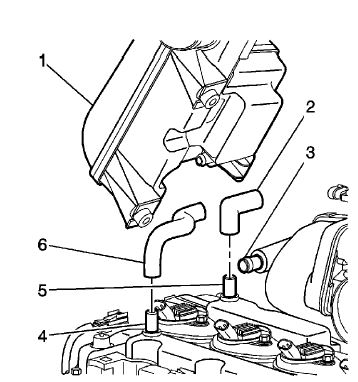
Need to know what holds this box on and where all the bolts are located. I've got a nice vacuum leak inside here and would like to get this fixed
 
#2 ·

Attachments

#3 ·
Intake manifold is going to be fun, if I remember correctly it should be 2 bolts per port so a total of 10 bolts maybe 12. Some you might have to get through the wheel well. They are held on with a washer so you don't have to worry about dropping them. Good luck.
 
#7 ·
I think you're right on the 10 bolts.

Also, to make life easier, remove battery and battery box,
Alternator (some have been able to get those hidden bolts with out removing it), A couple of engine harnesses/brackets, power brake hose, crankcase vent hose, some have to remove oil dipstick, I didn't tho.
There may be more but that's what I remember.
 
#4 · (Edited)
Note: This is for the 3.7L, but the 3.5 should be similar.

Intake Manifold Replacement

Removal Procedure


  1. Remove the throttle body. Refer to Throttle Body Assembly Replacement.
  2. Remove the battery box. Refer to Battery Box Replacement.
  3. Remove the oil level indicator and tube. Refer to Oil Level Indicator and Tube Replacement.
  4. Disconnect the brake booster hose (6) from the brake booster.
  5. Disconnect the engine wiring harness electrical connector (3) from the manifold absolute pressure (MAP) sensor.
  6. Disconnect the engine wiring harness retainer (4) from the intake manifold (5).
  7. Disconnect the positive crankcase ventilation (PCV) dirty air tube (2) from the camshaft cover.
  8. Remove the generator. Refer to Generator Replacement.
  9. Disconnect the engine wiring harness retainer (1) from the intake manifold (2).
  10. Remove the upper 2 bolts securing the engine wiring harness bracket to the intake manifold.
  11. Raise and support the vehicle only high enough to access the remaining components through the wheelhouse. Refer to Lifting and Jacking the Vehicle.
  12. Remove the left front wheel. Refer to Tire and Wheel Removal and Installation.
  13. Remove the left front wheelhouse liner. Refer to Front Wheelhouse Liner Replacement.
  14. Disconnect the following wiring harness retainers from the engine wiring harness bracket:
    • The battery cable
    • The engine (4, 6)
    • The MAP sensor (5)
  15. Remove the remaining engine wiring harness bracket lower bolt. Remove the bracket from the engine compartment through the wheelhouse opening.
  16. Remove the intake manifold bolts.
  17. Lower the vehicle.
  18. Remove the intake manifold from the cylinder head.
  19. Remove and discard the seal from the intake manifold. Discard the seal.
  20. Mask off the open ports to the cylinder head, in order to prevent foreign objects from entering the engine.

Installation Procedure


  1. Remove the masking from the cylinder head and ensure the sealing surface is clean and dry.
  2. Install a NEW seal into the intake manifold groove.
  3. Position the intake manifold to the cylinder head.
  4. Raise and support the vehicle only high enough to access the following components through the wheelhouse Refer to Lifting and Jacking the Vehicle.
    • The intake manifold bolts
    • The engine wiring harness bracket bolts
    • The wiring harnesses
    Caution: Refer to Fastener Caution in the Preface section.
  5. Install the intake manifold bolts and tighten from the inside working outward to 10 N·m
    (89 lb in)
    .
  6. Position the engine wiring harness bracket to the engine.
  7. Install the engine wiring harness bracket bolts and tighten to 10 N·m (89 lb in).
  8. Secure the following wiring harness retainers to the bracket:
    • The battery cable
    • The engine (4, 6)
    • The MAP sensor (5)​
  9. Install the left front wheelhouse liner. Refer to Front Wheelhouse Liner Replacement.
  10. Install the left front wheel. Refer to Tire and Wheel Removal and Installation.
  11. Lower the vehicle.
  12. Connect the engine wiring harness retainer (1) to the intake manifold (2).
  13. Install the generator. Refer to Generator Replacement.
  14. Connect the PCV dirty air tube (2) to the camshaft cover.
  15. Connect the engine wiring harness retainer (4) to the intake manifold (5).
  16. Connect the engine wiring harness electrical connector (3) to the MAP sensor.
  17. Connect the brake booster hose (6) to the brake booster.
  18. Install the oil level indicator and tube. Refer to Oil Level Indicator and Tube Replacement.
  19. Install the battery box. Refer to Battery Box Replacement.
  20. Install the throttle body. Refer to Throttle Body Assembly Replacement.
 
#8 ·
I shudda just waited a few minutes, rshadd sure does state it better. Nice pictures too.
 
#9 ·
Thanks for all the replies guys! Rich chimed in with exactly what I needed. The pcv hose that is coming out of the back has a pretty good leak in it. Is there any way that I can replace just the hose? If so, how can I go about doing that?
 
#10 ·
Before you get involved with the intake I would first check the PCV tube for leaks.


Positive Crankcase Ventilation Hose/Pipe/Tube Replacement
Removal Procedure

  1. Remove the air cleaner resonator and outlet duct. Refer to Air Cleaner Resonator and Outlet Duct Replacement.
  2. Disconnect the PCV fresh air tube (6) from the air cleaner resonator (1).
  3. Disconnect the PCV dirty air tube (2) from the following:
    • The camshaft cover (5)
    • The intake manifold (3)

Installation Procedure


  1. Connect the PCV fresh air tube (6) to the air cleaner resonator (1).
  2. Connect the PCV dirty air tube (2) to the following:
  3. Install the air cleaner resonator and outlet duct. Refer to Air Cleaner Resonator and Outlet Duct Replacement.
    • The camshaft cover (5)
    • The intake manifold (3)
 
#13 ·
Yep that hose. It's leaking , but the leak is coming from inside the intake manifold

Sent from AutoGuide.com Free App
 
#18 ·
I had to use two flat head screwdrivers and still ended up breaking it. You'll see once you have it pulled off, just go slow. There is a few that attache the over to the actual intake, those will be tricky. I had an extra one at the time so it didn't matter if I broke it or not.
 
#20 ·
I think I'll do that. But a cover just in case as well as a hose to replace the broken one. Thanks!

Sent from AutoGuide.com Free App
 
#22 ·
Yes I did. The hose that goes to the rear of the engine was loose at the fitting inside the intake. Once I got it opened up, I just added a hose clamp and tightened it down good and it worked perfectly
 
#24 ·
Hey, Before you get started. I had the same problem. Take a dremel tool and cut a square hole in the top flat part of the cover. Dig the foam out, and use zip ties to make clamps on the rubber elbow. Fixed mine for more than 100,00 miles. Made a cover for the hole out of roof valley flashing and black paint. Before I totaled my it looked like it was made that way.
 
#26 ·
Question has anyone broke all the cover off the intake and ran it that way? Just wondering. Does anyone have a pic with the cover removed?
 
#29 ·
Welcome to the Nation.

Need input!! You are going to have to provide us with something more to go on. What engine are we talking about? You got a picture? If not, what color is the plug? How many wires are in the plug? What are the colors of the wires in the plug? Where, on the left side of the engine, is it located? Front, middle, back, near the top or bottom?