

Disclaimer
The community here at 355nation.net urges you to please use caution and seek professional assistance when performing modifications to your vehicle. Before attempting any modification it is advised that you refer to your Colorado or Canyon service manual or contact a certified mechanic as not all GMT355 trucks are the same. The staff and the associated members are in no way responsible for any damages, injuries or other harm inflicted to your vehicle or yourself which may result in attempting these modifications. The posts and content presented on this site reflect in no way the views of 355nation.net or it’s ownership.
![Image]()
A 355nation How To presented by
Kiko
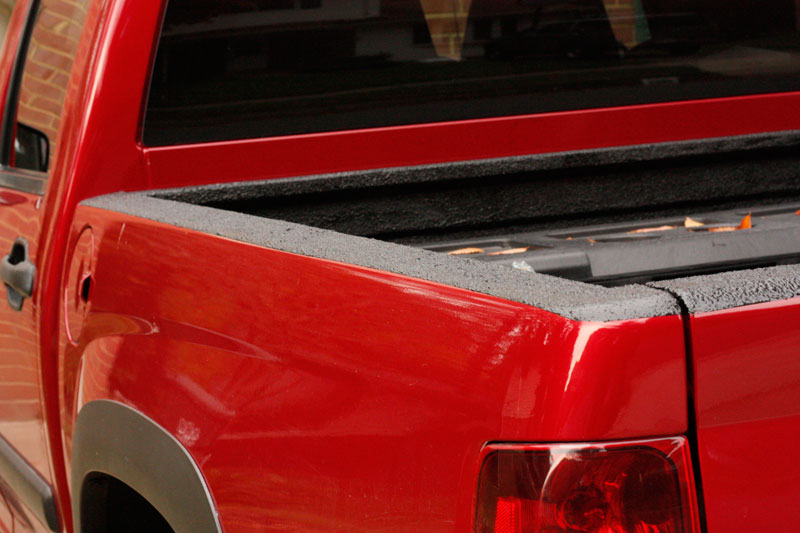
Project Name
Herculiner Truck Bed Liner
Project Description
Herculiner Truck Bed Liners are the durable and inexpensive solution to giving your truck bed new life!
Skill Level
Easy I only play a Herculiner Truck Bed Liner installer in the forums
Project Vehicle
Make: Chevrolet
Model: Colorado
Year: 2006
Engine: 3.5L
Power windows: Yes
Sun Roof: No
Tools Needed
the kit you've seen for $99USD @ Advanced Auto
something to kneel-on
broom or leaf blower
paint brush extension pole
toothbrush to get into nooks & crannies
quart acetone
painters tape
newspaper or butcher paper
rags to wipe off excess product
paint mixer attachment for drill
cordless drill
old clothes you dont mind throwing away
Project Time
4 hours to scuff-up 5ft. bed
4 hours to apply layers (1 hour for 3.5 layers and 3 hour wait time between (3) coats
Project Cost
$99USD for Herculiner Kit
$6USD paint mixer, you NEED this
$5USD painter tape
$10USD painter butcher paper
$5USD acetone
$6USD paint brush extension pole
$137USD total + applicable taxes
For all the "haters" this is a true Do-It-Yourself project, I WANTED to work on my truck.:thumbup:
Some will say "my time is worth more to me", well from my house to the "Rhino" dealer would be two hours round-trip and at least four hours in the shop. I figured this only cost me two hours and I saved about $250USD
The final product looks like it will handle the mulch/dirt/manure/paver stones/cement bags/plants/wood or whatever else I can find at Lowe's and toss it into the truck bed. I really only plan to haul exhaust parts & sharp objects a few times, and I'll probably toss them into the bed and not try to bust a hole thru the sheet metal.
![Image]()
After one hour using 180 sand paper this is how the tailgate looked. Green tint is because it was under green tarp, ice-cream box has WB reference
![Image]()
From here you can see the differences between 180 sand paper & 3M scotch pad provided in Herculiner kit, or can you?
![Image]()
One 8"x10" sheet of 180 sand paper & 200 block sander did:
- back wall of bed
- driver wheel well & wall side
- passenger wheel well & 1/2 wall side
This process using sand paper took 1.5 hours to remove the "gloss" from paint.
At this point the 3M pad did rest of the driver & passenger walls and the floor, it still had plenty of life left in it.
![Image]()
At this point I had the rest of the driver & passenger walls and the floor to scuff-up. I figured I'd need another 1.5 hours to scuff-up and remove the "gloss". From all the research I did, people took the Herculiner instructions of remove the "gloss" to mean "sand down to the metal & paint". This would be the reason why people would go thru 3-4 3M pads.
![Image]()
close up of 180/200 sand paper to remove "gloss" from paint
![Image]()
I took the Herculiner instructions more literally, I removed the "gloss" ie. scratch the clearcoat so it's not shiny.
![Image]()
taping job & scuffed-up wall from 3M pad
![Image]()
"primer" or "base" coat of Herculiner after scrub-down with acetone
![Image]()
At this point the liner was on the bed for one week, rained for four days, two day's temperature in lower 40's
![Image]()
Here's where the taping really counts nice, even lines, you can see where there are dents in the wheel well, you can see the texture after the final application. Floor looks motted because I was in the bed with dirty shoes.
![Image]()
You can see the texture after the final application. The tailgate at this point got four applications of Herculiner.
![Image]()
![Image]()
![Image]()
![Image]()
Here's where the taping really counts nice, even lines, you can see the texture after the final application
![Image]()
Yes I didn't follow the instructions and put the liner on the hooks
![Image]()
These are the shots you don't see of Herculiner, it is really textured.
![Image]()
![Image]()
![Image]()
The railing at this point got two applications of Herculiner
All told I got approximately 3.25 coatings of Herculiner in the Colorado Crew Cab (5ft.) bed. Still had 1/2 quart of Herculiner left, but I did not mix as well as I should've, so rest was disposed of.
The community here at 355nation.net urges you to please use caution and seek professional assistance when performing modifications to your vehicle. Before attempting any modification it is advised that you refer to your Colorado or Canyon service manual or contact a certified mechanic as not all GMT355 trucks are the same. The staff and the associated members are in no way responsible for any damages, injuries or other harm inflicted to your vehicle or yourself which may result in attempting these modifications. The posts and content presented on this site reflect in no way the views of 355nation.net or it’s ownership.
A 355nation How To presented by
Kiko
Project Name
Herculiner Truck Bed Liner
Project Description
Herculiner Truck Bed Liners are the durable and inexpensive solution to giving your truck bed new life!
Skill Level
Easy I only play a Herculiner Truck Bed Liner installer in the forums
Project Vehicle
Make: Chevrolet
Model: Colorado
Year: 2006
Engine: 3.5L
Power windows: Yes
Sun Roof: No
Tools Needed
the kit you've seen for $99USD @ Advanced Auto
something to kneel-on
broom or leaf blower
paint brush extension pole
toothbrush to get into nooks & crannies
quart acetone
painters tape
newspaper or butcher paper
rags to wipe off excess product
paint mixer attachment for drill
cordless drill
old clothes you dont mind throwing away
Project Time
4 hours to scuff-up 5ft. bed
4 hours to apply layers (1 hour for 3.5 layers and 3 hour wait time between (3) coats
Project Cost
$99USD for Herculiner Kit
$6USD paint mixer, you NEED this
$5USD painter tape
$10USD painter butcher paper
$5USD acetone
$6USD paint brush extension pole
$137USD total + applicable taxes
For all the "haters" this is a true Do-It-Yourself project, I WANTED to work on my truck.:thumbup:
Some will say "my time is worth more to me", well from my house to the "Rhino" dealer would be two hours round-trip and at least four hours in the shop. I figured this only cost me two hours and I saved about $250USD
The final product looks like it will handle the mulch/dirt/manure/paver stones/cement bags/plants/wood or whatever else I can find at Lowe's and toss it into the truck bed. I really only plan to haul exhaust parts & sharp objects a few times, and I'll probably toss them into the bed and not try to bust a hole thru the sheet metal.

After one hour using 180 sand paper this is how the tailgate looked. Green tint is because it was under green tarp, ice-cream box has WB reference

From here you can see the differences between 180 sand paper & 3M scotch pad provided in Herculiner kit, or can you?

One 8"x10" sheet of 180 sand paper & 200 block sander did:
- back wall of bed
- driver wheel well & wall side
- passenger wheel well & 1/2 wall side
This process using sand paper took 1.5 hours to remove the "gloss" from paint.
At this point the 3M pad did rest of the driver & passenger walls and the floor, it still had plenty of life left in it.

At this point I had the rest of the driver & passenger walls and the floor to scuff-up. I figured I'd need another 1.5 hours to scuff-up and remove the "gloss". From all the research I did, people took the Herculiner instructions of remove the "gloss" to mean "sand down to the metal & paint". This would be the reason why people would go thru 3-4 3M pads.

close up of 180/200 sand paper to remove "gloss" from paint

I took the Herculiner instructions more literally, I removed the "gloss" ie. scratch the clearcoat so it's not shiny.

taping job & scuffed-up wall from 3M pad

"primer" or "base" coat of Herculiner after scrub-down with acetone

At this point the liner was on the bed for one week, rained for four days, two day's temperature in lower 40's

Here's where the taping really counts nice, even lines, you can see where there are dents in the wheel well, you can see the texture after the final application. Floor looks motted because I was in the bed with dirty shoes.

You can see the texture after the final application. The tailgate at this point got four applications of Herculiner.


Here's where the taping really counts nice, even lines, you can see the texture after the final application

Yes I didn't follow the instructions and put the liner on the hooks

These are the shots you don't see of Herculiner, it is really textured.


The railing at this point got two applications of Herculiner
All told I got approximately 3.25 coatings of Herculiner in the Colorado Crew Cab (5ft.) bed. Still had 1/2 quart of Herculiner left, but I did not mix as well as I should've, so rest was disposed of.
")


