

How-To & Review: Install Power Stop 1-Click K2066 Brake Kit - rotors, pads & bed in
Disclaimer
The community here at 355nation.net urges you to please use caution and seek professional assistance when performing modifications to your vehicle. Before attempting any modification it is advised that you refer to your Colorado or Canyon service manual or contact a certified mechanic as not all GMT355 trucks are the same. The staff and the associated members are in no way responsible for any damages, injuries or other harm inflicted to your vehicle or yourself which may result in attempting these modifications. The posts and content presented on this site reflect in no way the views of 355nation.net or it’s ownership.
![Image]()
A 355nation How To presented by
blurred *some photos sourced from draggin_az as I could not get the shots I needed while doing the install*
Project Name
Power Stop 1-Click Brake kit, K2066 Brake installation
Project Description
Replace your stock rotors with Power Stop's drilled and slotted rotors as well as their Z16 brake pads
Skill Level
Moderate
Project Vehicle
Make: Chevrolet
Model: Colorado Xtreme
Year: 2007
Engine: 3.7L
Power windows: Yes
Sun Roof: No
Tools Needed
Impact
3/8 ratchet
1/4 ratchet
Big screwdriver
torque wrench
15mm socket
13/16 socket
17mm socket
7mm socket
swivel/universal - not necessary
Project Time
~ 2 hours
Project Cost
$165.25 includes shipping from www.powerstoponly.com or Brakes and Rotors | Brake Kits | Brake Lines & Fluid
-------------------------------------
I have done a video to help out with anything that isn't clear in the how-to and it's located here:
-------------------------------------
Disassembling the brakes
Jack up your truck and place it on jack stands. Then, loosen the lugs and remove the wheels.
![Image]()
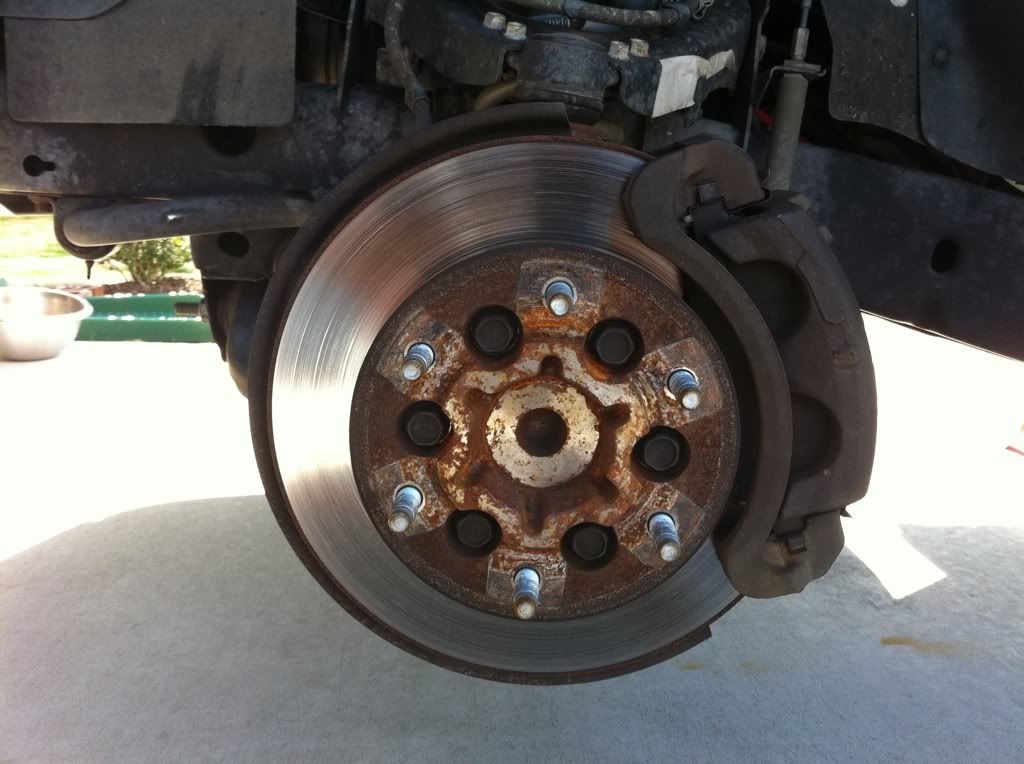
Remove the bolts that hold the brake caliper to its bracket. These will take a 13mm socket. *I advise that you hang the caliper from the frame with a zip tie or string/rope. Do not hang the caliper from the rubber hose as this might result in damage. For my truck, I was able to tuck the caliper between the frame and the lower control arm to hold it in place without fear of it falling.*
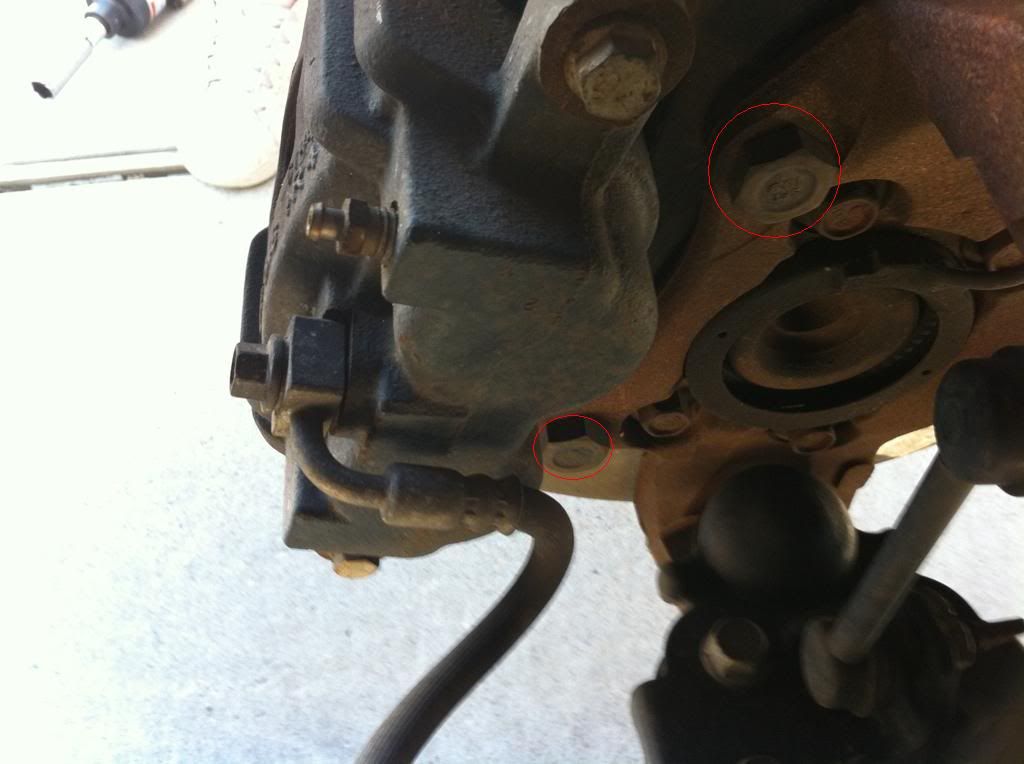
Take off brake caliper bracket bolts circled with a 13/16 socket. You might have to utilize a breaker bar to break these loose.
![Image]()
Then, remove the caliper brackets and set them off to the side. At this point, you can compress the pistons since the caliper is off. You will need to do it at some point since you are replacing the pads with new ones.
![Image]()
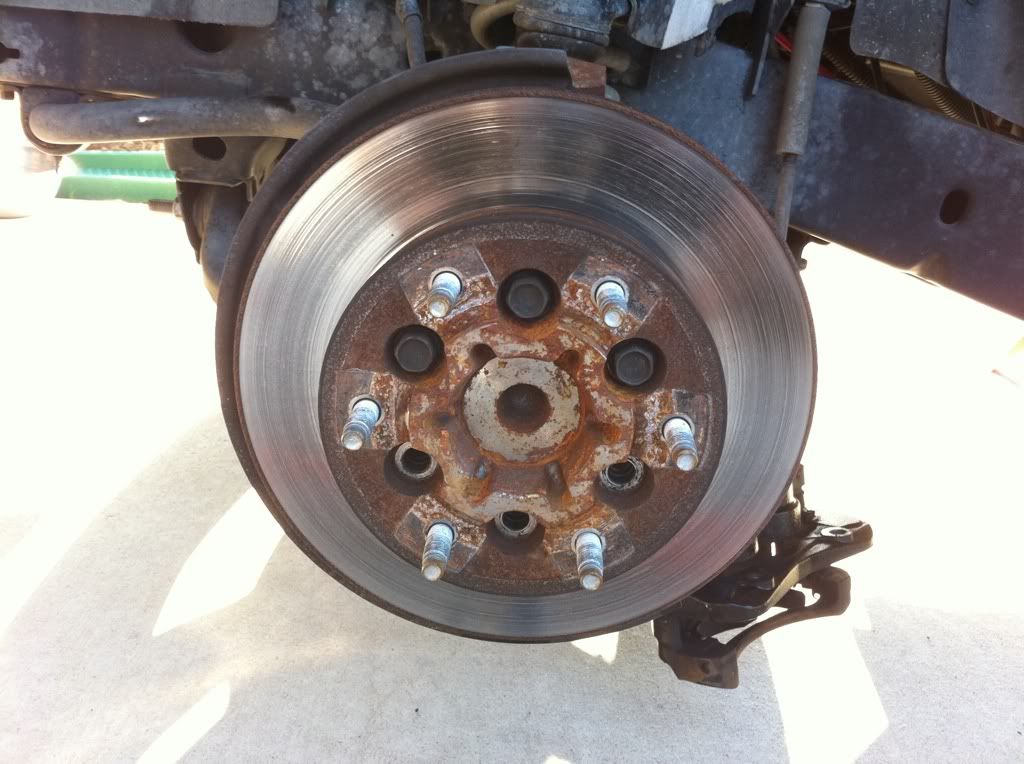
The next step can either be to loosen the 6 bolts on the face of the rotor or loosen the 4 bolts on the back of the hub.
To remove the bolts on the front of the rotor, find a piece of wood or long handle to brace between the lugs so they don't spin. Use a 17mm socket and break them loose. Do not remove them, just break them loose.
![Image]()
To loosen the bolts on the back of the hub, you will use a 15mm socket. Those 4 bolts hold your your hub to the spindle and can be a bit of a pain to get at. This is where the swivel may come in handy. Remove the bolts if you perform this second. If you do this before the front bolts, you will need to keep them in there to keep the hub from moving on you while loosening the rotor.
![Image]()
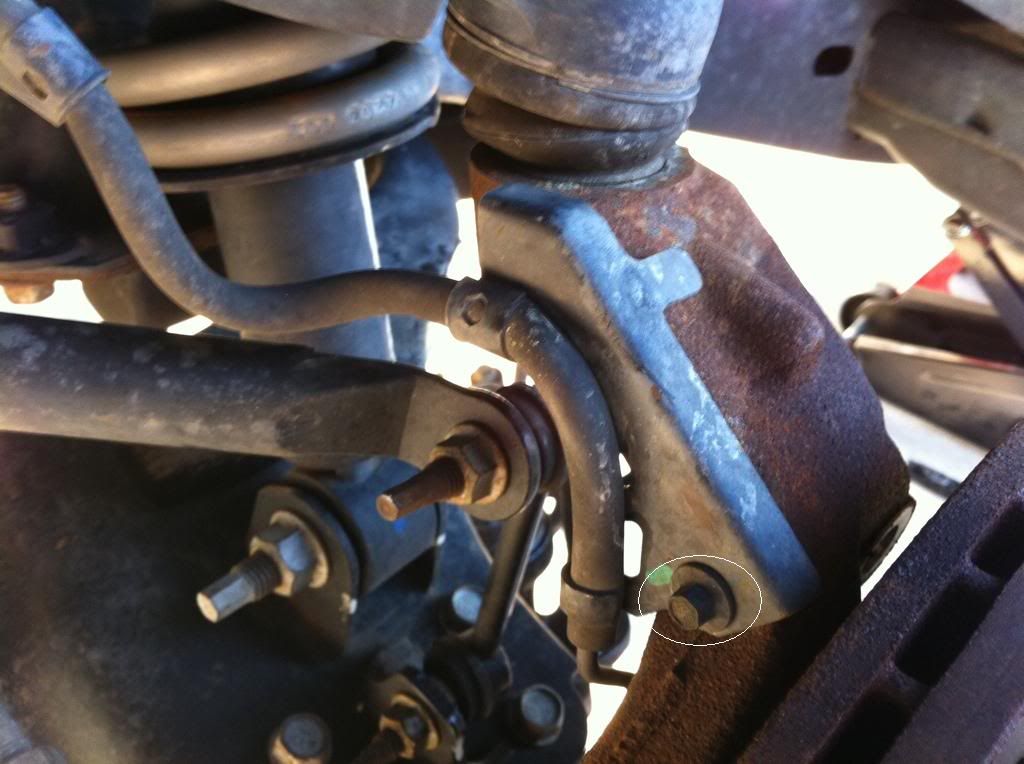
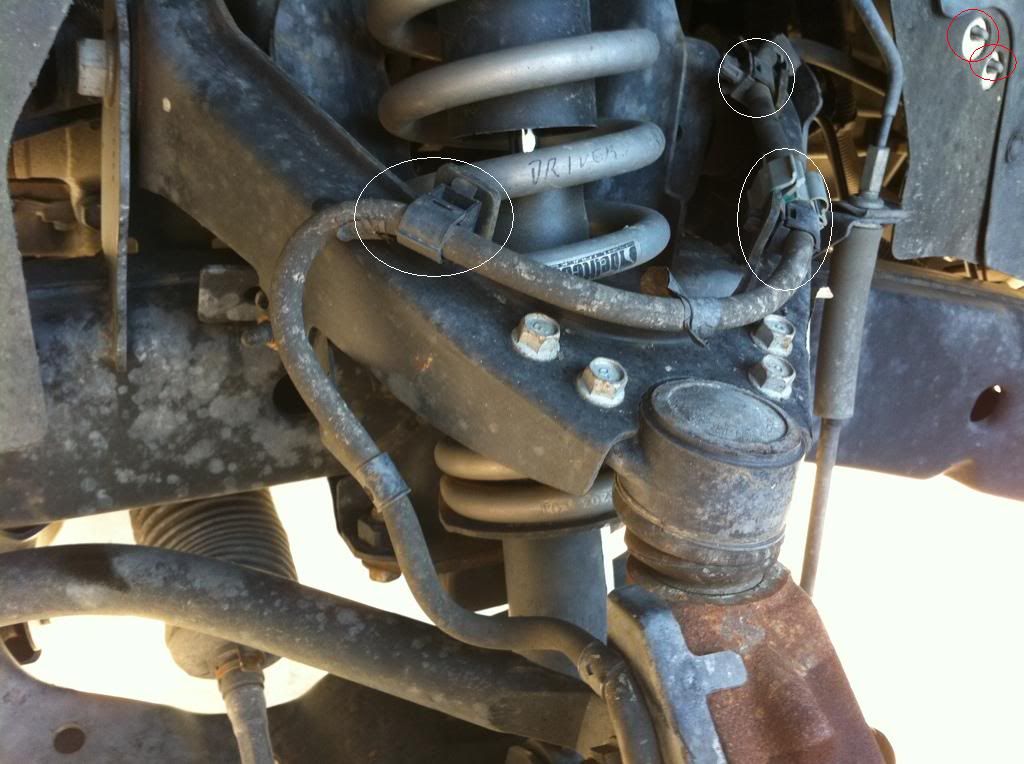
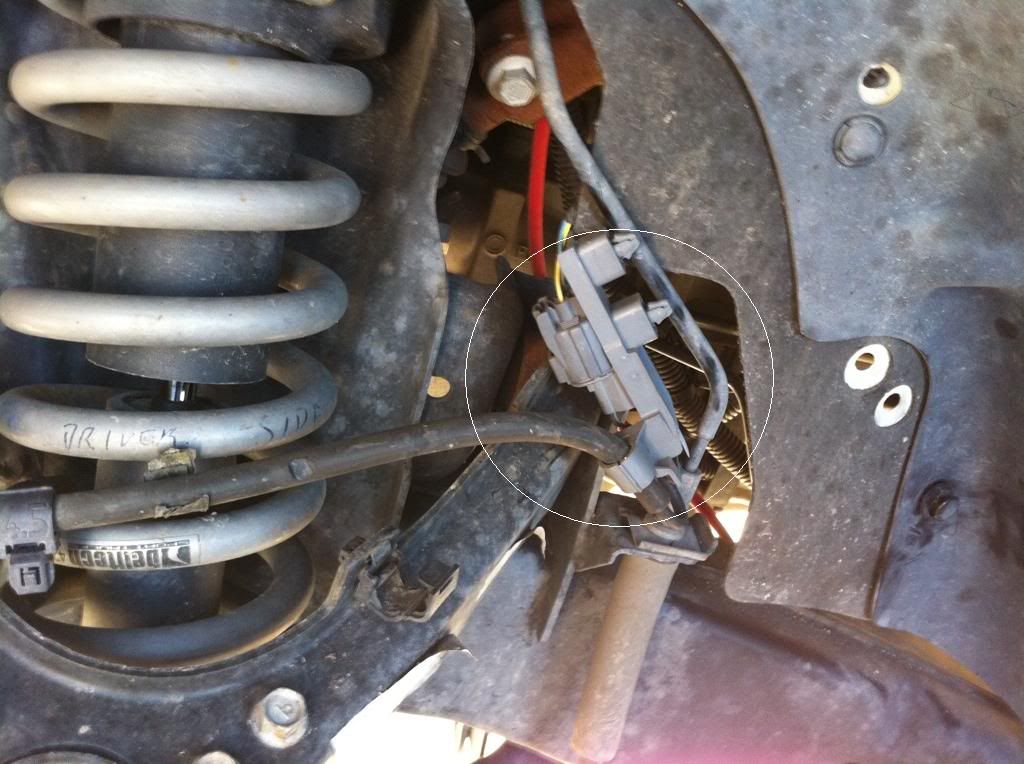
Now that you have the bolts for the calipers, caliper brackets, hub and rotor loose, you can remove the ABS line. To do this, you will disconnect the plastic clips with a flat head screwdriver. There is also a 7mm bolt that you will need to remove that holds the first metal retaining bracket for the ABS line. The second you will come across will be a 13mm nut that you have to remove. Then you will remove the ABS line connector from inside the wheel well and unplug the connectors by pushing down on the darker gray portion's clasp and pulling the two apart. The ABS sensor line should now be hanging free.
![Image]()
![Image]()
![Image]()
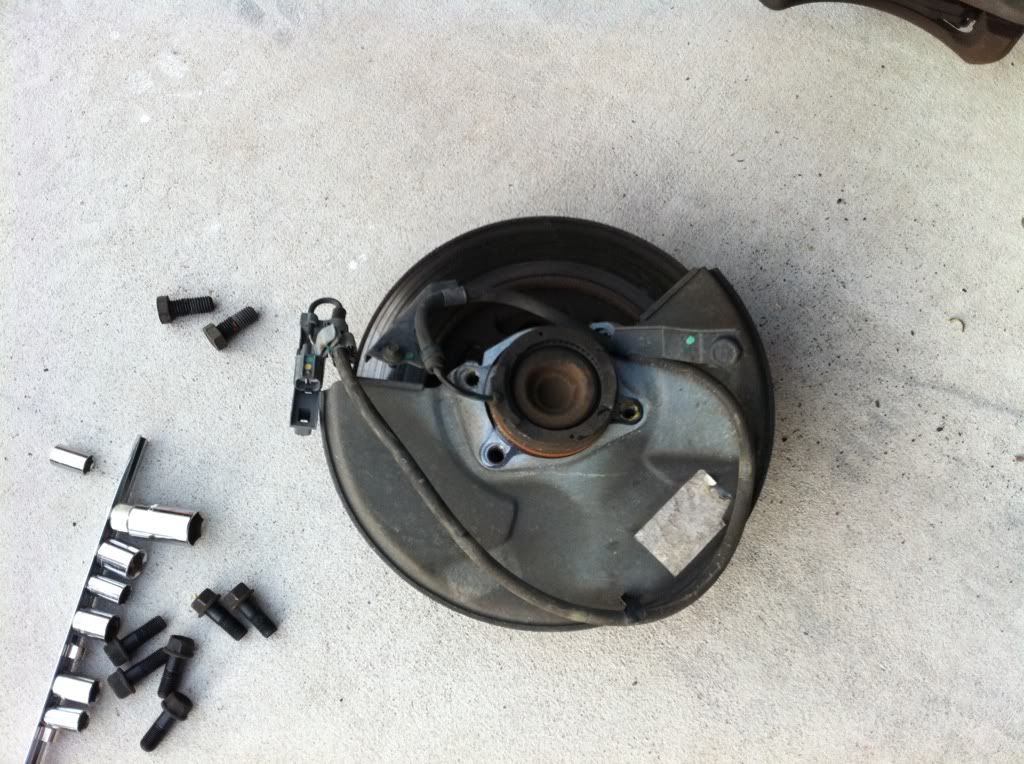
For this next step, you will most likely encounter some resistance and a bit of a struggle. You need to pull the hub from the spindle, and sometimes it is really tight. You can use some WD40 to loosen it a bit if need be. Pull back and forth and up and down, slowly pulling it from the spindle. As you free the hub, slowly pull the bottom out first, ensuring you carefully route the ABS line through the spindle without snagging or pulling too hard on it. It is easier to do with two people, but can be done with one.
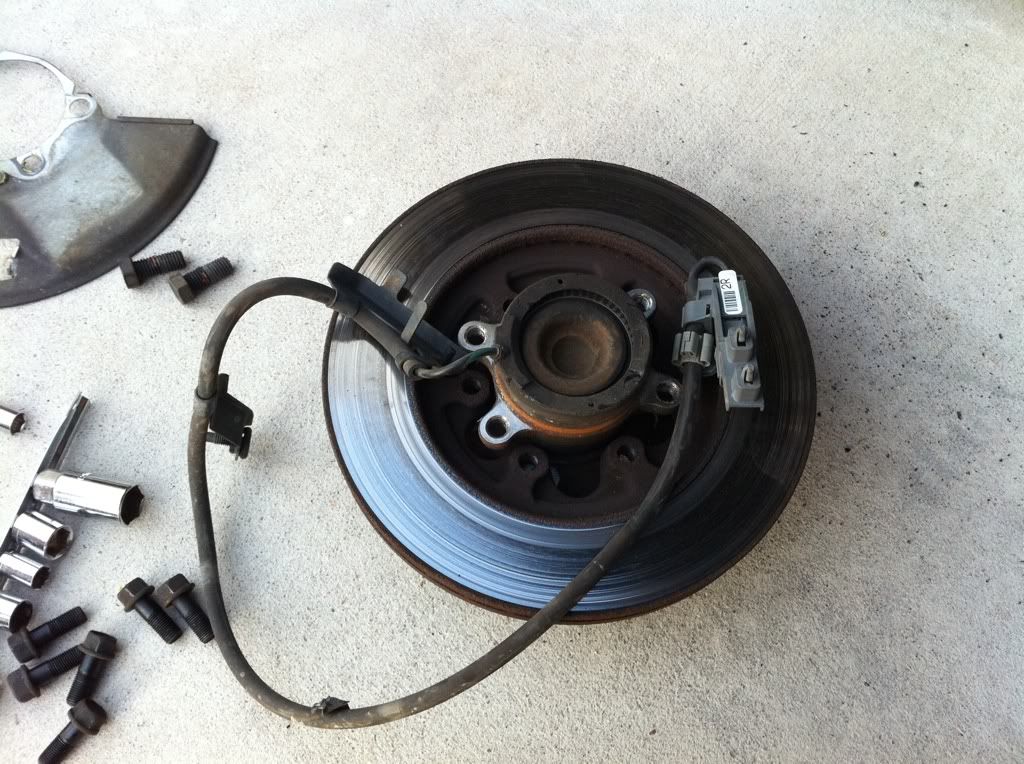
If you haven't already done so, remove the already loose bolts on the front of the assembly that holds the rotor to the hub. Then, flip it over and remove the dust shield, then the rotor.
![Image]()
![Image]()
The new Power Stop K2066 rotor next to the stock one.
![Image]()
-------------------------------------
Reassembling the brakes
I do not have pictures to go along with this as it is following the above steps, just in reverse, but I will spell it out.
Place the new rotor (ensure you have the correct side if doing drilled and slotted rotors) on the hub assembly. Flip it over and finger tighten the six 17mm bolts in the front. This will make it easier when installing the hub to the spindle.
Flip it back over and install the dust shield on the back.
Feed the ABS line through the spindle, inserting the hub into the hole in the spindle. Carefully line up the holes and feed the four 15mm bolts that hold the hub to the spindle through the spindle, dust shield and lastly into the hub.
Replace the ABS line by bolting the 7mm bolt and bracket in its location, bolting the second bracket back in place with the 15mm nut, insert the line into the plastic clips and reconnect the connectors. Then replace the connection back inside the wheel well.
Then, replace the caliper bracket with the two 13/16 bolts.
Insert the new Power Stop pads into the caliper bracket.
Carefully compress the caliper's pistons with a clamp to allow room to install over the new pads.
Position the caliper over the new pads and use the two 13mm bolts to bolt it back in place.
Tighten everything down to the recommended torque settings. This will include the four 15mm bolts (Hub to spindle), two 13/16 bolts (Caliper bracket to spindle), six 17mm bolts (Rotor to hub), one 7mm bolt (ABS line to spindle), one 15mm nut (ABS line to UCA) and the two 13mm bolts (Caliper to caliper bracket).
Completely finished assembly should look like this:
![Image]()
-------------------------------------
Bed in Procedure - Breaking in your pads and rotors
The first thing you should do when installing new pads and/or rotors is break them in properly to allow the most effective braking under any circumstance. This will also help to prevent uneven wear on the pads and possibly warping of the rotors.
The reason for bedding them in is to create a transfer layer between the rotor and the pad. This layer is what creates most of the stopping force.
You will need to find a road that will allow you to reach up to 45 mph as well as very scarce traffic as you will be stopping and going a few times.
*Ensure that you lift your foot entirely off the brake pedal as to ensure you do not ride the brakes, which can result in creating too much heat*
The first phase is to conduct 6-10 stops with a medium pressure on the pedal going from approximately ~35mph to 5 mph each time.
In the next phase you will need to conduct 2-3 more stops, which will be more aggressive. These two stops will take you from ~45mph to 5mph with just enough force as to not trigger the ABS or locking up your tires.
Once you have conducted these stops, the truck will need to sit for approximately 15 minutes in order for the pads and rotors to cool down. You will also be able to smell the brakes when you step out of the truck. Once they are cool, you are done.
Here are a couple Youtube videos that talk through this process:
How to Bed in Brake Pads
Break in procedure for new brakes, brake bedding process.
Now, enjoy the new pads and rotors!
Disclaimer
The community here at 355nation.net urges you to please use caution and seek professional assistance when performing modifications to your vehicle. Before attempting any modification it is advised that you refer to your Colorado or Canyon service manual or contact a certified mechanic as not all GMT355 trucks are the same. The staff and the associated members are in no way responsible for any damages, injuries or other harm inflicted to your vehicle or yourself which may result in attempting these modifications. The posts and content presented on this site reflect in no way the views of 355nation.net or it’s ownership.
A 355nation How To presented by
blurred *some photos sourced from draggin_az as I could not get the shots I needed while doing the install*
Project Name
Power Stop 1-Click Brake kit, K2066 Brake installation
Project Description
Replace your stock rotors with Power Stop's drilled and slotted rotors as well as their Z16 brake pads
Skill Level
Moderate
Project Vehicle
Make: Chevrolet
Model: Colorado Xtreme
Year: 2007
Engine: 3.7L
Power windows: Yes
Sun Roof: No
Tools Needed
Impact
3/8 ratchet
1/4 ratchet
Big screwdriver
torque wrench
15mm socket
13/16 socket
17mm socket
7mm socket
swivel/universal - not necessary
Project Time
~ 2 hours
Project Cost
$165.25 includes shipping from www.powerstoponly.com or Brakes and Rotors | Brake Kits | Brake Lines & Fluid
-------------------------------------
I have done a video to help out with anything that isn't clear in the how-to and it's located here:
-------------------------------------
Disassembling the brakes
Jack up your truck and place it on jack stands. Then, loosen the lugs and remove the wheels.
Remove the bolts that hold the brake caliper to its bracket. These will take a 13mm socket. *I advise that you hang the caliper from the frame with a zip tie or string/rope. Do not hang the caliper from the rubber hose as this might result in damage. For my truck, I was able to tuck the caliper between the frame and the lower control arm to hold it in place without fear of it falling.*
Take off brake caliper bracket bolts circled with a 13/16 socket. You might have to utilize a breaker bar to break these loose.
Then, remove the caliper brackets and set them off to the side. At this point, you can compress the pistons since the caliper is off. You will need to do it at some point since you are replacing the pads with new ones.
The next step can either be to loosen the 6 bolts on the face of the rotor or loosen the 4 bolts on the back of the hub.
To remove the bolts on the front of the rotor, find a piece of wood or long handle to brace between the lugs so they don't spin. Use a 17mm socket and break them loose. Do not remove them, just break them loose.
To loosen the bolts on the back of the hub, you will use a 15mm socket. Those 4 bolts hold your your hub to the spindle and can be a bit of a pain to get at. This is where the swivel may come in handy. Remove the bolts if you perform this second. If you do this before the front bolts, you will need to keep them in there to keep the hub from moving on you while loosening the rotor.

Now that you have the bolts for the calipers, caliper brackets, hub and rotor loose, you can remove the ABS line. To do this, you will disconnect the plastic clips with a flat head screwdriver. There is also a 7mm bolt that you will need to remove that holds the first metal retaining bracket for the ABS line. The second you will come across will be a 13mm nut that you have to remove. Then you will remove the ABS line connector from inside the wheel well and unplug the connectors by pushing down on the darker gray portion's clasp and pulling the two apart. The ABS sensor line should now be hanging free.
For this next step, you will most likely encounter some resistance and a bit of a struggle. You need to pull the hub from the spindle, and sometimes it is really tight. You can use some WD40 to loosen it a bit if need be. Pull back and forth and up and down, slowly pulling it from the spindle. As you free the hub, slowly pull the bottom out first, ensuring you carefully route the ABS line through the spindle without snagging or pulling too hard on it. It is easier to do with two people, but can be done with one.
If you haven't already done so, remove the already loose bolts on the front of the assembly that holds the rotor to the hub. Then, flip it over and remove the dust shield, then the rotor.
The new Power Stop K2066 rotor next to the stock one.

-------------------------------------
Reassembling the brakes
I do not have pictures to go along with this as it is following the above steps, just in reverse, but I will spell it out.
Place the new rotor (ensure you have the correct side if doing drilled and slotted rotors) on the hub assembly. Flip it over and finger tighten the six 17mm bolts in the front. This will make it easier when installing the hub to the spindle.
Flip it back over and install the dust shield on the back.
Feed the ABS line through the spindle, inserting the hub into the hole in the spindle. Carefully line up the holes and feed the four 15mm bolts that hold the hub to the spindle through the spindle, dust shield and lastly into the hub.
Replace the ABS line by bolting the 7mm bolt and bracket in its location, bolting the second bracket back in place with the 15mm nut, insert the line into the plastic clips and reconnect the connectors. Then replace the connection back inside the wheel well.
Then, replace the caliper bracket with the two 13/16 bolts.
Insert the new Power Stop pads into the caliper bracket.
Carefully compress the caliper's pistons with a clamp to allow room to install over the new pads.
Position the caliper over the new pads and use the two 13mm bolts to bolt it back in place.
Tighten everything down to the recommended torque settings. This will include the four 15mm bolts (Hub to spindle), two 13/16 bolts (Caliper bracket to spindle), six 17mm bolts (Rotor to hub), one 7mm bolt (ABS line to spindle), one 15mm nut (ABS line to UCA) and the two 13mm bolts (Caliper to caliper bracket).
Completely finished assembly should look like this:

-------------------------------------
Bed in Procedure - Breaking in your pads and rotors
The first thing you should do when installing new pads and/or rotors is break them in properly to allow the most effective braking under any circumstance. This will also help to prevent uneven wear on the pads and possibly warping of the rotors.
The reason for bedding them in is to create a transfer layer between the rotor and the pad. This layer is what creates most of the stopping force.
You will need to find a road that will allow you to reach up to 45 mph as well as very scarce traffic as you will be stopping and going a few times.
*Ensure that you lift your foot entirely off the brake pedal as to ensure you do not ride the brakes, which can result in creating too much heat*
The first phase is to conduct 6-10 stops with a medium pressure on the pedal going from approximately ~35mph to 5 mph each time.
In the next phase you will need to conduct 2-3 more stops, which will be more aggressive. These two stops will take you from ~45mph to 5mph with just enough force as to not trigger the ABS or locking up your tires.
Once you have conducted these stops, the truck will need to sit for approximately 15 minutes in order for the pads and rotors to cool down. You will also be able to smell the brakes when you step out of the truck. Once they are cool, you are done.
Here are a couple Youtube videos that talk through this process:
How to Bed in Brake Pads
Break in procedure for new brakes, brake bedding process.
Now, enjoy the new pads and rotors!


