

Disclaimer
The community here at 355nation.net urges you to please use caution and seek professional assistance when performing modifications to your vehicle. Before attempting any modification it is advised that you refer to your Colorado or Canyon service manual or contact a certified mechanic as not all GMT355 trucks are the same. The staff and the associated members are in no way responsible for any damages, injuries or other harm inflicted to your vehicle or yourself which may result in attempting these modifications. The posts and content presented on this site reflect in no way the views of 355nation.net or it’s ownership.
![Image]()
A 355nation How To presented by
Slo86GT
Calvert Racing Caltrac Traction Bar Installation
Skill Level
Easy to Moderate (some machine shop assistance required)
Project Time
2 hours or less
Project Cost
$339 + shipping, plus labor cost for bushing installation.
Project Vehicle
Year: 2004
Make: Chevrolet
Model: Colorado
Style: ZQ8
Engine: 3.5L
Introduction:
The purpose of this write up is to assist those interested in the ultimate streetable drag racing leaf spring stability. Of note is the space requirements of this installation. This kit hangs relatively low below the rear frame of the truck, and can cause issues on a lowered truck, especially where the roads my be bad or the owner may traverse poorly aligned railroad crossings.
The Caltrac system creates a pseudo-4 link using the leaf spring and what Calvert Racing calls the "Force Transfer Links", which are the large turnbuckle-type rods in the kit. I ran into a few small issues because of the Belltech lowering leaf springs I have on my truck, but as you will see, everything worked out very well.
Tools Needed
Tire tool/19mm rachet or a 4 way tire-tool
21mm Ratchet(mid- to deep-well works best)
Large adjustable wrench
2-4 jackstands
Hydraulic floor jack.
Note: You will need transportation to a machine shop for the bushing replacement as the aluminum bushings are over sized and designed to be "crushed" by the leaf eyelets. Be sure to setup a good time before hand so that your truck is down for a minimum amount of time.
Parts Kit Contents:
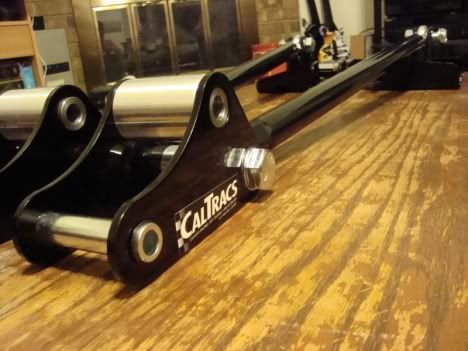
Here's what comes in the packaging for the Calvert Racing Caltrac Traction Bar Kit:
From this end, you see the loaded Front Pivot Assemblies. This version is called the "Low Profile" as they do not have a second lower adjustment hole, which saves our trucks 1.5" of clearance and is STRONGLY suggested. On this Front Pivot Assembly, there is a very strong spherical bushing equipped tie rod end, and the large aluminum part you see is the Front Eyelet Bushing Kit that must be pressed into the eyelet of the leaf spring.

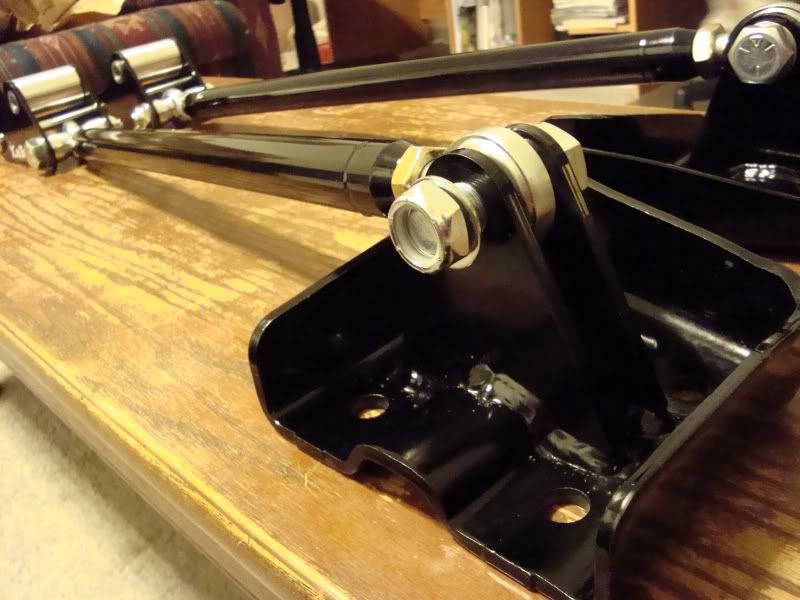
The rear shot shows in detail the rear mount plate, which are stock rear plates with mounts for the tie rod welded up and powder coated to a very pretty finish. The front and rear brackets are connected by the Force Transfer Links which are threaded for adjustable pre-load of the rear leaf.
Instruction for removal of stock components and installation of Caltrac Traction Bar kit:
1. Park truck on a flat work area, chocking the front tires is advised to avoid rolling.
2. Loosen lugs on rear wheels and jack truck up until the rear tires are 3-6 inches off the ground with leafs unloaded. Support vehicle and axle by jack stands. I recommend 2 jack stands under the rear axle, then two more under the rearward frame rails to support the vehicle itself as the axle will not be supporting the truck while leafs are removed.
3. Remove rear wheels.


4. Remove lower shock bolt.
5. Remove 4 U-bolt nuts under axle mount plate. Set plate aside, save the 4 nuts, washers, and leave U-bolts hanging.
6. Remove front and rear leaf spring mount bolts. This may require lowering the spare tire also. The spare tire can be lowered using the factory jack tool (located under the front passenger seat, in the tool kit). Use the access hole in the rear bumper to unwind the cable wench located there to lower the tire until rearmost leaf spring bolt can be removed entirely. I suggest putting this bolt back in head side out in order to avoid this hassle in the future.
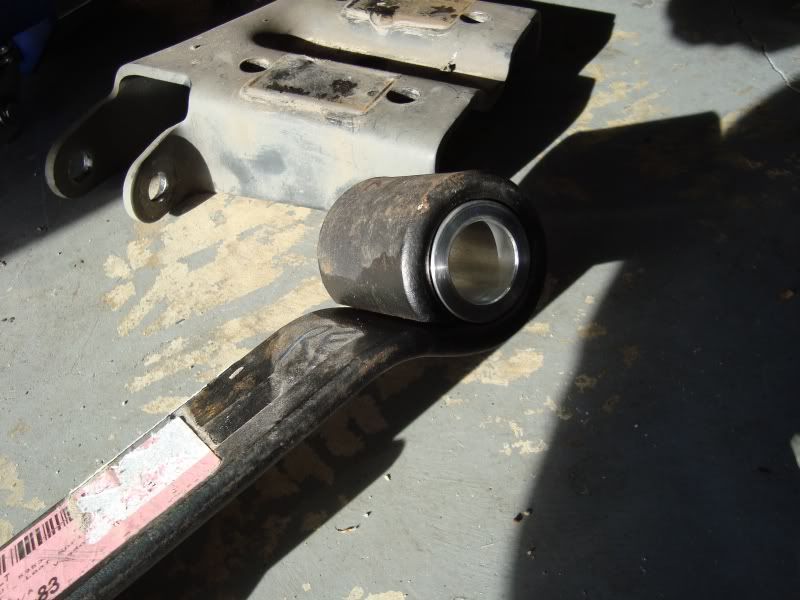
7. Leafs will need to have the front factory rubber bushings and sleeves removed. I had a machine shop perform this step and ran into some complications, as the Belltech lowering leaf I run has an eyelet inner diameter of 1.5" where the factory spring should be 1.7" ID according to Calvert Racing. The machine shop I used called Calvert, confirmed the sizing, called me and advised for a few bucks they could turn this piece down to the size I needed. Make sure you aren't getting ripped off by the machine shop!!! They are notorious for giving "we-don't-really-want-to-do-this-for-you prices" that are extraordinary!!! Even with the custom work I needed, the machine shop only charged me $80, which I feel was a lower than expected price, so I tipped the guys $20 more for the work.
Below you can see the finished product of the leafspring with the aluminum bushing pressed into place.

8. Place the leaf in position to reinstall it, and slide the front bracket over the front eyelet in this manner for installation. Notice that the pivot bar rests on top of the leaf, the tie rod hangs loose below the steel rod that now goes through the aluminum bushing that was pressed in. The setup really is eloquently simple.

9. Reinstall front and rear leaf spring bolts.

10. Install replacement rear mounts onto original U-bolts and bolt back up the shock using all original hardware.

11. Per instructions supplied, screw the Force Transfer Link (big black rod) into the front tie rod end entirely, then with the right tie rod end removed, screw it into the other end entirely to allow for even threading in the front and rear. Once screwed in entirely, hold the rear tie rod end still, twist the Force Transfer Link to lengthen the rod like a turnbuckle, and remount the rear tie rod with supplied hardware.
I suggest tightening these nearly all the way to lift the pivot bar off the spring a good bit before reinstalling the wheels and lowering the truck back down, as once you put the wheels back on the ground, the rods will tighten up quite a bit and you may unintentionally preload the leafs. The specs call for 1/4 turn pre-load after the pivot bar just touches the leaf, and I found that this adjustment can be made by hand with the truck on the ground, but trying to loosen the adjustment at all when pre-loaded was nearly impossible as the tools required are too big to use so close to the ground.
***** AGAIN, YOU CANNOT ACCURATELY PRE-LOAD THE BARS OFF THE GROUND!!!! *****
Once completed, my lowered truck feels slightly stiffer in the rear, but MUCH more firm on shift. I went out and played round some and I must admit, this truck feels VERY solid, and should show much improved traction on and off the track.

Thanks for reading!!!

The community here at 355nation.net urges you to please use caution and seek professional assistance when performing modifications to your vehicle. Before attempting any modification it is advised that you refer to your Colorado or Canyon service manual or contact a certified mechanic as not all GMT355 trucks are the same. The staff and the associated members are in no way responsible for any damages, injuries or other harm inflicted to your vehicle or yourself which may result in attempting these modifications. The posts and content presented on this site reflect in no way the views of 355nation.net or it’s ownership.
A 355nation How To presented by
Slo86GT
Calvert Racing Caltrac Traction Bar Installation
Skill Level
Easy to Moderate (some machine shop assistance required)
Project Time
2 hours or less
Project Cost
$339 + shipping, plus labor cost for bushing installation.
Project Vehicle
Year: 2004
Make: Chevrolet
Model: Colorado
Style: ZQ8
Engine: 3.5L
Introduction:
The purpose of this write up is to assist those interested in the ultimate streetable drag racing leaf spring stability. Of note is the space requirements of this installation. This kit hangs relatively low below the rear frame of the truck, and can cause issues on a lowered truck, especially where the roads my be bad or the owner may traverse poorly aligned railroad crossings.
The Caltrac system creates a pseudo-4 link using the leaf spring and what Calvert Racing calls the "Force Transfer Links", which are the large turnbuckle-type rods in the kit. I ran into a few small issues because of the Belltech lowering leaf springs I have on my truck, but as you will see, everything worked out very well.
Tools Needed
Tire tool/19mm rachet or a 4 way tire-tool
21mm Ratchet(mid- to deep-well works best)
Large adjustable wrench
2-4 jackstands
Hydraulic floor jack.
Note: You will need transportation to a machine shop for the bushing replacement as the aluminum bushings are over sized and designed to be "crushed" by the leaf eyelets. Be sure to setup a good time before hand so that your truck is down for a minimum amount of time.
Parts Kit Contents:
Here's what comes in the packaging for the Calvert Racing Caltrac Traction Bar Kit:
From this end, you see the loaded Front Pivot Assemblies. This version is called the "Low Profile" as they do not have a second lower adjustment hole, which saves our trucks 1.5" of clearance and is STRONGLY suggested. On this Front Pivot Assembly, there is a very strong spherical bushing equipped tie rod end, and the large aluminum part you see is the Front Eyelet Bushing Kit that must be pressed into the eyelet of the leaf spring.

The rear shot shows in detail the rear mount plate, which are stock rear plates with mounts for the tie rod welded up and powder coated to a very pretty finish. The front and rear brackets are connected by the Force Transfer Links which are threaded for adjustable pre-load of the rear leaf.
Instruction for removal of stock components and installation of Caltrac Traction Bar kit:
1. Park truck on a flat work area, chocking the front tires is advised to avoid rolling.
2. Loosen lugs on rear wheels and jack truck up until the rear tires are 3-6 inches off the ground with leafs unloaded. Support vehicle and axle by jack stands. I recommend 2 jack stands under the rear axle, then two more under the rearward frame rails to support the vehicle itself as the axle will not be supporting the truck while leafs are removed.
3. Remove rear wheels.


4. Remove lower shock bolt.
5. Remove 4 U-bolt nuts under axle mount plate. Set plate aside, save the 4 nuts, washers, and leave U-bolts hanging.
6. Remove front and rear leaf spring mount bolts. This may require lowering the spare tire also. The spare tire can be lowered using the factory jack tool (located under the front passenger seat, in the tool kit). Use the access hole in the rear bumper to unwind the cable wench located there to lower the tire until rearmost leaf spring bolt can be removed entirely. I suggest putting this bolt back in head side out in order to avoid this hassle in the future.
7. Leafs will need to have the front factory rubber bushings and sleeves removed. I had a machine shop perform this step and ran into some complications, as the Belltech lowering leaf I run has an eyelet inner diameter of 1.5" where the factory spring should be 1.7" ID according to Calvert Racing. The machine shop I used called Calvert, confirmed the sizing, called me and advised for a few bucks they could turn this piece down to the size I needed. Make sure you aren't getting ripped off by the machine shop!!! They are notorious for giving "we-don't-really-want-to-do-this-for-you prices" that are extraordinary!!! Even with the custom work I needed, the machine shop only charged me $80, which I feel was a lower than expected price, so I tipped the guys $20 more for the work.
Below you can see the finished product of the leafspring with the aluminum bushing pressed into place.
8. Place the leaf in position to reinstall it, and slide the front bracket over the front eyelet in this manner for installation. Notice that the pivot bar rests on top of the leaf, the tie rod hangs loose below the steel rod that now goes through the aluminum bushing that was pressed in. The setup really is eloquently simple.

9. Reinstall front and rear leaf spring bolts.

10. Install replacement rear mounts onto original U-bolts and bolt back up the shock using all original hardware.

11. Per instructions supplied, screw the Force Transfer Link (big black rod) into the front tie rod end entirely, then with the right tie rod end removed, screw it into the other end entirely to allow for even threading in the front and rear. Once screwed in entirely, hold the rear tie rod end still, twist the Force Transfer Link to lengthen the rod like a turnbuckle, and remount the rear tie rod with supplied hardware.
I suggest tightening these nearly all the way to lift the pivot bar off the spring a good bit before reinstalling the wheels and lowering the truck back down, as once you put the wheels back on the ground, the rods will tighten up quite a bit and you may unintentionally preload the leafs. The specs call for 1/4 turn pre-load after the pivot bar just touches the leaf, and I found that this adjustment can be made by hand with the truck on the ground, but trying to loosen the adjustment at all when pre-loaded was nearly impossible as the tools required are too big to use so close to the ground.
***** AGAIN, YOU CANNOT ACCURATELY PRE-LOAD THE BARS OFF THE GROUND!!!! *****
Once completed, my lowered truck feels slightly stiffer in the rear, but MUCH more firm on shift. I went out and played round some and I must admit, this truck feels VERY solid, and should show much improved traction on and off the track.

Thanks for reading!!!

") and I wasn't easy on it. Tried forwards and back, no issues. On my way to work yesterday, I layed into it and did a nice BIG smokey burnout on a not so good piece of road... no bounce, no jitter, nothing. These things are GREAT.
and I wasn't easy on it. Tried forwards and back, no issues. On my way to work yesterday, I layed into it and did a nice BIG smokey burnout on a not so good piece of road... no bounce, no jitter, nothing. These things are GREAT.

