

Disclaimer
The community here at 355nation.net urges you to please use caution and seek professional assistance when performing modifications to your vehicle. Before attempting any modification it is advised that you refer to your Colorado or Canyon service manual or contact a certified mechanic as not all GMT355 trucks are the same. The staff and the associated members are in no way responsible for any damages, injuries or other harm inflicted to your vehicle or yourself which may result in attempting these modifications. The posts and content presented on this site reflect in no way the views of 355nation.net or it’s ownership.
![Image]()
A 355nation (MTS) presented by
Canyon08Z71
Project Name
How-To: Replace Exhaust Camshaft Actuator Solenoid
Project Description
Testing/Replacement of the Exhaust Camshaft Actuator Solenoid
Skill Level
Moderate
Project Vehicle
Make: Chevrolet
Model: Colorado
Year: 2004
Engine: 3.5L
Power windows: Yes
Sun Roof: No
Tools Needed
10mm socket
Ratchet / extensions
Anti-seize
New GM exhaust camshaft actuator solenoid (P/N 12615873)
Clean rags
Project Time
1 hour or less
Project Cost
Effort, parts/supplies cost, time
Removal Procedure
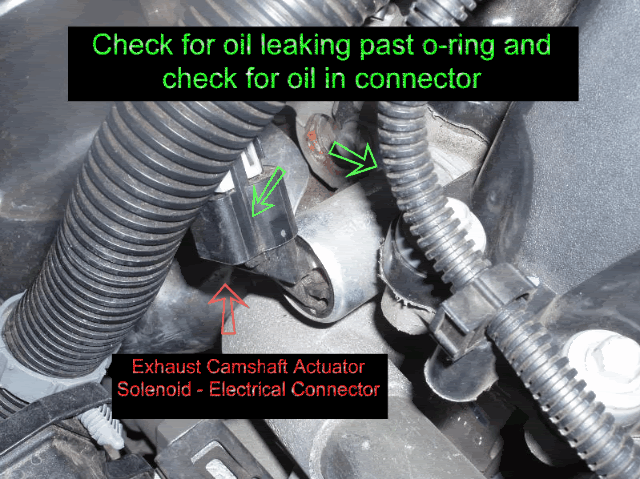
1.Disconnect the engine wiring harness electrical connector from the camshaft position actuator solenoid valve.
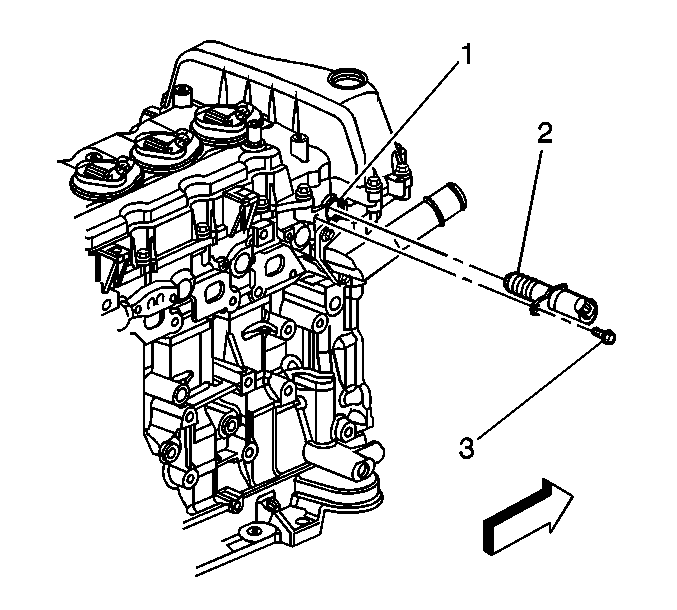
2.Remove the CMP actuator solenoid valve bolt.
3.Remove the CMP actuator solenoid valve from the cylinder head.
4.Clean debris from the hole.
Inspect CMP actuator solenoid valve assembly for the following:
•Torn screens
•Debris on the screens
•Debris clogging the oil ports
•Missing screens
•Oil seepage at the solenoid connector pins
Component Testing


Installation Procedure
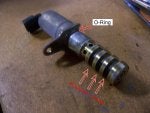
1. Lightly lubricate the O-ring seal with clean engine oil on the new actuator.
2. Install the CMP actuator solenoid valve into the cylinder head.
3. Install the camshaft position actuator solenoid valve bolt.
4. Tighten the CMP actuator solenoid valve bolt to 10 N.m (89 lb inches) ** LB Inches = VERY LITTLE FORCE **
5. Connect the engine wiring harness electrical connector to the CMP actuator solenoid valve.
The community here at 355nation.net urges you to please use caution and seek professional assistance when performing modifications to your vehicle. Before attempting any modification it is advised that you refer to your Colorado or Canyon service manual or contact a certified mechanic as not all GMT355 trucks are the same. The staff and the associated members are in no way responsible for any damages, injuries or other harm inflicted to your vehicle or yourself which may result in attempting these modifications. The posts and content presented on this site reflect in no way the views of 355nation.net or it’s ownership.
A 355nation (MTS) presented by
Canyon08Z71
Project Name
How-To: Replace Exhaust Camshaft Actuator Solenoid
Project Description
Testing/Replacement of the Exhaust Camshaft Actuator Solenoid
Skill Level
Moderate
Project Vehicle
Make: Chevrolet
Model: Colorado
Year: 2004
Engine: 3.5L
Power windows: Yes
Sun Roof: No
Tools Needed
10mm socket
Ratchet / extensions
Anti-seize
New GM exhaust camshaft actuator solenoid (P/N 12615873)
Clean rags
Project Time
1 hour or less
Project Cost
Effort, parts/supplies cost, time
Camshaft Position Actuator Solenoid Valve Replacement
Removal Procedure
1.Disconnect the engine wiring harness electrical connector from the camshaft position actuator solenoid valve.
2.Remove the CMP actuator solenoid valve bolt.
3.Remove the CMP actuator solenoid valve from the cylinder head.
4.Clean debris from the hole.
Inspect CMP actuator solenoid valve assembly for the following:
•Torn screens
•Debris on the screens
•Debris clogging the oil ports
•Missing screens
•Oil seepage at the solenoid connector pins
Component Testing
- Measure the resistance of each CMP actuator solenoid valve assembly. Resistance should be between 8-12 ohms.
- Connect a jumper wire between the CMP actuator low reference circuit at the solenoid and a good ground. Connect a fused jumper wire to the CMP actuator high control circuit at the solenoid. Momentarily touch the fused jumper to B+. Observe the spool valve inside the CMP actuator. The spool valve should move from fully closed to fully opened position.
Installation Procedure
1. Lightly lubricate the O-ring seal with clean engine oil on the new actuator.
2. Install the CMP actuator solenoid valve into the cylinder head.
3. Install the camshaft position actuator solenoid valve bolt.
4. Tighten the CMP actuator solenoid valve bolt to 10 N.m (89 lb inches) ** LB Inches = VERY LITTLE FORCE **
5. Connect the engine wiring harness electrical connector to the CMP actuator solenoid valve.


")


